
Facade Design Pattern
Imagine a car engine!
When you want to control the engine as a driver, you get into the divers seat. But, when you want to work on it as a mechanic, you open its bonnet.
Even when we are talking about the same engine, it has exposed two separate facades for two different types of users.
Its a structural design pattern that provides context specific interfaces to simplify and make the integration of a complex system easy for the clients.
A complex system may consists of multiple sub-systems. But, we need not expose everything, expecting the clients to figure out what they need. Instead we can identify what the client needs from our system to build an interface, so that it provides a simplified view of our system. We call such a context specific interface as a facade.
A facade may provide many key advantages while exposing a complex systems as listed below.
Benefits of using Facades
- Provides simplified views of the our system, matching to their usage
- Since different user groups have different views, we may create multiple facades to meet their needs. For instance an admin and a normal user can have their own facades.
- In case there are too many features to accomodate, we may break our facades using logical groups.
- Provides the flexibility to redesign by decoupling the sub-systems from the clients
- Enable us to simplify our usage by creating higher order services
- Because of the facade, we can combine multiple dependent calls to the sub-systems to build higher order services.
- Without a facade, we may force the clients to build these services on their own.
- In case of remote services, it would also affect the performance due to higher number of network calls.
In the section below we look at these points with an example to figure out how it really works.
How does the pattern work?
Lets say we have a core banking system with so many re-usable service modules. The web app, mobile app, desktop or the ATM, all the clients use these services provided by different modules.
Now lets say we want to expose these services for our ATM client. Out of so many features provided by these modules, our ATM needs only a specific set. Hence, as shown in the figure, we can either let the client access the services directly or use it through a simplified interface.

First of all, with the option-1, the client needs to unnecessarily understand all our internal modules. For example, for getting the approved list of payees for fund transfer purpose, the client has to figure out if it is there in customer profile service or fund transfer service. Both are a close possibility.
Secondly, once the clients figure it out and use it, we can no longer redesign without affecting the clients.
But, a facade can solve both of the above problems for us. With a context specific interface, we reduce the complex system to something which is just enough to meet our ATM client needs. And, since the clients refer only through this interface, we are free to change our internal design as we need.
Source Code for the Demo
Below is the demo code for showing the design and significance of a facade that we have discussed above.
1. The first set has the facade and the related services, showing how does a facade hide the internal design with it’s concise interface.
The inline comments highlights the key points along the code.
package spectutz.dp.struct.facade;
import java.util.List;
import spectutz.dp.struct.facade.services.CustomerProfileService;
import spectutz.dp.struct.facade.services.FundTransferService;
import spectutz.dp.struct.facade.services.SavingsAccountService;
import spectutz.dp.struct.facade.vo.Account;

//We have used minimal code and interfaces to keep the size small and focus on the concept
public class ATMUserServiceFacade implements IATMUserServiceFacade {
	CustomerProfileService customerProfileService = new CustomerProfileService();
	FundTransferService fundTransferService = new FundTransferService();
	SavingsAccountService savingsAccountService = new SavingsAccountService();

	//A facade is mostly an indirection that provides
	//a usage specific simplified view of the underlying complex system.

	@Override
	public boolean withdrawCash(String accountId, float amount) {
		return savingsAccountService.withdrawCash(accountId, amount);
	}
	@Override
	public boolean depositeFunds(String accountId, float amount) {
		return savingsAccountService.depositeFunds(accountId, amount);
	}
	@Override
	public float checkBalance(String accountId) {
		return savingsAccountService.checkBalance(accountId);
	}
	@Override
	public List<Account> getApprovedPayeeList(String accountId) {
		return customerProfileService.getApprovedPayeeList(accountId);
	}
	@Override
	public boolean transferFunds(String fromAccId, String toAccId, float amount) {
		return fundTransferService.transferFunds(fromAccId, toAccId, amount);
	}

}
package spectutz.dp.struct.facade;

import java.util.List;

import spectutz.dp.struct.facade.vo.Account;

//A simple demo facade from ATM user's point of view
public interface IATMUserServiceFacade {
	public boolean withdrawCash(String accountId, float amount);
	public boolean depositeFunds(String accountId, float amount);
	public float checkBalance(String accountId);
	public List<Account> getApprovedPayeeList(String accountId);
	public boolean transferFunds(String fromAccId, String toAccId, float amount);
}
package spectutz.dp.struct.facade.services;
import java.util.ArrayList;
import java.util.List;
import spectutz.dp.struct.facade.vo.Account;

public class CustomerProfileService {
	public List<Account> getApprovedPayeeList(String accountId){
		List<Account> approvedPayees = new ArrayList<Account>();
		approvedPayees.add(new Account("SA4684","Dave Muskan"));
		approvedPayees.add(new Account("SA4684","Tommy Pehelwan"));

		System.out.println("Returning approved payee list.");
		return approvedPayees;
	}
}
package spectutz.dp.struct.facade.services;

public class FundTransferService {

	public boolean transferFunds(String fromAccId, String toAccId,float amount) {
		SavingsAccountService savingsAccountService = new SavingsAccountService();

		if(savingsAccountService.withdrawCash(fromAccId, amount)) {
			System.out.println("Initiate fund transfer to account id :"+fromAccId);
			return true;
		}else {
			System.out.println("Insufficient balance.");
			return false;
		}
	}
}
package spectutz.dp.struct.facade.services;

public class SavingsAccountService {
	public boolean withdrawCash(String accountId, float amount) {
		if (checkBalance(accountId) > amount) {
			System.out.println("Amount debited  - " + amount);
			return true; // approved
		} else {
			System.out.println("Not enough balance !");
			return false;// failed
		}
	};

	public float checkBalance(String accountId) {
		return 50000;// dummy amount
	};

	public boolean depositeFunds(String accountId, float amount) {
		System.out.println("Amount desposited :" + amount);
		return true;// successful
	}

}
package spectutz.dp.struct.facade.vo;

public class Account {
	private String id;
	private String name;
	//Other details
	public Account(String id,String name) {
		this.id=id;
		this.name=name;
	}
	public String getId() {
		return id;
	}
	public void setId(String id) {
		this.id = id;
	}
	public String getName() {
		return name;
	}
	public void setName(String name) {
		this.name = name;
	}
}
2. This one only has the client code with it’s output, majorly showing the call flow that simplifies the system for the client.
package spectutz.dp.struct.facade;

public class ATMApplicationClientDemo {

	IATMUserServiceFacade atmService = new ATMUserServiceFacade();

	public void withdrawCash(String accountId, float amount) {
		System.out.println("Inside ATMApplicationClientDemo.withdrawCash()");

		boolean isApproved = atmService.withdrawCash(accountId, amount);
		if (isApproved) {
			System.out.println("Disburse the cash.");
		} else {
			System.out.println("Show the error message.");
		}
	}

	public static void main(String[] args) {
		ATMApplicationClientDemo demo = new ATMApplicationClientDemo();

		System.out.println("Call flow : ATM Client --> Facade --> Actual Service\n");
		demo.withdrawCash("SA53762", 2000);
	}
}

//Output showing call flow
/*
Call flow : ATM Client --> Facade --> Actual Service

Inside ATMApplicationClientDemo.withdrawCash()
Inside ATMUserServiceFacade.withdrawCash()
Inside SavingsAccountService.withdrawCash()
Amount debited  - 2000.0
Disburse the cash.
*/
Comparing with other patterns
1. Facade Vs Adapter :
An adapter looks similar to a facade in terms of design, but they are quite different in their intents.
- A client builds an adapter for addressing the compatibility concerns. Whereas a system builds a facade for providing simpler views to its clients.
- An adapter manages the changes in the underlying system. In contrast, a facade provides the flexibility to re-design the underlying system.
2. Facade Vs Mediator:
A facade may also look similar to behavioral pattern called, the mediator. But, again the way they decouple multiple components from the clients is quite different.
- First of all, a facade simplifies a group of systems whereas a mediator simplifies a group of interactions.
- Second, facade is mostly an indirection to a feature whereas a mediator holds the business logic or a feature.
- Thus we can think of a facade hiding a group of mediators under it from its clients.
- For example, the facade talks to FundTransferService which is a mediator that:
- might be talking to CustomerProfileService for verifying the limits
- the SavingsAccountService for withdrawal and
- a third party transfer service for initiating the transfer.
Conclusion
As we have noticed, a facade provides a simplified view irrespective of the underlying design. Its a great way to server multiple user groups from a common set of reusable assets. We use it to serve only that is meaningful and hiding the rest.
In case of microservice environments, integration tools like Apache Camel, API gateways can help us build such facades on top of independent reusable services.
Builder Design Pattern
A good builder takes your input the way you understand the object. And, builds the object the way it needs to be built technically. In short, it makes your building process easy irrespective of the underlying complexities !
The Builder is a simple and useful creational pattern to custom build objects and services consisting of multiple parameters.
Comparing it with the factory, the factory has the responsibility of providing the instances of its family of products. But, the builder has the goal to simplify the object building process. Hence, if the underlying products of a factory are complex, we may use a builder to build them.
It’s a widely used pattern to provide a convenient way to build complex components:
- It may be a multi-parameter based service call like a http service call.
- It can be a highly configurable component like a spring boot application.
- Or it might be a multiple-input based complex object structure like a query object.
In all such cases, a builder pattern can provide a simplified and client friendly object building interface. One of the common and simple example in java being the StringBuffer, to append or do other manipulations on multiple strings.
In this article we will first look at why and how to use the builder pattern. And, then follow it up with some real world code snippets to understand its usages better.
Why and How to use the Builder ?
Why should we use it ?
When we design, we do it from a technical point of view keeping the design principle in mind. But, when we use it or write a test case for the system, we hope it were as simple and close to our business requirements. The builder helps us achieve it by bridging the gap. In other words, it provides a business friendly interface, hiding the underlying technical complexities.

Let’s say we want to create usage limits for cards in a banking application. In order to create limits for our multiple usage types, we have a separate UsageLimit object.
Even with this simple object structure, below is the difference in creating the CardUsageLimit for our test cases for instance.
package spectutz.dp.creational.builder.client;

import spectutz.dp.creational.builder.CardUsageLimitBuilder;
import spectutz.dp.creational.builder.UsageLimitBuilder;
import spectutz.dp.creational.builder.card.CardType;
import spectutz.dp.creational.builder.card.CardUsageLimit;
import spectutz.dp.creational.builder.card.UsageType;

public class CardUsageUsingBuilder {

	public static void main(String[] args) {

		//Build your usage limit the same way as you understand your business
		CardUsageLimit cardUsageLimit =

				new CardUsageLimitBuilder("2334-675-6775", CardType.DEBIT)

				.addUsageLimit(new UsageLimitBuilder(UsageType.ATM)
						           .isAllowed(true).setMaxLimit(25000).build())
				.addUsageLimit(new UsageLimitBuilder(UsageType.MERCHANT_OUTLET)
						           .isAllowed(true).setMaxLimit(20000).build())
				.addUsageLimit(new UsageLimitBuilder(UsageType.ONLINE)
						           .isAllowed(false).build())
				.build();

		System.out.println(cardUsageLimit.toString());

	}

}
// Output
/*
Card Usage for Card No: 2334-675-6775 AND Card Type : DEBIT

Card Usage Limits :
Usage Type: ATM; Is Allowed: true; Max Limit: 25000
Usage Type: ONLINE; Is Allowed: false; Max Limit: 0
Usage Type: MERCHANT_OUTLET; Is Allowed: true; Max Limit: 20000
*/
package spectutz.dp.creational.builder.client;

import spectutz.dp.creational.builder.card.CardType;
import spectutz.dp.creational.builder.card.CardUsageLimit;
import spectutz.dp.creational.builder.card.UsageLimit;
import spectutz.dp.creational.builder.card.UsageType;

public class CardUsageWithoutBuilder {

	public static void main(String[] args) {

		//Build your usage limit as per your underlying data structure
		CardUsageLimit cardUsageLimit = new CardUsageLimit();
		cardUsageLimit.setCardNumber("2334-675-6775");
		cardUsageLimit.setCardType(CardType.DEBIT);

		UsageLimit atmUsageLimit = new UsageLimit();
		atmUsageLimit.setUsageType(UsageType.ATM);
		atmUsageLimit.setAllowedFlag(true);
		atmUsageLimit.setMaxLimit(25000);

		UsageLimit merChantOutLetUsageLimit = new UsageLimit();
		merChantOutLetUsageLimit.setUsageType(UsageType.MERCHANT_OUTLET);
		merChantOutLetUsageLimit.setAllowedFlag(true);
		merChantOutLetUsageLimit.setMaxLimit(20000);

		UsageLimit onlineUsageLimit = new UsageLimit();
		onlineUsageLimit.setUsageType(UsageType.ONLINE);
		onlineUsageLimit.setAllowedFlag(false);

		cardUsageLimit.addUsageLimit(atmUsageLimit);
		cardUsageLimit.addUsageLimit(merChantOutLetUsageLimit);
		cardUsageLimit.addUsageLimit(onlineUsageLimit);

		System.out.println(cardUsageLimit);
	}

}

// Output
/*
Card Usage for Card No: 2334-675-6775 AND Card Type : DEBIT

Card Usage Limits :
Usage Type: ATM; Is Allowed: true; Max Limit: 25000
Usage Type: ONLINE; Is Allowed: false; Max Limit: 0
Usage Type: MERCHANT_OUTLET; Is Allowed: true; Max Limit: 20000
*/
In the above example, we can clearly figure out how a builder makes our client interface compact and much more readable. Moreover, it keeps the client interface independent of the underlying data structure.
How does it work ?
A builder pattern basically consists of two different types of APIs :

- Fluent and Business Friendly APIs to Collect a Series of Inputs :
- Regardless of the underlying data structure, we can design these apis in a business friendly manner.
- The fluent apis makes the builder code highly readable.
- For example, even for complex queries and expression objects these apis can still look non-technical.
- Regardless of the underlying data structure, we can design these apis in a business friendly manner.
- A Build API to Create and Return the Desired Object :
- This is where we do the final processing, if any, to build and return the desired object.
With the client code shown above, below are the objects and their builders for the card usage example.
package spectutz.dp.creational.builder;

import spectutz.dp.creational.builder.card.CardType;
import spectutz.dp.creational.builder.card.CardUsageLimit;
import spectutz.dp.creational.builder.card.UsageLimit;

public class CardUsageLimitBuilder {

    CardUsageLimit cardUsageLimit;

    public CardUsageLimitBuilder(String cardNumber, CardType cardType){
    	cardUsageLimit = new CardUsageLimit();
    	cardUsageLimit.setCardNumber(cardNumber);
    	cardUsageLimit.setCardType(cardType);
    }
    public CardUsageLimitBuilder addUsageLimit(UsageLimit usageLimit){
    	cardUsageLimit.addUsageLimit(usageLimit);
    	return this;
    }

    public CardUsageLimit build() {
    	return cardUsageLimit;
    }

}
package spectutz.dp.creational.builder;

import spectutz.dp.creational.builder.card.UsageLimit;
import spectutz.dp.creational.builder.card.UsageType;

public class UsageLimitBuilder {

    UsageLimit usageLimit;

    public UsageLimitBuilder(UsageType usageType){
    	this.usageLimit = new UsageLimit();
    	usageLimit.setUsageType(usageType);
    }

    public UsageLimitBuilder isAllowed(boolean isAllowed){
    	usageLimit.setAllowedFlag(isAllowed);
    	return this;
    }
    public UsageLimitBuilder setMaxLimit(int maxLimit){
    	usageLimit.setMaxLimit(maxLimit);
    	return this;
    }
    public UsageLimit build(){
    	return usageLimit;
    }

}
package spectutz.dp.creational.builder.card;

import java.util.HashMap;
import java.util.Map;

public class CardUsageLimit {
	private String cardNumber;
	private CardType cardType;
    private Map<UsageType, UsageLimit> usageLimits = new HashMap<UsageType, UsageLimit>();

	public String getCardNumber() {
		return cardNumber;
	}
	public void setCardNumber(String cardNumber) {
		this.cardNumber = cardNumber;
	}
	public CardType getCardType() {
		return cardType;
	}
	public void setCardType(CardType cardType) {
		this.cardType = cardType;
	}
	public Map<UsageType, UsageLimit> getUsageLimits() {
		return usageLimits;
	}
	public void addUsageLimit(UsageLimit usageLimit) {
		this.usageLimits.put(usageLimit.getUsageType(), usageLimit);
	}

	public String toString() {
		StringBuffer cardUsageLimit = new StringBuffer("Card Usage for Card No: "+this.cardNumber);
		cardUsageLimit.append(" AND Card Type : "+this.cardType)
		.append("\n\nCard Usage Limits :");

		usageLimits.forEach((k, v) -> {
			cardUsageLimit.append("\nUsage Type: " + k )
			.append("; Is Allowed: " + v.isAllowed())
			.append("; Max Limit: " + v.getMaxLimit());
		});

		return cardUsageLimit.toString();
	}
}
package spectutz.dp.creational.builder.card;

public class UsageLimit {

	private UsageType usageType;
	private boolean isAllowed;
	private int maxLimit;

	public UsageType getUsageType() {
		return usageType;
	}
	public void setUsageType(UsageType usageType) {
		this.usageType = usageType;
	}
	public boolean isAllowed() {
		return isAllowed;
	}
	public void setAllowedFlag(boolean isAllowed) {
		this.isAllowed = isAllowed;
	}
	public int getMaxLimit() {
		return maxLimit;
	}
	public void setMaxLimit(int maxLimit) {
		this.maxLimit = maxLimit;
	}


}
package spectutz.dp.creational.builder.card;

public enum CardType {
	DEBIT, CREDIT;
}
package spectutz.dp.creational.builder.card;

public enum UsageType {
	ATM, MERCHANT_OUTLET, ONLINE;
}
Some Realtime Usages
Use Case -1
The below is a sample code for creating an EhCache(2.8 version) which is a highly customizable component. By default, it comes with lots of default configurations but, it lets us customize many of them through CacheConfiguration.
Here, the CacheConfiguration uses the builder pattern. And, as we can see, the pattern makes it fluent and flexible to add our custom options.
//Create a singleton CacheManager using defaults
CacheManager manager = CacheManager.create();

// CacheConfiguration : Update as many configs as you want where the rest will run with the defaults.
Cache sampleCache= new Cache(
  new CacheConfiguration("sampleCache", maxEntriesLocalHeap)
    .memoryStoreEvictionPolicy(MemoryStoreEvictionPolicy.LFU)
    .eternal(false)
    .timeToLiveSeconds(60)
    .timeToIdleSeconds(30)
    .diskExpiryThreadIntervalSeconds(0)
    .persistence(new PersistenceConfiguration().strategy(Strategy.LOCALTEMPSWAP)));

  manager.addCache(sampleCache);
Use Case-2
A Builder can hide a lot of complexities from you.
In case of stuffs like hibernate queries or elastic search queries, building the desired outcome manually will be lot difficult.
Here, the builder takes our input using a simpler, business friendly interface. Then, it collects them into a technically suitable intermediate object. Finally, it uses the intermediate object to produce our desired output. Moreover, sometimes we may need the output in multiple formats. The hibernate queries supporting multiple databases for instance.
Below is an example to build a search query to find laptops with RAM greater than 8GB and screen size between 15-15.9 inch.
The two tabs below show, how we build vs what we need. The difference in their complexities shows the beauty of the builder pattern.
		BoolQueryBuilder boolQuery = QueryBuilders.boolQuery()
				.must(QueryBuilders.termQuery("product-category", "laptop"))
				.must(QueryBuilders.termQuery("RAM-GB", "4"))
				.must(QueryBuilders.rangeQuery("screen-size").gte(15).lte(15.9));


		System.out.println(boolQuery.toString());
{
  "bool" : {
    "must" : [
      {
        "term" : {
          "product-category" : {
            "value" : "laptop",
            "boost" : 1.0
          }
        }
      },
      {
        "term" : {
          "RAM-GB" : {
            "value" : "4",
            "boost" : 1.0
          }
        }
      },
      {
        "range" : {
          "screen-size" : {
            "from" : 15,
            "to" : 15.9,
            "include_lower" : true,
            "include_upper" : true,
            "boost" : 1.0
          }
        }
      }
    ],
    "adjust_pure_negative" : true,
    "boost" : 1.0
  }
}
Conclusion
To summarize what we have seen above, the builder is a quite an useful design pattern to make our life easy. It helps us hide the unavoidable technical complexities from the end users. Irrespective of the underlying complexities, the builder can collect the inputs in a much more compact and readable format.
Abstract Factory Design Pattern
An Abstract Factory provides a set of Factories at one place
because we love to use their products together!
An Abstract Factory lets us group a related set of product families(or factories) based on our usage pattern.
It may directly instantiate the products or may source them from their respective product factories. And, like a factory, it exposes abstract products to its clients, so that they can replace them with appropriate concrete versions at runtime.
Whereas a factory creates products belonging to single family; an abstract factory provide a meaningful sets of these products from different families from a single interface.
Examples in Brief
Let us look at couple of examples in brief, in order to understand the grouping better. Later we will discuss on these in more detail for clarifying it further.
Example 1 : Lets say we have loan processing application where each loan type has its own processor, pre-processor, validator etc.
So, ideally we will have separate factories for these components. But, since we use them together, how about providing a single interface to our clients for creating these components ? This is where the abstract factory comes in handy.
Example 2 : Lets say we are creating a PC health analyzer module for multiple platforms. Even though we need platform specific analyzers, installation on any platform needs access to only its own set of analyzers. So, how can we group these platform specific analyzers and filter out the unnecessary ones ?
How does the pattern work?
In this part we will restrict our discussions only to the above two examples. But, we will analyze them with diagrams and code samples, so as to understand how the pattern works and its benefits.
Example -1
Lets say we have a loan processing application where we have many similar components like a processor, pre-processor, validator for each of the loan types. Hence, instead of getting these components from so many factories, we may need a single interface that provides each of these required components.

As in option-1, we can build an abstract factory that composes all the abstract version of our product set. Then, build loan specific concrete factories that returns the concrete products, specific to the loan type. For example, the ‘HomeLoanFactory’ will return the processors and the validators specific to the home loan as shown.
But, we have so many loan types and many more are going to be added. Hence, the challenge is that we will end up with lot many concrete factories. Therefore, to retain the benefits without the challenge, we can go with option-2.
In option-2, we have simply added the loan type as a parameter to the factory methods, to avoid creating multiple classes. But, the underlying concept of grouping products from different factories for our business cases remains the same.
Having seen this, we will see when will the option-1 be useful in our other example. But, before that here are the code for this demo example.
The first set shows how our abstract factory, UnifiedLoanFactory works and makes use of the other factories. And, the second set lists the related abstract and the concrete products.
package spectutz.dp.creational.absfactory.loan;

import spectutz.dp.creational.absfactory.loan.processor.ILoanProcessor;
import spectutz.dp.creational.absfactory.loan.processor.LoanProcessorFactory;
import spectutz.dp.creational.absfactory.loan.validator.ILoanValidator;
import spectutz.dp.creational.absfactory.loan.validator.LoanValidatorFactory;
import spectutz.dp.creational.factory.loan.vo.LoanType;

public class UnifiedLoanFactory{
	private static UnifiedLoanFactory unifiedLoanFactory = new UnifiedLoanFactory();

	private UnifiedLoanFactory() {}
	public static UnifiedLoanFactory getInstance() {
		return unifiedLoanFactory;
	}

	// *** Abstract Factory : Uses the respective factories to retrieve the products! ***//

	public ILoanProcessor getLoanProcessor(LoanType loanType){
		return LoanProcessorFactory.getInstance().getLoanProcessor(loanType);
	}
	public ILoanValidator getLoanValidator(LoanType loanType){
		return LoanValidatorFactory.getInstance().getLoanValidator(loanType);
	}
}
package spectutz.dp.creational.absfactory.loan.validator;

import java.util.HashMap;
import java.util.Map;

import spectutz.dp.creational.absfactory.loan.vo.LoanType;

public class LoanValidatorFactory {
	private static LoanValidatorFactory instance = new LoanValidatorFactory();
	private static Map<LoanType, ILoanValidator> registry;

	static {
		registry = new HashMap<LoanType, ILoanValidator>();
		registry.put(LoanType.HOME_LOAN, new HomeLoanValidator());
		registry.put(LoanType.PERSONAL_LOAN, new PersonalLoanValidator());
		registry.put(LoanType.CAR_LOAN, new CarLoanValidator());
		//For any new loan processor - Add them to this registry !
	}

	public ILoanValidator getLoanValidator(LoanType loanType) {//throws Exception{
		return registry.get(loanType);
	}

	public static LoanValidatorFactory getInstance() {
		return instance;
	}
}
package spectutz.dp.creational.absfactory.loan.processor;

import java.util.HashMap;
import java.util.Map;

import spectutz.dp.creational.absfactory.loan.vo.LoanType;

public class LoanProcessorFactory {
	private static LoanProcessorFactory instance = new LoanProcessorFactory();
	private static Map<LoanType, ILoanProcessor> registry;

	static {
		registry = new HashMap<LoanType, ILoanProcessor>();
		registry.put(LoanType.HOME_LOAN, new HomeLoanProcessor());
		registry.put(LoanType.PERSONAL_LOAN, new PersonalLoanProcessor());
		registry.put(LoanType.CAR_LOAN, new CarLoanProcessor());
		//For any new loan processor - Add them to this registry !
	}

	public ILoanProcessor getLoanProcessor(LoanType loanType) {
		return registry.get(loanType);
	}

	public static LoanProcessorFactory getInstance() {
		return instance;
	}
}
package spectutz.dp.creational.absfactory.loan;

import spectutz.dp.creational.absfactory.loan.processor.ILoanProcessor;
import spectutz.dp.creational.absfactory.loan.processor.LoanProcessorFactory;
import spectutz.dp.creational.absfactory.loan.validator.ILoanValidator;
import spectutz.dp.creational.absfactory.loan.validator.LoanValidatorFactory;
import spectutz.dp.creational.absfactory.loan.vo.LoanApplication;
import spectutz.dp.creational.absfactory.loan.vo.LoanType;

public class WithAndWithoutAbstractFactoryDemo {

	public static void main(String[] args) {
		LoanApplication loanApplication = new LoanApplication();
		loanApplication.setLoanType(LoanType.PERSONAL_LOAN);

		WithAndWithoutAbstractFactoryDemo demoClient = new WithAndWithoutAbstractFactoryDemo();
		demoClient.processLoanWithAbstractFactory(loanApplication);
		demoClient.processLoanWithoutAbstractFactory(loanApplication);

	}

    public void processLoanWithAbstractFactory(LoanApplication loanApplication) {
    	LoanType loanType = loanApplication.getLoanType();

    	//Get all products from a single interface..
    	UnifiedLoanFactory unifiedLoanFactory = UnifiedLoanFactory.getInstance();
    	ILoanValidator loanValidator = unifiedLoanFactory.getLoanValidator(loanType);
    	ILoanProcessor loanProcessor = unifiedLoanFactory.getLoanProcessor(loanType);

    	if(loanValidator.validate(loanApplication)) {
    		loanProcessor.process(loanApplication);
    	}else {
    		//throw exception with validation errors
    	}
    }

    public void processLoanWithoutAbstractFactory(LoanApplication loanApplication) {
    	System.out.println("\n Start : processLoanWithFactory.....");
    	LoanType loanType = loanApplication.getLoanType();

    	//Get the  products from its respective factories..
    	ILoanValidator loanValidator = LoanValidatorFactory.getInstance()
    									.getLoanValidator(loanType);
    	ILoanProcessor loanProcessor = LoanProcessorFactory.getInstance()
    									.getLoanProcessor(loanType);

    	if(loanValidator.validate(loanApplication)) {
    		loanProcessor.process(loanApplication);
    	}else {
    		//throw exception with validation errors
    	}
    }
}
The code for the abstract and concrete products in the demo for our reference.
package spectutz.dp.creational.absfactory.loan.validator;

import spectutz.dp.creational.absfactory.loan.vo.LoanApplication;

public interface ILoanValidator {

	public boolean validate(LoanApplication loanApplication);

}
package spectutz.dp.creational.absfactory.loan.validator;

import spectutz.dp.creational.absfactory.loan.vo.LoanApplication;

public class HomeLoanValidator implements ILoanValidator{

	@Override
	public boolean validate(LoanApplication loanApplication) {
		System.out.println("Validate the home loan");
		return true; //validated successfully
	}

}
package spectutz.dp.creational.absfactory.loan.validator;

import spectutz.dp.creational.absfactory.loan.vo.LoanApplication;

public class PersonalLoanValidator implements ILoanValidator{

	@Override
	public boolean validate(LoanApplication loanApplication) {
		System.out.println("Validate personal loan");
		return true; //validated successfully
	}
}
package spectutz.dp.creational.absfactory.loan.validator;

import spectutz.dp.creational.absfactory.loan.vo.LoanApplication;

public class CarLoanValidator implements ILoanValidator{

	@Override
	public boolean validate(LoanApplication loanApplication) {
		System.out.println("Validate the car loan");
		return true; //validated successfully
	}

}
package spectutz.dp.creational.absfactory.loan.processor;

import spectutz.dp.creational.absfactory.loan.vo.LoanApplication;

public interface ILoanProcessor {

	public void process(LoanApplication loanApplication);

}
package spectutz.dp.creational.absfactory.loan.processor;

import spectutz.dp.creational.absfactory.loan.vo.LoanApplication;

public class HomeLoanProcessor implements ILoanProcessor{

	@Override
	public void process(LoanApplication loanApplication) {
		System.out.println("Process the home loan");
	}

}
package spectutz.dp.creational.absfactory.loan.processor;

import spectutz.dp.creational.absfactory.loan.vo.LoanApplication;

public class PersonalLoanProcessor implements ILoanProcessor{

	@Override
	public void process(LoanApplication loanApplication) {
		System.out.println("Process the personal loan");
	}
}
package spectutz.dp.creational.absfactory.loan.processor;

import spectutz.dp.creational.absfactory.loan.vo.LoanApplication;

public class CarLoanProcessor implements ILoanProcessor{

	@Override
	public void process(LoanApplication loanApplication) {
		System.out.println("Process the car loan");

	}

}
package spectutz.dp.creational.absfactory.loan.vo;


public enum LoanType {
   HOME_LOAN, PERSONAL_LOAN, CAR_LOAN
}
package spectutz.dp.creational.absfactory.loan.vo;

public class LoanApplication {
	LoanType loanType;

	public LoanType getLoanType() {
		return loanType;
	}

	public void setLoanType(LoanType loanType) {
		this.loanType = loanType;
	}
}
Example -2
Lets say we are developing a PC health analyzer module supporting multiple platforms.
Since each platform provides its own APIs to retrieve its component information, we need platform specific analyzers as shown below.

However, when we install this module, we only need the analyzers specific to that platform. Hence, creating a generic implementation, as in option-2 in example-1, does not make sense.
That’s why the option-1 is better as it provides only the platform specific products. Additionally, it also does not provide access to wrongfully use the analyzers meant for other platforms. For example, on a Mac system we will use ‘MacHealthAnalyzer’. And, as shown in the diagram, it will include the set of analyzers specific to Mac alone.
Moreover, since we are analyzing similar components, the ‘AbstractHealthAnalyzer’ standardizes the analyzer set for all platforms.
Conclusion
An abstract factory is an useful pattern to group the products together based on our usage pattern. Like factories, it keeps the client loosely coupled with the products it uses.
When our use case involves multiple factories, an abstract factory can consolidate them into a single interface.
Moreover, like in example-2 above, it can also help us build platform or product variant specific, component sets.
Factory Design Pattern
A Factory produces a family of products for us
so that we can easily order them for our use just by its tagged name .
The Factory is one of the most widely used creational design pattern. It hides the creation of a family of products, so that we can dynamically choose them for our usage just using a mapped name or a simple set of identifiers.
Benefits of using Factory Pattern
First of all, by hiding the creational logic, it simplifies the dependency for its clients. In other words, the clients can simply depend on a base class to use a long list of its sub-classes.
Secondly, a factory also helps us generalize our usage logic. Thus, making our design open for extension, but closed for modification.
Moreover, in case of invariant(client/context independent) instances, a factory can cache & share a single instance. Hence, a factory can also optimize the instance lifecycle and make our application light weight. We will discuss more on this in the Flyweight design pattern.
We will look at all these points in more detail with diagrams and code snippets in the sections below. Let’s start with exploring how the factory works.
How does the pattern work?
Let’s say we are developing a loan processing module where each loan type has a different processor. The below diagram shows how can we use a factory to simplify dependencies and generalize the processing logic.

The key point to note in the above diagram are :
1. Deferred Instantiation for Decoupling the Products
Here we have a family of loan processors but, the client only needs to know their base type i.e. ILoanProcessor.
By deferring the instantiation, the factory allows us to dynamically choose a product to replace our base product. Moreover, the factory only needs a simple identifier to decide on the actual product.
Thus, a factory greatly reduces the dependencies for its clients. In fact, it shifts the dependencies on a family of products from the clients to itself.
As regards the identities, we have mapped processors one to one with their loan types. In case the products are complex, we may need a multiple set of parameters to identify and create their instances.
public class LoanProcessorFactory {
        //Other code...
	private static Map<LoanType, LoanProcessor> registry;

	static {
		registry = new HashMap<LoanType, LoanProcessor>();
		registry.put(LoanType.NEW_HOME, new HomeLoanProcessor());
		registry.put(LoanType.HOME_RENOVATION, new HomeRenovationLoanProcessor());
		registry.put(LoanType.HOME_CONSTRUCTION, new HomeConstructionLoanProcessor());
		//For any new loan processor - Add them to this registry !
	}

	public LoanProcessor getLoanProcessor(LoanType loanType) {//throws Exception{
		return registry.get(loanType);
	}
        //Other code...
}
2. Factory Helps us Generalize our Code
The two loan processing methods shows the difference in processing logic with and without using a factory. It clearly shows how a factory makes our processing logic generic and flexible.
For instance, for a new loan type we simply have to register the instance of the new processor in the factory. There is no need to modify the processing logic inside the clients.
public class WithAndWithoutFactoryDemo {
	//Other code ........

    public void processLoanWithoutFactory(LoanApplication loanApplication) {
    	System.out.println("\n Start : processLoanWithoutFactory.....");
    	if(LoanType.NEW_HOME == loanApplication.getLoanType()) {
    		new HomeLoanProcessor().process(loanApplication);
    	} else if(LoanType.HOME_RENOVATION == loanApplication.getLoanType()) {
    		new HomeRenovationLoanProcessor().process(loanApplication);
    	} else if(LoanType.HOME_CONSTRUCTION == loanApplication.getLoanType()) {
    		new HomeRenovationLoanProcessor().process(loanApplication);
    	}
    	//Keep adding the conditional blocks for each new loan here........
    }

    public void processLoanWithFactory(LoanApplication loanApplication) {
    	System.out.println("\n Start : processLoanWithFactory.....");
    	//The client code is dependent only on base loan processor...
    	LoanProcessor loanProcessor = LoanProcessorFactory.getInstance()
    								  .getLoanProcessor(loanApplication.getLoanType());

    	//The logic is generic - Simply register the new processor instance in the factory!
    	loanProcessor.process(loanApplication);
    }
}
3. Factory can Optimize the Instance Management
Since a factory centrally controls the instantiation process, it allows us to instantiate once and then re-use the instances. This reusability is not only across classes but, also across the user requests.
Again, reusing the instances is absolutely fine when we are dealing with invariant(client\context independent) beans, as we have used in our example. But, just in case we need client specific instances, we can always create them on every request.
public class LoanProcessorFactory {
	private static LoanProcessorFactory instance = new LoanProcessorFactory();
	private static Map<LoanType, LoanProcessor> registry;

	static {//Create the instances once and save it for re-use
		registry = new HashMap<LoanType, LoanProcessor>();
		registry.put(LoanType.NEW_HOME, new HomeLoanProcessor());
		registry.put(LoanType.HOME_RENOVATION, new HomeRenovationLoanProcessor());
		registry.put(LoanType.HOME_CONSTRUCTION, new HomeConstructionLoanProcessor());
	}

	//Serve the saved instances.....
	public LoanProcessor getLoanProcessor(LoanType loanType) {//throws Exception{
		return registry.get(loanType);
	}

	public static LoanProcessorFactory getInstance() {
		return instance;
	}
}
Source Code for the Demo
Below are the source code for the demo example we have discussed above.
This first set shows the Factory and the client code showing its usage.
package spectutz.dp.creational.factory.loan.processor;

import java.util.HashMap;
import java.util.Map;

import spectutz.dp.creational.factory.loan.vo.LoanType;

public class LoanProcessorFactory {
	private static LoanProcessorFactory instance = new LoanProcessorFactory();
	private static Map<LoanType, LoanProcessor> registry;

	static {
		registry = new HashMap<LoanType, LoanProcessor>();
		registry.put(LoanType.NEW_HOME, new HomeLoanProcessor());
		registry.put(LoanType.HOME_RENOVATION, new HomeRenovationLoanProcessor());
		registry.put(LoanType.HOME_CONSTRUCTION, new HomeConstructionLoanProcessor());
		//For any new loan processor - Add them to this registry !
	}

	public LoanProcessor getLoanProcessor(LoanType loanType) {//throws Exception{
		return registry.get(loanType);
	}

	public static LoanProcessorFactory getInstance() {
		return instance;
	}
}
package spectutz.dp.creational.factory.loan;

import spectutz.dp.creational.factory.loan.processor.HomeLoanProcessor;
import spectutz.dp.creational.factory.loan.processor.HomeRenovationLoanProcessor;
import spectutz.dp.creational.factory.loan.processor.LoanProcessor;
import spectutz.dp.creational.factory.loan.processor.LoanProcessorFactory;
import spectutz.dp.creational.factory.loan.vo.LoanApplication;
import spectutz.dp.creational.factory.loan.vo.LoanType;

public class WithAndWithoutFactoryDemo {

	public static void main(String[] args) {
		LoanApplication loanApplication = new LoanApplication();
		loanApplication.setLoanType(LoanType.HOME_RENOVATION);

		WithAndWithoutFactoryDemo demoClient = new WithAndWithoutFactoryDemo();
		demoClient.processLoanWithoutFactory(loanApplication);
		demoClient.processLoanWithFactory(loanApplication);

	}

    public void processLoanWithoutFactory(LoanApplication loanApplication) {
    	System.out.println("\n Start : processLoanWithoutFactory.....");
    	if(LoanType.NEW_HOME == loanApplication.getLoanType()) {
    		new HomeLoanProcessor().process(loanApplication);
    	} else if(LoanType.HOME_RENOVATION == loanApplication.getLoanType()) {
    		new HomeRenovationLoanProcessor().process(loanApplication);
    	} else if(LoanType.HOME_CONSTRUCTION == loanApplication.getLoanType()) {
    		new HomeRenovationLoanProcessor().process(loanApplication);
    	}
    	//Add the logic for new loans here........
    }

    public void processLoanWithFactory(LoanApplication loanApplication) {
    	System.out.println("\n Start : processLoanWithFactory.....");
    	LoanProcessor loanProcessor = LoanProcessorFactory.getInstance()
    								  .getLoanProcessor(loanApplication.getLoanType());

    	//The logic is generic - Simply add the new processor in the factory!
    	loanProcessor.process(loanApplication);
    }

}
This second set includes the product family of loan processors and the loan object.
package spectutz.dp.creational.factory.loan.processor;

import spectutz.dp.creational.factory.loan.vo.LoanApplication;

public class HomeLoanProcessor implements LoanProcessor{

	@Override
	public void process(LoanApplication loanApplication) {
		System.out.println("Process Home Loan");
	}

}
package spectutz.dp.creational.factory.loan.processor;

import spectutz.dp.creational.factory.loan.vo.LoanApplication;

public class HomeRenovationLoanProcessor implements LoanProcessor{

	@Override
	public void process(LoanApplication loanApplication) {
		System.out.println("Process Home Renovation Loan");
	}
}
package spectutz.dp.creational.factory.loan.processor;

import spectutz.dp.creational.factory.loan.vo.LoanApplication;

public class HomeConstructionLoanProcessor implements LoanProcessor{

	@Override
	public void process(LoanApplication loanApplication) {
		System.out.println("Process Home Construction Loan");
	}
}
package spectutz.dp.creational.factory.loan.processor;

import spectutz.dp.creational.factory.loan.vo.LoanApplication;

public interface LoanProcessor {

	public void process(LoanApplication loanApplication);

}
package spectutz.dp.creational.factory.loan.vo;

public class LoanApplication {
	LoanType loanType;

	public LoanType getLoanType() {
		return loanType;
	}

	public void setLoanType(LoanType loanType) {
		this.loanType = loanType;
	}
}
package spectutz.dp.creational.factory.loan.vo;


public enum LoanType {
   NEW_HOME, HOME_CONSTRUCTION, HOME_RENOVATION
}
Conclusion
To summaries, the factory is quite an useful pattern for managing the instances when we have a family of products. It helps us generalize the processing logic. Thus, allowing us to extend our deign with new specific products without affecting the core logic.
Moreover, it lets us re-use the product instances, helping us to make our application light weight.
K8s – Volume and PersistentVolume
What is a K8s Volume ?
When we create or restart a container it starts with a fresh workspace. Hence, we can not save any data into its workspace for a re-use.
K8s Volume enables us to plug-in an external storage into the container workspace. Because of the plugged-in storage, the containers can save and re-use data across restarts and failures. K8s supports a wide range of storage types in this regard.
The Volume provides the simplest way for a Pod to plug-in an external storage.
Note : Apart from external storage plug-in, the regular volume supports some other special storage solutions like ConfigMaps, Secret, emptyDir() where the files are not supposed to be stored on an external storage beyond the life of the containers.

PersistentVolume
A storage handle which help us to provision the storage, manage and monitor the usage.
The Volume being part of a pod, it follows the life cycle of a pod and provides only a runtime reference to the storage. But, to manage the storage beyond the usage time of the pods, K8s needs a standalone handle which is addressed by the PersistentVolume.
The PersistentVolume is a cluster level object and holds a reference to external storage as shown above. Since its a standalone entity, it enables the admin to provision our required capacity of storage well in advance. Its also enables us to monitor the usage of the storage.
The PersistentVolume allows us to reserve the storage for a specific namespace, using a volume claim.
Moreover, through its reclaim policy we can retain its data and not allow others to tamper it even beyond the project usage.
As we compare the Volume inside a Pod & PersistentVolume API objects, we can notice both can point to similar storage. But, the later being a standalone object, provides the extra controls as mentioned just above.
apiVersion: v1
kind: Pod
metadata:
  name: my-app
spec:
  containers:
    - name: demo
      image: sample/my-app
      volumeMounts:
      - name: vol-myapp
        mountPath: "/data/order"
  volumes:
    - name: vol-myapp
      hostPath:
           path:  /data/vol-01
           type: DirectoryOrCreate
apiVersion: v1
kind: PersistentVolume
metadata:
 name: pv-01
 labels:
   type: local
spec:
 storageClassName: manual
 capacity:
   storage: 5Gi
 accessModes:
   - ReadWriteOnce
 persistentVolumeReclaimPolicy: Retain
 hostPath:
   path: /data/vol-01
   type: DirectoryOrCreate
Note : A volumeMounts makes the plugged-in storage available inside the container workspace as a local directory.
Deploy a PersistentVolume
The scripts below shows how can we deploy and verify a PersistentVolume.
$ kubectl apply -f pv.yaml
persistentvolume/pv-01 created

$ kubectl get pv -o wide
NAME    CAPACITY   ACCESS MODES   RECLAIM POLICY   STATUS      CLAIM   STORAGECLASS   REASON   AGE   VOLUMEMODE
pv-01   5Gi        RWO            Retain           Available           manual                  34s   Filesystem


//Note : The status shows available as the claim part is empty.
Since PV is a non-namespaced object, it is available across all namespaces. A PersitentVolumeClaim object from any namespace can bind to a PV, if it meets the requirement, and reserve it for that namespace as we have seen in diagram above.
PersistentVolumeClaim
Volume claim requirement which enable us to reserve a PV for our usage.
apiVersion: v1
kind: PersistentVolumeClaim
metadata:
  name: task-pvc-claim
spec:
  accessModes:
    - ReadWriteOnce
  resources:
    requests:
      storage: 1Gi
  storageClassName: manual
This highlighted part in the claim object holds the minimum requirement of our project. When we deploy a claim, it looks for its closet match among the available PV and binds into that as shown below.
Once a PVC claims a PV, the PV becomes unavailable for others. It will be available for other claims, only when the current claim releases it and the PV is recycled. It avoids any project conflicts in using a volume.
$ kubectl apply -f pvc.yaml
persistentvolumeclaim/task-pvc-claim created

$ kubectl get pv,pvc -o wide

NAME                     CAPACITY   ACCESS MODES   RECLAIM POLICY   STATUS   CLAIM                    STORAGECLASS   REASON   AGE   VOLUMEMODE
persistentvolume/pv-01   5Gi        RWO            Retain           Bound    default/task-pvc-claim   manual                  15m   Filesystem

NAME                                   STATUS   VOLUME   CAPACITY   ACCESS MODES   STORAGECLASS   AGE   VOLUMEMODE
persistentvolumeclaim/task-pvc-claim   Bound    pv-01    5Gi        RWO            manual         39s   Filesystem


// We can see the PV and PVC are now bound to each other
//(ref. STATUS, CLAIM on PV & STATUS,VOLUME on PVC).

//The above PVC belongs to default namespace.
//The PVs are shared resources and never belong to a namespace.
Note : As we see here, the capacity of the claim shows to be 5GB. It just shows that, the claim only contains the minimum requirement. And, the PV decides the available capacity.
PVC makes choice of storage flexible
# A regular volume pointing a storage
volumes:
  - name: myapp-volume
    awsElasticBlockStore:
      volumeID: <volume-id>
      fsType: ext4

//A Volume needs the technical details
//of the targeted storage
# A volume using pvc
volumes:
  - name: myapp-volume
    persistentVolumeClaim:
         claimName: pvc-myapp

//While using PV through PVC,
//we just need the name of the PVC
First, as we can see above, in case of PVC we just specify the claim name, whereas a regular volume has to hard code the storage details. Hence, in case the storage type changes, we will have to change all pods using it.
Second, just being a requirement, a PVC can use any storage types provisioned for it by an Admin. It can be a NFS, glusterfs, google PersistentDisk etc .
StorageClass
It enables us to provision PVs dynamically.
Usually an Admin provisions the PVs to meets the storage requirements.
But, in large systems, in distributed database systems or clustered database systems, we might need lots of separate volumes. Moreover, the number of volumes we need may be dynamic in nature. In such cases, dynamic provisioning of PVs becomes very useful.
A storageClass can create the PVs dynamically as per the need of our PVC. We can define each storageClass to provision volumes from a particular storage type. And, the PVC need to add the required storageClass through annotations as shown below.
apiVersion: storage.k8s.io/v1
kind: StorageClass
metadata:
  name: sc-ssd
/*annotations:
    storageclass.kubernetes.io/is-default-class: "true"*/
provisioner: kubernetes.io/gce-pd
parameters:
  type: pd-ssd

//Dynamically provisions SSD storage
apiVersion: v1
kind: PersistentVolumeClaim
metadata:
  name: pvc-project-X
spec:
  accessModes:
    - ReadWriteOnce
  storageClassName: sc-ssd
  resources:
    requests:
      storage: 10Gi

//The PVC points to the required storageClassName
//as part of its requirements
The example shows a StorageClass which dynamically provisions a SSD storage from a Google Persistent Storage. The PVC refers to the class using storageClassName.
Note : In the above example, we can make the StorageClass our default storageClass by un-commenting the annotation. Any PCV not specifying a storageClassName, uses the default storageClass.
Different storage classes supported by Kubernetes
K8s provides a wide range of volume plug-ins. Here is a subset of those, categorized under different storage types.
- Node-Local storage : emptyDir(),hostPath, local
- Network File System Based Storage: NFS, cephfs, cinder
- Distributed File System Based Storage : glusterfs, quobyte
- Cloud Storage : gcePersistentDisk, awsElasticBlockStore, azureDisk, azureFile
- Cloud Native Storage Solutions : portworxVolume, storageos, flocker,scaleIO
- Special Volume Types : ConfigMap, Secret
Authorization using JWT Access Tokens
Sending your payload in a JWT Token is like sending your object in a transparent box locked with a highly secure shared key.
If someone changes your box, you wont be able to open it.
If you are able to open it, you can safely say that the object is genuine- no one has changed it on the way.
JSON Web Token (JWT) is an open standard where two parties can exchange JSON payloads in a trusted way. Both parties can trust each other on the exchanged payload because it is digitally signed using a shared secret key or a public\private key.
In this article, we will see how this trusted exchange of payload in the JWT is useful in implementing a token based authorization system. We will use a node.js based POC to understand the token generation and its verification steps. But, before that let us have a look at the authorization process.
How does the authorization process work?
The below diagram clearly shows the authentication steps, but here is a brief explanation of the same.
Generating the token:
When a user needs access to protected resources in an application server, the login process redirects him to the authorization server. After a successful verification of the credentials, the server generates an access token. The token includes the user detail in a JSON payload and a signature signed using a shared secret key.
We will discuss more on the token content and the verification mechanism later, but the signature ensures only the target server with the shared secret key will be able to verify it.
The server sends the access token to the client, so that he can store and use it multiple times.

Verifying the token:
After receiving the token, the client browser makes a request to the application server adding the token in its header.
Since, the server has the shared secret key, its able to match the signature to verify the token . Moreover, because the verification has succeeded, it uses the user detail in the payload with an assurance that no one has modified.
Thus in the process the user is able to access the resource from the application only with a digital token.
A few important points to note:
First, with this token based system, the user can have one password and trust one authorization server, to get access to so many applications.
Second, we can share the secrets or the public keys in different ways. For example, we can use same secret key for multiple applications to have sso like implementation. Or, we may choose to use separate secret keys for each one.
Third, the access tokens are safer compared to the passwords, because they have access only to specific servers. Besides this limited access, we always provide a limited validity to these tokens based on the security needs of the targeted application.
Fourth, the authentication server is just a logically different entity. It can very well be a separate module inside an application requiring token based authorization. In such cases, the first attempt to a protected resource will need your credentials whereas the subsequent attempts will use the tokens.
POC to show how the JWT tokens work
The POC demonstrates the basic concepts of generating and verifying the tokens as we have discussed above. We are using ‘jsonwebtoken‘ library for working on the tokens.
The POC has two methods :
- generateToken – Its for generating the signed access tokens which we use on the authentication server.
- verifyToken – Its for verifying and retrieving user details which we use on the client application side.
const jwt = require('jsonwebtoken');

const accessTokenSecretApp01 = 'accessToken-secret-app-01';
const accessTokenSecretApp02 = 'accessToken-secret-app-02';

const validity = '5s';

const adminUser = { "username" : 'testAdmin', "role" : "admin"};

// Generate a signed token using authenticated user detail
function generateToken(user, tokenSecret, validity){
        console.log("Token created for user:" + JSON.stringify(user));

        const jwtToken = jwt.sign({ username: user.username, role: user.role },tokenSecret, { expiresIn: validity });

        console.log("JWT token created using "+tokenSecret +":\n" + JSON.stringify(jwtToken));
        return jwtToken;
}

// Verify and retrieve the user detail using the correct secret key
function verifyToken(token, tokenSecret){
        jwt.verify(token, tokenSecret, (err, user) => {
            if (err) {
                console.error("Verified with "+tokenSecret+" :" + err);
                return;
            }
            console.log("Verified with "+tokenSecret+" :"+JSON.stringify(user));
        });
}

//Test generation and verification of the GWT access tokens
console.log("\nStep 1 : Token generation at the authentication server :\n ")
let accessToken = generateToken(adminUser, accessTokenSecretApp01, validity);

console.log("\nStep 2: Verification & user detail retrieval at the client application :\n ")
verifyToken(accessToken,accessTokenSecretApp01);
verifyToken(accessToken,accessTokenSecretApp02);
setTimeout(()=>{console.log("After expiry ........: ");
                verifyToken(accessToken,accessTokenSecretApp01);}, 10000)
To summaries, the output of the POC shows :
- After we authenticate an user, we can create an access token using his details.
- Since it is signed, only the intended applications that has the key can verify and use it. For example, the verification by the application 02 using ‘accessToken-secret-app-02’, has failed.
- Last line in the output and point 2 above shows, unlike the user id and password, these tokens carry a limited scope and have limited life period. Hence, these tokens carry a much lesser risk.
F:\stutz\jwt-auth>node jwt-access-token-poc.js

Step 1 : Token generation at the authentication server :

Token created for user:{"username":"testAdmin","role":"admin"}
JWT token created using accessToken-secret-app-01:
"eyJhbGciOiJIUzI1NiIsInR5cCI6IkpXVCJ9.eyJ1c2VybmFtZSI6InRlc3RBZG1pbiIsInJvbGUiOiJhZG1pbiIsImlhdCI6MTYwNjk1MDQ5MywiZXhwIjoxNjA2OTUwNDk4fQ.Vfr4M31jkqT5u4BqbDqNQaEtZ1Sqbwwy7zS7jw94CC0"

Step 2: Verification & user detail retrieval at the client application :

Verified with accessToken-secret-app-01 :{"username":"testAdmin","role":"admin","iat":1606950493,"exp":1606950498}
Verified with accessToken-secret-app-02 :JsonWebTokenError: invalid signature
After expiry ........:
Verified with accessToken-secret-app-01 :TokenExpiredError: jwt expired
Refresh Token – To avoid re-using credentials
As we have seen so far, we usually give a limited scope and life to our access tokens for the security reasons. The expiry time depends on our use case. And, it may vary from few minutes to several days
But, in case our usage is longer compared to these access tokens, we need to get new access tokens. Moreover, we also require separate access tokens for accessing separate systems.
To address the above needs, we can use another kind of token called refreshTokens. These are similar to the access tokens but, with a much longer lifetime. These are not meant for any other clients, but only for our authentication sever.
Instead of the credentials, we can send the refresh token to the authentication server. Then the server can verify the refresh token, for extracting the user detail and, thereby, sending us a new access token.
Understanding the Token & the Signature
If we look at the token we have generated above, it has 3 sections- Header, PayLoad and Sign, as shown below.
eyJhbGciOiJIUzI1NiIsInR5cCI6IkpXVCJ9.eyJ1c2VybmFtZSI6InRlc3RBZG1pbiIsInJvbGUiOiJhZG1pbiIsImlhdCI6MTYwNjk1MDQ5MywiZXhwIjoxNjA2OTUwNDk4fQ.Vfr4M31jkqT5u4BqbDqNQaEtZ1Sqbwwy7zS7jw94CC0
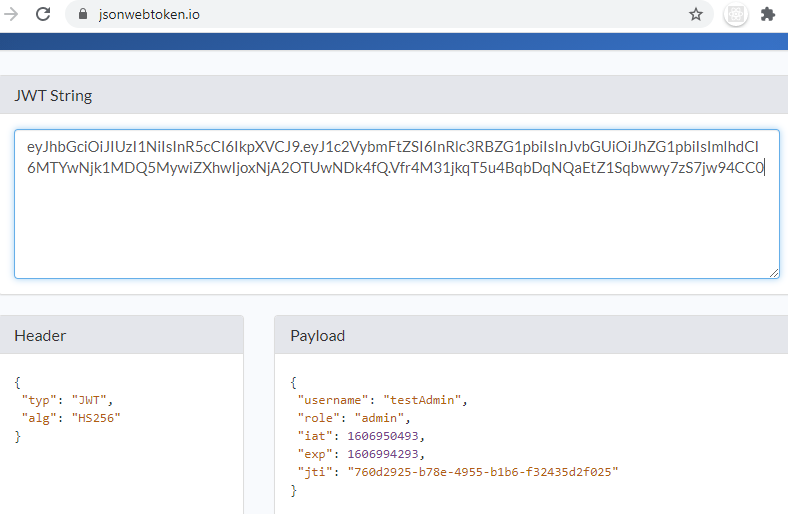
We can easily decode the content of the header and the pay load as these are Base64 encoded.
- The header contains the encryption algorithm used in the signing process.
- The payload includes the user detail, his role and usually an expiry time for the token.
But, in any case, clearly the token does not protect the content!
Why should we trust these tokens ?
These token does not protect the content but ensures it’s integrity. In other words, it ensures no one has tampered it. And, the below diagram shows how ?

As we can see the verifying server tries to re-create the signature on the message using the shared secret key. Hence, if any one tampers the message or the signature, the signatures won’t match and the verification will fail.
Again, the signature won’t match for anyone with a different key. Hence, we can not use a given access token for any server, other than the intended one.
What precaution should we take on these tokens ?
- Any one can read the payload in the token. Hence, it should not have sensitive information like our password, SSN number etc.
- We can also encrypt the token again to hide the payload.
- Even though these tokens have limited scope, any one can utilize these limited scope if stolen. Hence, the browsers or the systems those use these tokens, should ensure they store it securely.
- We should use an appropriate expiry time for these access tokens.
- The log out mechanism should discard the refreshTokens from the server side, so that no one is able reuse these refreshTokens for renewing accessTokens.
- We should also discard these refreshTokens on the server side with an appropriate expiry time.
K8s – StatefulSets
In a stateless application the instances are interchangeable, as they have the same backing state (or source of data).
Whereas in a distributed data system like kafka , cassandra, Solar, each computing node has its own data or state. Similarly, in clustered database like Redis or MySql each node has a server and its own replicated data store. When a server goes down, the replacing server has to connect to the same data replica that lost its server.
Because each instance has its unique state, we can not replace it with a new one or interchange it with any existing one. So, we only have to restore it using its backing state. Due to their unique backing states, we call them as stateful applications.
K8s allows us to deploy and manage such stateful applications using StatefulSets.
StatefulSets – How does it manage its unique instances ?
The diagram below with a MySql cluster with three instances show the various aspects of how K8s manages a StatefulSets.
As we have seen above, managing these stateful applications is all about :
- Knowing that each of its instances are unique and
- We have to restore an instance along with its backing state, if it goes down.
With this in mind let us see how the StatefulSets handle it.

Unique Instances
StatefulSets assigns an ordinal index to each set.
Since each instance is unique, the StatefulSets assigns an ordinal index(1…N) to each of them as an unique identifier. Moreover, both the POD(mysql) and the backing state(my-pvc), use this as part of their names. Thus, if the POD goes down, we can easily identify its corresponding state using the index number.
As shown above, the statefulsets creates the sets in order(0,1…N-1) when we deploy. We can make it parallel though if we need so.
Coming to the deletion, it deletes them in the reverse order when we un-deploy.
- Each POD gets a host-name of the form- $(statefulsets-name)-$(index)
- Each PVC gets its unique name of the form $(pvc-template-name)-$(index)
Stable Storage
Each instance uses a separate persistent volume.
Because the states are unique, each instance uses a separate persistent volume(PV) to maintain its state. Since the PVC-PV is a one-to-one mapping, we use a volumeClaimTemplates as shown, to dynamically create claims(PVC) for each instance.
The PVCs are shown using ‘my-pvc-0’, ‘my-pvc-1’ and ‘my-pvc-2’ in the diagram.
volumeClaimTemplates:
  - metadata:
      name: my-pvc
    spec:
      accessModes: [ "ReadWriteOnce" ]
      storageClassName: "ssd-vol-class"
      resources:
        requests:
          storage: 1Gi
As regards the PVs, we have used a StorageClass that will create the PVs dynamically for each claim as shown.
Failover Management
Its a restoration using stable host name; not a complete replacement.
When a POD, mysql-2 as shown, goes down, the StatefulSets assigns the same name to the replacing instance.
The ordinal index of the replaced POD help us find the matching PVC, here it is my-pvc-2.
Moreover, since we re-use the host name of the failing POD, the stable host name makes the replacement transparent for it’s client. Thus, the instance gets restored with its hostname as well as backing state .
Note : In the our example, the default ordered creation of the instances is fine, as we do not want every instance to replicate from the master. Using ordered creation, each new instance will replicate its database from it previous instance.
In case, such dependencies are not there, we can opt for parallel instantiation as well using,
podManagementPolicy: Parallel
Services to Access the Satefulsets
HeadlessService
For getting separate service url for each instance.
Since the instances are unique, there are many cases where we might need to access a particular instance. For instance, we would like to access the master instance for our write transactions.
We can use the headless service for getting separate urls to meet such requirements.
- It creates a service domain as follows : (assuming, Namespace = p1-dev, Headless Service Name=mysqlservice)
- $(service-name).$(namespace).svc.cluster.local
- mysqlservice.p1-dev.svc.cluster.local
- Each POD gets a sub-domain of the form : $(pod-name).$(service-domain)
- mysql-0.mysqlservice.p1-dev.svc.cluster.local
- mysql-1.mysqlservice.p1-dev.svc.cluster.local and
- mysql-2.mysqlservice.p1-dev.svc.cluster.local gets created as shown in the diagram
- These service sub-domain names allows us to target individual PODs.
ClusterService
Use it for getting single load balanced service to access a cluster
For example, we would require load-balanced service for our read-only access. For such cases, we can deploy cluster services for getting single load-balanced urls.
K8s – Namespace
A Namespace enables us to divide the physical cluster of servers into multiple virtual clusters as shown below.

When 22 players are running around on the same field, how do we watch them? The first thing we do is to group them using there colorful jerseys.
In a similar way, these virtual clusters group the project specific objects spread all over cluster of servers using their namespace attribute values.
So, all objects in the cluster with the same namespace value fall into one virtual cluster. They are visible to each other and can access each other. But, objects with different namespace values stay independent of each other.
Thus the namespace, allows us to share the physical cluster with multiple teams, projects and environments by creating virtual clusters.
Default K8s Namespaces
$ kubectl get namespace
NAME                STATUS   AGE
default             Active   2m36s
kube-node-lease     Active   2m37s
kube-public         Active   2m37s
kube-system         Active   2m37s
The list above shows the Namespaces that a K8s the cluster has by default .
- default : It is the default namespace assigned to the deployed objects by K8s when we deploy a namespaced object without specifying a namespace.
- kube-system : Kubernetes uses this for creating its own objects.
- kube-public : Its the Namespace accessible to all users. We can use this for keeping shared object available to all the clusters.
- kube-node-release : It is used for the lease objects associated with each node that improves the performance of the node heartbeats as the cluster scales.
Creating and using a Namespace
Create a Namespace
apiVersion: v1
kind: Namespace
metadata:
 name: demo-project-dev
The .yaml above, shows a Namespace API object that we will use for creating a dev environment for our demo-project.
We can deploy this .yaml using apply command or, as an alternative, we use the create [namespace] command as shown :
$ kubectl apply -f demo-project-dev.yaml

namespace/demo-project-dev created

//We can use this as an alternative to the above command
$ kubectl create namespace demo-project-dev
As we retrieve all our namespace, we can now see our newly added demo-project-dev environment, ready for use.
$ kubectl get namespace
NAME                STATUS   AGE
default             Active   2m36s
demo-project-dev    Active   52s
kube-node-lease     Active   2m37s
kube-public         Active   2m37s
kube-system         Active   2m37s
Deploy an Application & Verify its Scope
K8s uses namespace attribute to logically group objects in a namespace.
Let us deploy a hello-app from google sample project, into the default and demo-project-dev namespace.
When we deploy something without specifying the namespace, K8s deploys that to default namespace. Hence, for deploying into ‘demo-project-dev’ namespace, we will have to specify the namespace explicitly as shown.
# Deploy into default namespace
kubectl create deployment hello --image=gcr.io/google-samples/hello-app:1.0

# Deploy into demo-project namespace (-n demo-project-dev)
kubectl create deployment hello  --image=gcr.io/google-samples/hello-app:1.0 -n demo-project
As we retrieve the pods using get pod command from both the namespaces, we can clearly observer the following things:
- We have two separate PODs as they have their own names and ips.
- As each namespace shows its own pod instance, it confirms that an object belonging to a namespace is not visible to the other namespaces.
- We can also see how K8s has assigned the Namespace attribute to each of these instances for grouping them into their namespaces.
$ kubectl get pod -o wide
NAME                     READY   STATUS    RESTARTS   AGE   IP           NODE       NOMINATED NODE   READINESS GATES
hello-6649fc6cf7-jlv96   1/1     Running   0          47m   172.18.0.4   minikube   <none>           <none>

$ kubectl describe pod |head -2
Name:         hello-6649fc6cf7-jlv96
Namespace:    default    #This attribute helps in grouping objects in a namespace
$ kubectl get pod -n demo-project-dev -o wide
NAME                     READY   STATUS    RESTARTS   AGE     IP           NODE       NOMINATED NODE   READINESS GATES
hello-6649fc6cf7-tk7bs   1/1     Running   0          2m15s   172.18.0.5   minikube   <none>           <none>

$ kubectl describe pod -n demo-project-dev |head -2
Name:         hello-6649fc6cf7-tk7bs
Namespace:    demo-project-dev
As each namespace hold their own set of objects in a separate scope, it enables us to create multiple projects on the shared servers.
Namespaced vs Non-Namespaced Objects.
All API objects do not belong to a namespace, as some are shared across the projects.
K8s categorizes the objects which always belong to a specific project as namespaced objects and assigns a namespace value when they are deployed. Thus, we confine their visibility only to the assigned namespace.
On the other hand, some objects are shared across multiple projects and, hence, they do not have a namespace value. As a result, we can access them from any namespace.
Below are few example showing the objects of both the types.

We can use the following commands to get the complete list of the namespaced and non-namespaced objects.
#To get all Namespace objects
kubectl api-resources --namespaced=true

# To get all Non-namespace objects
kubectl api-resources --namespaced=false
$ kubectl api-resources --namespaced=true
NAME                        SHORTNAMES   APIGROUP                    NAMESPACED   KIND
bindings                                                             true         Binding
configmaps                  cm                                       true         ConfigMap
endpoints                   ep                                       true         Endpoints
events                      ev                                       true         Event
limitranges                 limits                                   true         LimitRange
persistentvolumeclaims      pvc                                      true         PersistentVolumeClaim
pods                        po                                       true         Pod
podtemplates                                                         true         PodTemplate
replicationcontrollers      rc                                       true         ReplicationController
resourcequotas              quota                                    true         ResourceQuota
secrets                                                              true         Secret
serviceaccounts             sa                                       true         ServiceAccount
services                    svc                                      true         Service
controllerrevisions                      apps                        true         ControllerRevision
daemonsets                  ds           apps                        true         DaemonSet
deployments                 deploy       apps                        true         Deployment
replicasets                 rs           apps                        true         ReplicaSet
statefulsets                sts          apps                        true         StatefulSet
localsubjectaccessreviews                authorization.k8s.io        true         LocalSubjectAccessReview
horizontalpodautoscalers    hpa          autoscaling                 true         HorizontalPodAutoscaler
cronjobs                    cj           batch                       true         CronJob
jobs                                     batch                       true         Job
leases                                   coordination.k8s.io         true         Lease
endpointslices                           discovery.k8s.io            true         EndpointSlice
events                      ev           events.k8s.io               true         Event
ingresses                   ing          extensions                  true         Ingress
ingresses                   ing          networking.k8s.io           true         Ingress
networkpolicies             netpol       networking.k8s.io           true         NetworkPolicy
poddisruptionbudgets        pdb          policy                      true         PodDisruptionBudget
rolebindings                             rbac.authorization.k8s.io   true         RoleBinding
roles                                    rbac.authorization.k8s.io   true         Role
$ kubectl api-resources --namespaced=false
NAME                              SHORTNAMES   APIGROUP                       NAMESPACED   KIND
componentstatuses                 cs                                          false        ComponentStatus
namespaces                        ns                                          false        Namespace
nodes                             no                                          false        Node
persistentvolumes                 pv                                          false        PersistentVolume
mutatingwebhookconfigurations                  admissionregistration.k8s.io   false        MutatingWebhookConfiguration
validatingwebhookconfigurations                admissionregistration.k8s.io   false        ValidatingWebhookConfiguration
customresourcedefinitions         crd,crds     apiextensions.k8s.io           false        CustomResourceDefinition
apiservices                                    apiregistration.k8s.io         false        APIService
tokenreviews                                   authentication.k8s.io          false        TokenReview
selfsubjectaccessreviews                       authorization.k8s.io           false        SelfSubjectAccessReview
selfsubjectrulesreviews                        authorization.k8s.io           false        SelfSubjectRulesReview
subjectaccessreviews                           authorization.k8s.io           false        SubjectAccessReview
certificatesigningrequests        csr          certificates.k8s.io            false        CertificateSigningRequest
runtimeclasses                                 node.k8s.io                    false        RuntimeClass
podsecuritypolicies               psp          policy                         false        PodSecurityPolicy
clusterrolebindings                            rbac.authorization.k8s.io      false        ClusterRoleBinding
clusterroles                                   rbac.authorization.k8s.io      false        ClusterRole
priorityclasses                   pc           scheduling.k8s.io              false        PriorityClass
csidrivers                                     storage.k8s.io                 false        CSIDriver
csinodes                                       storage.k8s.io                 false        CSINode
storageclasses                    sc           storage.k8s.io                 false        StorageClass
volumeattachments                              storage.k8s.io                 false        VolumeAttachment
One important point to notice here is the namespace object. Even though it forms the boundary of a project, we do not categorize it as a namespaced object.
This is because, if we categorize it as a namespaced object we can not view it from other namespaces. Thus, we can never list the all of the namespaces from any namespace.
Finalizers in Namespace
Useful for making any specialized cleanups of resources when we delete the namspace.
We have used the following command to fetch our dev project.
kubectl get namespace my-project-dev -o yaml
As we can see, K8s has add a default task under sepec.finalizers. When we delete our namespace, this will do a regular clean up for the Namespace.
If we need to do any special clean up, we can add our own finalizes in our Namespace definition files.
The namespace as stored in K8s cluster:
apiVersion: v1
kind: Namespace
metadata:
  name: my-project-dev
  #few metadata cleaned up for clarity purpose
spec:
  finalizers:
  - kubernetes
status:
  phase: Active
Using Context to Switch the Default Namespace
In kubectl, the current context decides the namespace it points to by default.
While working on kubectl, if we do not specify a namespace, K8s deploys our objects into the default namespace.
This is because, by default kubectl points to a context that does not point to any namespace. And, as a result, it uses the default namespace.
The following command shows this in a minikube installation as an example:
$ kubectl config view
apiVersion: v1
clusters:
- cluster:
    certificate-authority: /root/.minikube/ca.crt
    server: https://160.74.10.56:8443
  name: minikube
contexts:
- context:           # This context does not point to any namespace and, hence, points to default namespace
    cluster: minikube
    user: minikube
  name: minikube
current-context: minikube
For making any desired namespace our default namespace, we can follow the below 2 steps.
Step 1 : Add a new context
Add a new context, dev that points to our namespace, demo-project-dev .
//Create a context using set-context
$ kubectl config set-context dev --namespace=demo-project-dev --cluster=minikube --user=minikube
Context "dev" created.

//Verify the context using get-contex
$ kubectl config get-contexts dev
CURRENT   NAME   CLUSTER    AUTHINFO   NAMESPACE
          dev    minikube   minikube   demo-project-dev
Step 2 : Switch to the new context
Switch to ‘dev’ context using ‘use-context’, to make ‘demo-project-dev’ as our default namespace.
//The command to switch to a new context
$ kubectl config use-context dev
Switched to context "dev".

//Command to verify current context
$ kubectl config current-context
dev
How to use Namespace for organizing our projects?
We use the namespace for creating projects and environments. The diagram shows a typical way to organize our projects :

- Use separate namespaces for creating separate projects & environments
- Use separate namespaces for deploying the shared tools & applications
- e.g. shared database, auditing , monitoring, reporting applications
Conclusion
Namespaces allows us to share our physical clusters with multiple teams, projects and environments.
The shared servers in K8s comes with many advantages. First of all it minimizes our provisioning hassles. Being shared, it enhances resource utilization, reduces the administration cost and provides a better fail-over handling.
Shared Server Space Demands Proper Resource Allocation.
With projects of different priorities and criticality, it is important to have a proper resource allocation at our project levels. Without such plans, our low priority environments may consume all our resources. And, make the critical production clusters starving.
Apart from cluster level allocation, we may need allocations within the cluster as well. We need to manage CPU, memory, storage usages and leaks, inside and out side our clusters.
We can use a mix of options like Admission Control Mechanism, ResourceQuota, LimitRange ect to put these checks at appropriate levels.
Shared Server Space Demands Proper Access Control.
The other important part is to have a proper access control policy in place. With multiple teams sharing the workspace, there can be many intentional or unintentional activities across projects. We have to make sure we manage this as well.
Kubernetes – Architecture
The Kubernetes cluster architecture mainly consists of a Master and a set of Worker nodes. The Master is the controlling node. It is responsible for managing the cluster and distributing the tasks to the worker nodes. The worker nodes execute their assigned tasks and send regular status updates back to the master node, enabling the master to monitor.
Before we get into the components of the cluster in more detail, let us have a quick look at the kind of requirements they would be managing. And, the add on components that K8s provide for interacting with it and sending the requirements.
K8s Dashboad and the Kubectl
The K8s dashboad and the Kubectl are two add-on components. The dashboard is a web based utility tool and, mainly useful for monitoring various runtime objects in the K8s cluster.
The Kubectl is a command line utility. Its a key tool for interacting with the K8s master.
Both of these tools talk to the K8s master through its REST API service which is shown as API Server component in the diagram.

Kube API Objects – The requirement templates
K8s comes with a flexible design to manage our servers, environments, applications, deployments, services and the other deployment related stuffs, as separate entities.
And, it allows us to build our requirements by configuring these entities in its .yaml templates called the Kube API Objects. Some of these entities are simple and some are complex, referring to several other entities.
Below are some examples of these API objects. It includes a sample for creating a project environment. The second one is for deploying my-app. And, the last one is for exposing the deployed instances as a service.
The comments added there, specify the kind of instructions it provides to Kubernetes.
apiVersion: v1
kind: Namespace          #Hi K8s, I need a new environment( Namespace object )
metadata:
 name: my-project-dev    #Name it as my-project-dev
apiVersion: apps/v1
kind: Deployment              #Please create a deployment object for my-app
metadata:
  name: my-app-deployment     #Use this as the name of the object
spec:
  replicas: 3          #Create 3 instances of my application
  selector:            #And, use this selector to keep track of these instances.
   matchLabels:        #Track instances whose label match to - 'app: my-app'
    app: my-app
  template:            #This template provides you the specification of the instances I need
   metadata:
    labels:            #Assign these labels to my instances
     app: my-app
   spec:
    containers:
    - name: echo-container
      image: k8s.gcr.io/echoserver:1.4 #This is the IMAGE you need to deploy for creating my application instance
      ports:
      - containerPort: 8080            #Open http port on 8080

#Please use these instructions for now, I will update this
#and send you for a re-deployment when I am ready with my next version!
apiVersion: v1
kind: Service             #Please create a service
metadata:
  name: my-app-service    #Name it as my-app-service
spec:
  selector:
    app: my-app           #Select all application instances with label - 'app: my-app'
  ports:
    - protocol: http
      port: 80            #Expose this service on port 80
      targetPort: 8080    #Point to my application instances on port 8080 .
                          #These are running at separate virtual IPs as assigned to their containing PODs. I know you know it 🙂
Now having seen how the requirements look like, let us look at the components in the Master and the Worker nodes. And, how they work together to fulfill these user requirements.
K8s Master – Creates & Monitors our System
We also refer to this as the Control Plane.
As we send our requirement to the K8s cluster, the Master node acts as the main contractor responsible to fulfill our requirements.
It divides the contract and distributes it among several worker nodes. The worker nodes work on their assigned part and keep updating their status to the master. The regular update of the status enables the Master to monitor its contract. And, in case a worker node fails to run its assigned load, the corresponding controller initiates the steps to re-assign that a different node.
The following diagram shows how the Master & Worker nodes work in a feedback loop to keep the desired and actual system in sync.

The key components inside the Master are – controllers , scheduler , ETCD database & Kube API server
Kube API Server
It’s the RESTful service interface for the master for all its communication.
This is the interface for the master node to interact with the worker nodes and the outside world.
For example, the kubectl – command line tool, kubernetes dashboard, kubelet – on the worker nodes all interact with the master through this interface.
Controllers
The components holding the automation logic to fulfil our requests.
K8s has several controller. Each of them fulfil the requirement coming in a specific API object. The list below shows some of the key controllers in K8s.
- Node Controller
- Deployment Controller
- Replication Controller
- Job Controller
- Ingress Controller
- Service Controller
- EndPoints Controller
- StatefulSets Controller
The controllers carry the automation logics. They understand how to monitor and fulfil requirements corresponding to their API objects. For instance,
- A JobController fulfills the requirement coming in API objects of kind Job. It understands how to run the specified number of worker PODs in sequence or in parallel till its completion.
- A DeploymentController handles API objects of kind Deployment. It knows how to monitor and ensure all of the the specified number of application instances are up and running.
Scheduler
Its’ like a facility manager responsible for optimizing the resource utilization across the nodes.
As we try to instantiate a Pod, the K8s hands it over to the scheduler to find a suitable node. The scheduler then starts a evaluation process taking into account so many built-in policies.
These policies evaluates the needs of the POD like the memory needs, CPU needs, the priority etc. And, it checks these needs, against the things like resource availability, resource distribution across the nodes. The selection of an optimal node is basically a two step process as below:
- Filtering : It is the process of figuring out the eligible nodes, to identify the options.
- Scoring : Its the process of ranking the eligible nodes to figure out the optimal ones.
ETCD
It’s the reference for both the desired state and the actual state of the K8s cluster.
ETCD is a consistent and highly-available key value store. Its the central store for various configurations related to the clusters, the nodes and the deployed applications.
Apart from this, we uses this to store the incoming API objects which describes the desired states. And, it also stores the status updates from various worker nodes which tell us about the actual state across the cluster. Hence, the ETCD acts as the single source of truth for the the schedulers and controllers for their monitoring purpose.
Moreover, this database is also useful for the restoration purpose in case of a cluster wide crash. Hence, it is important for us to take its scheduled backups if we are using it for our production servers.
Nodes – Builds and provides status on the assigned tasks
K8s cluster usually has multiple worker nodes to deploy its workloads. The Node Controller on the Master is responsible for monitoring the health of these Nodes.
As discussed above, the master is responsible for distributing the workload among the worker nodes. The distribution mainly happens as the scheduler distributes the new Pod instances.
Each node creates and manage the assigned Pods. As part of managing the work loads, the node keep updating the status to the master node. In turn, this helps the corresponding controller to monitor and take necessary action to handle failures.

The key components of a node includes – a kubelet, a kube-proxy and the container runtime as shown.
Kubelet
The primary ‘node agent’ managing the key run time activities of the node
Its the key agent that carries out a number of activities to manages local Pods, containers, node and provides their status to the master.
Create, monitor and update POD health : The agent ensure the Pod and its containers on the node are running healthy and as per their specifications. It manages their local fail-over restarts and updates their availability to the control panel.
Monitor and update Node status : Provides key status updates on the resource availability and health of the nodes.
Activities are Configurable : We configure the agent’s activities when start the node server. Besides this, K8s also allows us to dynamically change these configurations using KubeletConfiguration objects .
The examples of some supported configurations are like:
- fileCheckFrequency : Tells how often to check for any update in the configmaps used by the pods and others.
- nodeStatusUpdateFrequency : how often kubelet posts node status to master
- volumeStatsAggPeriod : Specifies interval for kubelet to calculate and cache the volume disk usage for all pods and volumes
kube-proxy
Its the network proxy managing the service concept
Its a network proxy which manages the cluster IPs and network routing rules.
The virtual network implemented through kube-proxy, greatly simplifies the network routing in setting up application services. It helps us avoid a lot of fire wall request, IP and port dependencies that we face in traditional development environments.
Container Runtime
This is the place where we instantiate the application instances using its images.
K8s supports multiple container runtime. Apart from Docker, it supports CRI-O, Containerd and frakti etc.
NodeJS- Child Process & Worker Threads
A Node.js is very efficient in handling data intensive calls involving lots of IO calls and minimal cpu processing. But, being a single threaded model, any cpu intensive tasks can block it longer; affecting the response time for the other concurrent tasks.
Some examples of such cpu intesive calls could be complex mathematical calculations, parsing long JSON or scrip file. It could be some image or video processing, running batch job and so on. The multi-threaded applications do have a clear advantage in such scenarios. When one thread is busy handling a heavy computational task, the other ones can still proceed with the other request.
Nodejs Options for CPU Intensive Tasks
In case of Node.js, we only had the option of creating a child process, a new Nodejs instance, for running something in parallel. Though it runs independently with its own thread and event loop, creation of a new instance is expensive both in terms of time and memory requirement. In fact, these child processes are whole new instances of V8 with independent pid and io streams(stdin, stdout, stderr).
The only other option to handle the expensive cpu centric operation within Nodejs was to carefully break the tasks into smaller parts and execute it in multiple event-loops. Of course not a generic or a straight forward approach.
Hence, in version 10.5.0, Nodejs introduced the concept of worker threads, for making an independent and parallel processing much lighter. This was similar to the multi-thread model, creating new threads in the same Nodejs instance. Importantly, these threads use their separate event loops in order to work completely independent of the parent thread.
The below diagram summarizes the difference between the worker threads and the child process as discussed above.

As we will notice below, the implementation for both of these options are very similar. Whereas the child process will be useful in long running parallel processes like running scripts, batch jobs; the lighter worker threads will be very useful in handling smaller computational tasks within a request. For example, the tasks like parsing long JSON files, carrying out complex calculations etc.
However, both being expensive we should always plan to re-use them using a pool for our frequently repeated usage.
Below are the sample code for these child process and worker thread showing how they run independently from the main threads.
Demos on using worker threads and child processes
1. Running Programs using Child Process – fork()
The child_process.fork() method is a special case of child_process.spawn() used specifically to spawn new Node.js processes. The returned ChildProcess supports an additional IPC channel to allows messages communication between the parent and child.
In the following example, the child-process.js contains a mock cpu intensive task, with a configurable response time. The parent program creates the child process using child_process.fork() and passes the input using send() method.
const { spawn, fork } = require('child_process');

function callChildProcess(){
  const childProcess = fork('child-process.js');

  //Set a on-message handler to receive the outcome
  childProcess.on('message', (result) => {
        console.log(`Outcome : ${result}`);
        childProcess.kill('SIGTERM');
  });
  childProcess.on('close', (code) => {
        console.log(`child process exited with code ${code}`);
  });

  //Call the childProcess - for a cpu intensive task taking 5000ms.
  childProcess.send({"command" : "SLEEP", "responseTime" : 5000});
}

callChildProcess();
setTimeout(()=>{console.log("\nTest Parent Event-Loop :cpuIntensiveTask in child process does not block this event in parent process!")}
          ,1000);
function cpuIntensiveTask(responseTime){
  console.log("cpuIntensiveTask started......")
  let startTime=Date.now();
  while(Date.now()-startTime<responseTime){}
  console.log("cpuIntensiveTask completed in :" + (Date.now()-startTime) +" ms.")
  return (Date.now()-startTime);
}

process.on('message', (message) => {
  console.log(message);
  if(message.command=='SLEEP'){
    setTimeout(()=>{console.log("\nTest Child process Event-Loop :cpuIntensiveTask in child process blocks this event in child thread!")}
              ,1000);

    const result = cpuIntensiveTask(message.responseTime);
    process.send("Completed in :"+ result +" ms.");
  }
});
If we look at the output, even though the tasks in child process takes 5sec, it does not block the events in the main process.
The child process runs separately without blocking the events in parent process. But, it blocks a similar event set to trigger at the same time inside the child process.
F:\nodejs\samples\childprocess>node main-process.js
{ command: 'SLEEP', responseTime: 5000 }
cpuIntensiveTask started......

Test Parent Event-Loop :cpuIntensiveTask in child process  does not block this event in parent process!
cpuIntensiveTask completed in :5000 ms.
Outcome : Completed in :5000 ms.

Test Child process Event-Loop :cpuIntensiveTask in child process blocks this event in child thread!
child process exited with code null
2. Running Programs using Worker Threads
As discussed, whereas the fork() in child-process spawns out a separate NodeJs process, the worker_threads creates a new thread in the existing NodeJs process with a separate event loop. Therefore, the worker threads are independent but, lighter compared to the child process.
The structure of the interaction is very similar to one the child process. The parent and the child threads both send message using postMessage() and receive it using on-message event handler as shown:
const { Worker } = require('worker_threads');

function callWorkerThread(){
  const worker = new Worker('./worker-thread.js');

  //Set worker thread event handlers
  worker.on('message', (result) => {
        console.log(`Outcome in Parent Thread : ${result}`);

        //Delaying the termination of the worker for testing event set in inside it.
        setTimeout(()=>{worker.terminate();},500);
  });

  worker.on('exit', (code) => {
        console.log(`worker exited with code ${code}`);
  });

  //Post message to the worker thread.
  worker.postMessage({"command" : "SLEEP", "responseTime" : 5000});
}

callWorkerThread();
setTimeout(()=>{console.log("\nTest Parent Event-Loop :cpuIntensiveTask in child thread does not block this event in parent thread!")}
          ,1000);
const { parentPort } = require('worker_threads');

function cpuIntensiveTask(responseTime){
  console.log("cpuIntensiveTask started......")
  let startTime=Date.now();
  while(Date.now()-startTime<responseTime){}
  console.log("cpuIntensiveTask completed in :" + (Date.now()-startTime) +" ms.")
  return (Date.now()-startTime);
}


parentPort.on('message', (message) => {
  console.log(message);
  if(message.command=='SLEEP'){
    setTimeout(()=>{console.log("\nTest Child Event-Loop :cpuIntensiveTask in child thread blocks this event in child thread!")}
              ,1000);
    const result = cpuIntensiveTask(message.responseTime);
    parentPort.postMessage("Completed in :"+ result +" ms.");
  }
});
Below is the output when we run the parent.js. When we compare it with the one in our child process test above, the threads and their event loop both are independent. But, if we look at line-6, it shows the console output from child thread got delayed. It’s because it shares the same io stream used by the Nodejs process along with the main thread.
F:\nodejs\samples\childprocess>node 20-parent-thread.js
{ command: 'SLEEP', responseTime: 5000 }

Test Parent Event-Loop :cpuIntensiveTask in child thread does not block this event in parent thread!
Outcome in Parent Thread : Completed in :5000 ms.
cpuIntensiveTask started......
cpuIntensiveTask completed in :5000 ms.

Test Child Event-Loop :cpuIntensiveTask in child thread blocks this event in child thread!
worker exited with code 1
3. Running Scripts using Child Process – exec()
The child_process.exec() that extends the child_process.spawn() , spawns a new shell for executing specified command. This is useful in automating script from Node.js programs.
The sample program shows the callback and promise-async versions running a simple command. We can replace that with other OS specific commands or the scripts we want to automate.
The stdout and stderr arguments passed to the callback contains the stdout and stderr output of the child process.
const { exec } = require('child_process');

let child = exec('node -v', (error, stdout, stderr) => {
  if (error) {
    console.error(`exec error: ${error}`);
    return;
  }
  console.log(`stdout: ${stdout}`);
  console.error(`stderr: ${stderr}`);
});

child.on('exit', (code) => {
  console.log(`Child exited with code ${code}`);
});


//Output
F:\nodejs\samples\childprocess>node exec-command.js
Child exited with code 0
stdout: v12.18.3

stderr:
const util = require('util');
const exec = util.promisify(require('child_process').exec);

async function promiseExec() {
  const { stdout, stderr } = await exec('node --version');
  console.log('stdout:', stdout);
  console.error('stderr:', stderr);
}
promiseExec();
