
GoF Design Patterns – How to learn them with ease?
The design patterns are the standard, re-usable solution approach for commonly occurring software design problems. Since they are tried and tested solutions based on the design best practices, they provide a safe guide to design our systems the right way.
The Object Oriented Programming is all about creating the objects, building the features and integrating them together to build our solutions.
However, the problem is that we can build and integrate these components in multiple ways. But, if we use this flexibility without a though, we will end up with a chaos. Then, even a simple solution can pose nightmares to build, maintain and enhance.
Fortunately, even if the objects differ, the features change, there are many aspects which keep repeating. For instance, the complexity of the objects, relationship between the objects. Similarly, the compatibility issues during their integration. Also, the way to organize the common and specific features. The design patterns come in handy as they provide tried and tested solutions for such repeating problems.
GoF Design Patterns
The famous Gang of Four (GoF) design pattern was published way back in 90’s. It consists of 23 basic patterns, covering the 3 important aspects of our design as mentioned below :
- Creational Design Patterns – Focuses on the ease of creating the objects.
- Structural Design Patterns – Guides us on effective ways to integrate the components for the client usage.
- Behavioral Design Patterns – Focuses on systematically building the features.
The “Gang of Four” refers to the four authors of the book – Erich Gamma, Richard Helm, Ralph Johnson, and John Vlissides. The name of the book is “Design Patterns : Elements of Reusable Object-Oriented Software”.
Learning them with ease with the Bigger Pictures
The first thing to understand is the significance of the 3 main categories of these patterns.
These categories divides the complexities into 3 key aspects of our design. As a result, we can focus on the creation of objects, development of features and the concerns of integration separately. This greatly simplifies our design compared to when they are mixed up. In other words, it helps us to create flexible, reusable objects and features which are easy to integrate.
Secondly, the patterns in each category divides its problem domain into few complementary concerns.
Even though they address complementary concerns, these patterns often look similar and confusing. Hence, its always important to view these related patterns together in a bigger picture.
Finally, these patterns provide generic approach where we can suitably customize our implementations. Hence, more than the concrete implementations, our focus should be on their use cases and the solution approach. More specifically on when, why and how to use?
In this article, we will look at those bigger pictures that connects these patterns with their use cases. We will look at them in more detail in separate articles.
Creational Patterns
These patterns hide the complexities of the object creation, so that the clients can create them with ease.
Removing the complexities of the object creation, also help the clients focus more on their usage and simplify building of the features.
For example, a client can use a factory to generalize its business logic. With a simple generalized logic, the client can work on a long list of similar components without depending on any of them.
The diagram below shows the various creational patterns and their usage.

Structural Patterns
Structural Design Patterns guides us on how to structure a re-usable component so that it is easy to integrate, efficient and flexible.
Say, we are building a reusable component. When a client wants to use it, there can be various types of challenges or expectations during their integration. The diagram below summarizes them along with the corresponding GoF structural pattern as its solution.

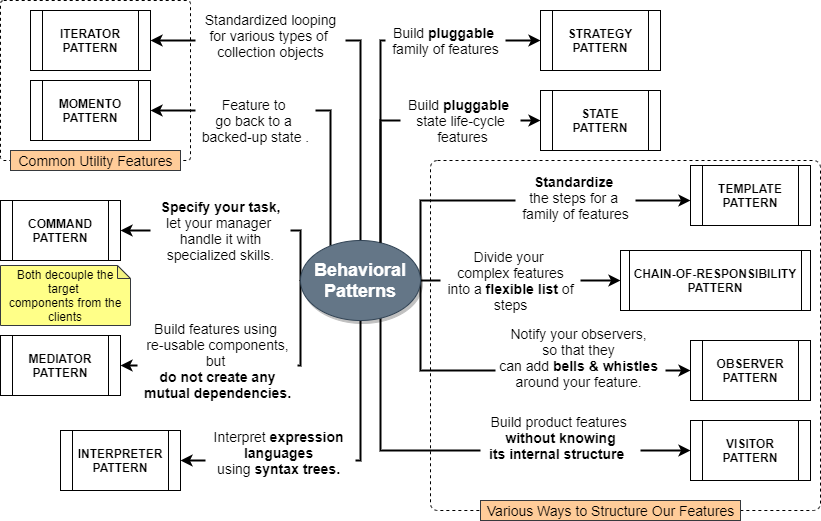
Behavioral Patterns
As shown below, these patterns focus on various ways of adding features ensuring its flexibility and maintainability.
State Design Pattern
For an object with multiple states, each state has it’s own specific behavior.
The state pattern just plugs in the required state behavior; as the object moves from one state to the other.
This is a behavioral design pattern that helps us design the state lifecycles in a clean and flexible way.
Its very similar to the strategy pattern as we build the lifecycle features using composition. For each state in the lifecycle, it allows us to group the related actions as pluggable components. When the object moves between lifecycle states, the pattern helps us plug in the appropriate state behavior of the object.
To make it clear, let us look at it with an example.
How does the pattern work?
State Requirements
Consider a simple document lifecycle. Lets say it goes from draft, review to approved state as shown.

Design using State Pattern
As shown above, the document has 3 states and 5 state dependent features.
One way to implement these state specific operations is to check for the current state within the operations as shown below in option-1.

The option-2 shows how can we design this using state pattern.
- Instead of conditional checks for the states as in option-1, we can group the state specific actions for these operations in a separate class. For example, DraftState will have all actions related to draft state.
- Then, instead of the state as a status, we can inject these state specific behavior so that the operations behave as per the injected state.
For example, while in draft state we can inject the DraftState as the state. As shown under option-2.x, the edit() operation in DraftState will allow us to open the document in edit mode. However, the same edit() will throw exception when we move to any other state.
What advantages do we get ?
- When we have a number of states, we can manage the state specific behaviors separately, in a cleaner way.
- Addition, removal or replacements of these state behaviors is much easier, as we only have to touch the state specific files those change.
- It will help us the do away with the conditional cases distributed across the features for our multiple states.
Demo Implementation
The code below shows what we have discussed so far.
package spectutz.dp.behavior.state.doc;
import spectutz.dp.behavior.state.doc.state.DraftState;
import spectutz.dp.behavior.state.doc.state.IState;

public class Document {
	private IState state;
	private String name;


	public Document(String name) {
		this.name =name;
		System.out.println("\nDocument created in : Draft state.");

		this.state= new DraftState();
	}
	public void setState(IState state) {
		System.out.println("\nDocument state set to : "+state.getClass().getSimpleName());
		this.state = state;
	}

	public void open() {
		this.state.open(this);
	}
	public void edit() {
		this.state.edit(this);
	}
	public void submitForReview() {
		this.state.submitForReview(this);
	}
	public void addReview() {
		this.state.addReview(this);
	}
	public void submitApproval(boolean isApproved) {
		this.state.submitApproval(this, isApproved);
	}

}
package spectutz.dp.behavior.state.doc.state;
import spectutz.dp.behavior.state.doc.Document;

public interface IState {

	public void open(Document doc);

	//Allowed only in draft state
	public void edit(Document doc);
	public void submitForReview(Document doc);

	//Allowed only in review state
	public void addReview(Document doc);
	public void submitApproval(Document doc,boolean isApproved);

}
package spectutz.dp.behavior.state.doc.state;
import spectutz.dp.behavior.state.doc.Document;

public  abstract class AbstractState implements IState{


	public void open(Document doc) {
		System.out.println("Document opened in read-only mode.");
	}

	public void edit(Document doc) {
		System.out.println("Sorry, the current state does not allow edit.");
	}

	public void submitForReview(Document doc){
		System.out.println("Sorry, the current state does not allow submitting for review.");
	}

	public void addReview(Document doc){
		System.out.println("Sorry, the current state does not allow adding review.");
	}

	public void submitApproval(Document doc, boolean isApproved) {
		System.out.println("Sorry, the current state does not accept approval.");
	}


	//Note :
	// 1. We can add appropriate business exceptions where we do not allow an operation.
	//  Just to keep it simple we have used sops instead.
	// 2. Other conditions like document owner, reviewer checks has been omitted for brevity.

	// The goal here is to have separate implementation class for each state,
	// this abstract class being the place for default implementations.
}
package spectutz.dp.behavior.state.doc.state;
import spectutz.dp.behavior.state.doc.Document;

public class DraftState extends AbstractState{

	@Override
	public void edit(Document doc) {
		System.out.println("Document opened in edit mode.");
	}

	@Override
	public void submitForReview(Document doc){
		doc.setState(new ReviewState());
		System.out.println("Document submitted for review.");
	}
}
package spectutz.dp.behavior.state.doc.state;
import spectutz.dp.behavior.state.doc.Document;

class ReviewState extends AbstractState{

	@Override
	public void addReview(Document doc){
		System.out.println("Review added successfully.");
	}

	@Override
	public void submitApproval(Document doc, boolean isApproved) {
		if(isApproved) {
			doc.setState(new ApprovedState());
			System.out.println("Approved: Document state changed to Approved mode.");
		}else {
			doc.setState(new DraftState());
			System.out.println("Send for Rework: Document state changed to Draft mode.");
		}
	}
}
package spectutz.dp.behavior.state.doc.state;

class ApprovedState extends AbstractState{
// Uses the default implementations
}
When the document moves from one state to the other, the implementation assigns the corresponding state behavior to its state variable.
Hence, as we can see in the output, the same operations behaves differently as per the state table given above.
package spectutz.dp.behavior.state;
import spectutz.dp.behavior.state.doc.Document;

public class DocumentSateDemo{
	public static void main(String[] args) {
		Document requiremetsDoc = new Document("StarWarGame");


		requiremetsDoc.edit();
		requiremetsDoc.submitApproval(true);

		requiremetsDoc.submitForReview();
		requiremetsDoc.addReview();
		requiremetsDoc.edit();

		requiremetsDoc.submitApproval(false);
		requiremetsDoc.edit();

		requiremetsDoc.submitForReview();
		requiremetsDoc.addReview();

		requiremetsDoc.submitApproval(true);
		requiremetsDoc.edit();


	}
}
// ----Console output---- //
/*
Document created in : Draft state.
Document opened in edit mode.
Sorry, the current state does not accept approval.

Document state set to : ReviewState
Document submitted for review.
Review added successfully.
Sorry, the current state does not allow edit.

Document state set to : DraftState
Send for Rework: Document state changed to Draft mode.
Document opened in edit mode.

Document state set to : ReviewState
Document submitted for review.
Review added successfully.

Document state set to : ApprovedState
Approved: Document state changed to Approved mode.
Sorry, the current state does not allow edit.
*/
Conclusion
The state pattern is very similar to the strategy pattern where we build pluggable features. The state patterns additionally manage the plugging in of the new state behavior as the object goes through its state change.
Since it allows us to define each state behavior separately, it keeps our lifecycle management simple and flexible.
Chain of Responsibility Design Pattern
Thinking about the Chain of Responsibility, think of a train!
The pattern is like a train. We can plug-in goods compartments, AC/Non-AC, Pantry, chair car compartments in whatever sequence we want to the same engine. Moreover, even if it is a kilometer long, the complexity of the bogies remain limited. This is exactly the flexibility what the Chain of Responsibility design pattern provide to us.
Many a times we would have noticed our code to be too complex. Several hundreds or thousands of lines in a single method or a class might be giving us a maintenance nightmare. It happens not because our requirements are complex. But, mainly because we have ignored an important design principle, the principle of Single Responsibility.
The Chain of Responsibility is an important behavioral design pattern to implement Single Responsibility. It can divide our complex processing logic into simple and pluggable units. Just like the bogies in a train!
Depending on our use case, we can make One or more of the processing units in the chain to process our request.
Its a very powerful design pattern. In case we feel our application is overly complicated, we have most likely under utilized this pattern. But, before we discuss more on this, lets us have a look at its implementation.
How does the pattern work?
The diagram below shows how we can design multistep process using chain of responsibility.

As can notice we have separated each step into different classes. Then the obvious question would be how does it help ?
- Firstly, it stops complicating the main process.
- Secondly, for any addition or removal of these steps, we need not have to touch files of the other steps. Hence, allowing us follow the open and close principle.
- Thirdly, it keeps our code simple and makes our unit testing easy.
- Fourthly, these separate processing classes provides us an intuitive idea about the process without opening the code. Thus, it greatly helps the maintenance team.
A Demo Implementation
As we can see above, the main objective of this pattern is to divide the processing logic into simpler and manageable units. Depending on our use case, we can customize our execution process.
- Skipping the Processing Units: We may need only one out of several processors like stepOne and stepTwo, for instance. Then, we can do that by adding the required conditional logics for those processing steps.
- Breaking the Chain: When we have to stop the processing after a certain point, we may opt for not calling the continueNext(). This will stop the chain and come out of the processing without using the subsequent processors. This case is similar to how we use our servlet filters for instance.
- We may also use our exception handling mechanisms to break out of the loop.
In our demo example we will use a slightly different approach for chaining, so that the core processing steps remains simple. Instead of the processing nodes in the chain using continueNext(), they will send a flag to an executor to handle the same.
Part 1: The Chain of Processors
Its like a regular processor interface with an additional feature to decide the continuation to its next step. As we have discussed above, we have modified the chain processors to send a boolean flag instead of triggering the next process itself.
The VerifyDeliveryPincode shows how we can conditionally decide to continue or break the chain.
package spectutz.dp.behavior.chain;

public interface IChainProcessor<E>{
	public static final boolean CONTINUE_CHAIN = true;
	public static final boolean BREAK_CHAIN = false;
	/*
	 * Return CONTINUE_CHAIN, in case we want to continue with next processor
	 * Return BREAK_CHAIN, in case we want to stop proceeding to the next processor
	 */
	public boolean process(E e);
}
package spectutz.dp.behavior.chain.processor;

import java.util.Arrays;
import java.util.List;

import spectutz.dp.behavior.chain.IChainProcessor;
import spectutz.dp.behavior.chain.Order;

public class VerifyDeliveryPincode implements IChainProcessor<Order>{
    List<String> validPinCodes = Arrays.asList("10025", "10026", "10026");

	public boolean process(Order order) {

		if(validPinCodes.contains(order.getDeliveryPincode())) {
			System.out.println("Verified the delivery pincode to be fine.");

			return CONTINUE_CHAIN;
		}else {
			System.out.println("Delivery pincode not covered..."
					+ "\nException captured and further processing discontinued.");

			return BREAK_CHAIN;
		}
	}
}
package spectutz.dp.behavior.chain.processor;

import spectutz.dp.behavior.chain.IChainProcessor;
import spectutz.dp.behavior.chain.Order;

public class VerifyOrderValue implements IChainProcessor<Order>{

	public boolean process(Order order) {
		System.out.println("Verified the total order value.");

		return CONTINUE_CHAIN;
	}
}
package spectutz.dp.behavior.chain.processor;

import spectutz.dp.behavior.chain.IChainProcessor;
import spectutz.dp.behavior.chain.Order;

public class VerifyOffersAndDiscounts implements IChainProcessor<Order>{

	public boolean process(Order order) {
		System.out.println("Verified offers and discount!");

		return CONTINUE_CHAIN;
	};
}
package spectutz.dp.behavior.chain.processor;

import spectutz.dp.behavior.chain.IChainProcessor;
import spectutz.dp.behavior.chain.Order;

public class SaveOrderDetail implements IChainProcessor<Order>{

	public boolean process(Order order) {
		System.out.println("Saved the order.");
		return CONTINUE_CHAIN;
	}
}
package spectutz.dp.behavior.chain;

//A minimal order object for demo
public class Order{
	private String id;
	private String deliveryPincode;

	public Order(String id,String deliveryPincode) {
		this.id = id;
		this.deliveryPincode =deliveryPincode;
	}
	public String getId() {
		return id;
	}
	public void setId(String id) {
		this.id = id;
	}
	public String getDeliveryPincode() {
		return deliveryPincode;
	}
	public void setDeliveryPincode(String deliveryPincode) {
		this.deliveryPincode = deliveryPincode;
	}
}
Part 2: The Chain-of-Responsibility Executor
Its has two simple methods :
- One method to add the chain of processors one by one. We can create this list using any other means as well.
- The second method executes the chain sequentially and is uses the flag from each executor to either continue or break the chain.
package spectutz.dp.behavior.chain;
import java.util.ArrayList;
import java.util.List;

public class  ChainOfResponsibility<V>{
	//A chain of responsibilities : A flexible list of sub-steps
	private List<IChainProcessor<V>> chainOfProcessors;


	//Break the chain Get the first node of the chain and start the process
	public void process(V v) {
		try {
			if(chainOfProcessors!=null) {
				for (IChainProcessor<V> iChainProcessor : chainOfProcessors) {
					boolean continueChain = iChainProcessor.process(v);
					if(!continueChain)break;
				}
			}
		}catch(Exception e) {
			e.printStackTrace();
		}
	}

	//Add the processor to the end of the chain
	public ChainOfResponsibility<V> addProcessor(IChainProcessor<V> subProcess) {
		if(this.chainOfProcessors == null) {
			this.chainOfProcessors= new ArrayList<IChainProcessor<V>>();
		}
		this.chainOfProcessors.add(subProcess);
		return this;
	}

}
Demo Client
The demo client has two use cases to show, how can we execute all or a few of processors in the chain.
package spectutz.dp.behavior.chain;

import spectutz.dp.behavior.chain.processor.SaveOrderDetail;
import spectutz.dp.behavior.chain.processor.VerifyDeliveryPincode;
import spectutz.dp.behavior.chain.processor.VerifyOffersAndDiscounts;
import spectutz.dp.behavior.chain.processor.VerifyOrderValue;
import spectutz.dp.behavior.chain.processor.VerifyTaxOnItems;

public class ChainOfResponsibilityDemo{
	public static void main(String[] args) {
		ChainOfResponsibility<Order> orderProcessorChain = new ChainOfResponsibility<Order>();

		//A chain of processors
		orderProcessorChain.addProcessor(new VerifyDeliveryPincode());
		orderProcessorChain.addProcessor(new VerifyOrderValue());
		orderProcessorChain.addProcessor(new VerifyTaxOnItems());
		orderProcessorChain.addProcessor(new VerifyOffersAndDiscounts());
		orderProcessorChain.addProcessor(new SaveOrderDetail());

		System.out.println("\n***Demo breaking a chain***");//
		orderProcessorChain.process(new Order("1005","10020"));

		System.out.println("\n***Demo executing the complete chain***");//
		orderProcessorChain.process(new Order("1005","10025"));
	}
}
Output:
***Demo breaking a chain using a wrong pincode***
Delivery pincode not covered...
Exception captured and further processing discontinued.

***Demo complete execution of chain***
Verified the delivery pincode to be fine.
Verified the total order value.
Verified tax on product items.
Verified offers and discount!
Saved the order.
Summary of the benefits
- Firstly, it helps us break the system into simpler units which brings in clarity and makes our maintenance easy.
- Secondly, the simpler units makes our unit testing easy.
- Furthermore, as these units are pluggable, it minimizes our future enhancement efforts.
Prototype Design Pattern
When we need multiple instances of our complex object, we need not build it from scratch every time.
We can build a base version instead as a prototype.
Consequently, we can copy and modify this prototype to create the other instances.
The prototype is another creational design pattern intended to simplify the creation of instances of complex objects.
We can think of it as a variation of the builder pattern for complex objects. It’s because we use the builder to build the object, whereas the prototype says :
“Look ! We may not have to build the whole object. Building it partially on a base version instead may be just enough”.
There can be two very valid reasons:
- Not Every Part is Important
- Not Every Part is Changing
Hence, you just build only that matters !
In this article we will elaborate on these two use cases to understand the usage of the prototype design pattern better.
Use Case 1 : Not Every Part is Important
Lets say we need complex loan objects for our test cases. Each test case needs to test a specific sub-component but, we need the entire loan object for running our test case.
In such a case, we can better have a base version of a valid loan object which we can copy and re-use for our test objects. As a result, each test scenario will just update the part they are interested in testing. No need to build a valid loan object from scratch every time. Here, the base version of our loan object is our prototype.
Moreover, in case we have a family of loan types, we may have to use multiple base versions. And, to make things easy, we may have a factory of different prototypes. The below diagram sums up the use case we have just discussed.

Besides making the creation easy, the prototype provides a common place for accommodating any future changes. Thereby, making our design flexible and more maintainable.
Here is the client code showing how we create a new instance from a copy of the prototype. And, the Prototype factory shows how we can return the copy of the prototype for each new instance.
package spectutz.dp.creational.prototype.loan.client;

import com.fasterxml.jackson.core.JsonProcessingException;
import com.fasterxml.jackson.databind.ObjectMapper;

import spectutz.dp.creational.prototype.loan.vo.LoanType;
import spectutz.dp.creational.prototype.loan.vo.PersonalLoan;
import spectutz.dp.creational.prototype.loan.vo.util.IncomeExpenseSummaryBuilder;
import spectutz.dp.creational.prototype.loan.vo.util.LoanDetailBuilder;
import spectutz.dp.creational.prototype.loan.vo.util.LoanPrototypeFactory;

public class PrototypePatternDemo {

	public static void main(String[] args) {

		//Step-1 : Get a copy of the base version of the personal loan object
		PersonalLoan personalLoan =
				(PersonalLoan)new LoanPrototypeFactory()
				                    .getPrototype(LoanType.PERSONAL_LOAN);


		//Step-2 : Build the required components and
		//update the base version to create a new version
		personalLoan.setLoanDetail(
				new LoanDetailBuilder(500000f, 11.5f, 60).build());
		personalLoan.setIncomeExpenseSummary(
				new IncomeExpenseSummaryBuilder(70000f, 20000f).build());

		try {
			System.out.println(new ObjectMapper().writeValueAsString(personalLoan));
		} catch (JsonProcessingException e) {
			// TODO Auto-generated catch block
			e.printStackTrace();
		}
	}
}
//Output - The modified loan object
/*
{
"loanId":0,
"borrowerDetail":"Mr. X - so and so",
"borrowerLiabilities":"X , Y, Z",
"borrowerAssets":"M, N, O",
"employementDetail":"ABCD Corporation Pvt ltd",
"incomeExpenseSummary":{
	"grossMonthlyIncome":70000.0,
	"monthlyLiabilities":20000.0
	},
"loanDetail":{
	"loanAmount":500000.0,
	"tenureInMonths":60,
	"rateOfInterest":11.5
	}
}

*/
package spectutz.dp.creational.prototype.loan.vo.util;

import java.io.FileNotFoundException;
import java.io.IOException;
import java.io.InputStream;
import java.util.HashMap;
import java.util.Map;

import com.fasterxml.jackson.databind.ObjectMapper;

import spectutz.dp.creational.prototype.loan.vo.ILoan;
import spectutz.dp.creational.prototype.loan.vo.LoanType;
import spectutz.dp.creational.prototype.loan.vo.PersonalLoan;

public class LoanPrototypeFactory {
    private Map<LoanType, ILoan> registry;

    public LoanPrototypeFactory(){
    	registry = new HashMap<LoanType, ILoan>();

    	//Get the file detail from some properties file
    	Map<LoanType, String> loanFiles = new HashMap<LoanType, String>();
    	loanFiles.put(LoanType.PERSONAL_LOAN, "loans/BasePersonalLoan_01.json");

    	//Register the loan prototypes in the factory
    	registerLoanPrototypes(loanFiles);
    }

	public ILoan getPrototype(LoanType loanType) {
	    //Clone the prototype and return a copy
		ILoan copyOfLoan = null;
		try {
			if(LoanType.PERSONAL_LOAN == loanType) {
				PersonalLoan personalLoan =(PersonalLoan) registry.get(loanType);
				copyOfLoan = personalLoan.clone();
			}
		} catch (CloneNotSupportedException e) {
			e.printStackTrace();
		}
		return copyOfLoan;
	}

    private void registerLoanPrototypes(Map<LoanType, String> loanFiles) {
    	loanFiles.forEach((k,v) ->{
    		//Load and register the loan objects in JSON files
    		ILoan loanPrototype = loadLoanObject(k,v);

    		if(loanPrototype !=null) {
    	    	registry.put(LoanType.PERSONAL_LOAN, loanPrototype);
    		}
    	});
    }

	private ILoan loadLoanObject(LoanType loanType, String fileName ) {
		ILoan loanPrototype = null;
		InputStream inputStream = null;
        ObjectMapper objectMapper = new ObjectMapper();
        ClassLoader classLoader = getClass().getClassLoader();
        try {
			inputStream = classLoader.getResourceAsStream(fileName);

			if(LoanType.PERSONAL_LOAN == loanType) {
				loanPrototype = objectMapper.readValue(inputStream, PersonalLoan.class);
	        }
		} catch (FileNotFoundException e) {
			e.printStackTrace();
		} catch (IOException e) {
			e.printStackTrace();
		}finally {
			if(inputStream != null) {
				try {
					inputStream.close();
				} catch (IOException e) {
					e.printStackTrace();
				}
			}
		}
        return loanPrototype;
	}
}
{
"loanId":0,
"borrowerDetail":"Riyan Dev - so and so",
"borrowerLiabilities":"X , Y, Z",
"borrowerAssets":"M, N, O",
"employementDetail":"ABCD Corporation Pvt ltd - so and so",
"incomeExpenseSummary":{
	"grossMonthlyIncome":50000.0,
	"monthlyLiabilities":10000.0
	},
"loanDetail":{
	"loanAmount":200000.0,
	"tenureInMonths":48,
	"rateOfInterest":11.5
	}
}
Below are the other files related to the demo:
package spectutz.dp.creational.prototype.loan.vo.util;

import spectutz.dp.creational.prototype.loan.vo.LoanDetail;

public class LoanDetailBuilder {
	private LoanDetail loanDetail = null;

	public LoanDetailBuilder(float loanAmount, float rateOfInterest, int tenureInMonths){
		loanDetail = new LoanDetail();
		loanDetail.setLoanAmount(loanAmount);
		loanDetail.setRateOfInterest(rateOfInterest);
		loanDetail.setTenureInMonths(tenureInMonths);
	}

	// Builder methods for other attributes....

	public LoanDetail build() {
		return loanDetail;
	}
}
package spectutz.dp.creational.prototype.loan.vo.util;

import spectutz.dp.creational.prototype.loan.vo.IncomeExpenseSummary;

public class IncomeExpenseSummaryBuilder {
	private IncomeExpenseSummary incomeExpenseSummary;

	public IncomeExpenseSummaryBuilder(float grossMonthlyIncome, float monthlyLiabilities) {
		incomeExpenseSummary = new IncomeExpenseSummary();
		incomeExpenseSummary.setGrossMonthlyIncome(grossMonthlyIncome);
		incomeExpenseSummary.setMonthlyLiabilities(monthlyLiabilities);
	}
	// Builder methods for other attributes....

	public IncomeExpenseSummary build() {
		return incomeExpenseSummary;
	}
}
package spectutz.dp.creational.prototype.loan.vo;

public class PersonalLoan implements ILoan{

	//We are using string to keep the example simple...
	private long loanId;
	private String borrowerDetail;
	private String borrowerLiabilities;
	private String borrowerAssets;
	private String employementDetail;

	private IncomeExpenseSummary incomeExpenseSummary;
	private LoanDetail loanDetail;

	public PersonalLoan clone() throws CloneNotSupportedException {
		return (PersonalLoan)super.clone();
	}
	public long getLoanId() {
		return loanId;
	}

	public void setLoanId(long loanId) {
		this.loanId = loanId;
	}
	public String getBorrowerDetail() {
		return borrowerDetail;
	}

	public void setBorrowerDetail(String borrowerDetail) {
		this.borrowerDetail = borrowerDetail;
	}

	public String getBorrowerLiabilities() {
		return borrowerLiabilities;
	}

	public void setBorrowerLiabilities(String borrowerLiabilities) {
		this.borrowerLiabilities = borrowerLiabilities;
	}

	public String getBorrowerAssets() {
		return borrowerAssets;
	}

	public void setBorrowerAssets(String borrowerAssets) {
		this.borrowerAssets = borrowerAssets;
	}

	public String getEmployementDetail() {
		return employementDetail;
	}

	public void setEmployementDetail(String employementDetail) {
		this.employementDetail = employementDetail;
	}

	public IncomeExpenseSummary getIncomeExpenseSummary() {
		return incomeExpenseSummary;
	}

	public void setIncomeExpenseSummary(IncomeExpenseSummary incomeExpenseSummary) {
		this.incomeExpenseSummary = incomeExpenseSummary;
	}

	public LoanDetail getLoanDetail() {
		return loanDetail;
	}

	public void setLoanDetail(LoanDetail loanDetail) {
		this.loanDetail = loanDetail;
	}
}
package spectutz.dp.creational.prototype.loan.vo;

public class LoanDetail implements ILoan{
	private static final long serialVersionUID = -6128596301867791695L;

	private float loanAmount;
	private int tenureInMonths;
	private float rateOfInterest;

	public float getLoanAmount() {
		return loanAmount;
	}
	public void setLoanAmount(float loanAmount) {
		this.loanAmount = loanAmount;
	}
	public int getTenureInMonths() {
		return tenureInMonths;
	}
	public void setTenureInMonths(int tenureInMonths) {
		this.tenureInMonths = tenureInMonths;
	}
	public float getRateOfInterest() {
		return rateOfInterest;
	}
	public void setRateOfInterest(float rateOfInterest) {
		this.rateOfInterest = rateOfInterest;
	}


}
package spectutz.dp.creational.prototype.loan.vo;

public class IncomeExpenseSummary implements ILoan{
	private static final long serialVersionUID = 1L;

	private float grossMonthlyIncome;
	private float monthlyLiabilities;

	 public float getGrossMonthlyIncome() {
		return grossMonthlyIncome;
	}
	public void setGrossMonthlyIncome(float grossMonthlyIncome) {
		this.grossMonthlyIncome = grossMonthlyIncome;
	}
	public float getMonthlyLiabilities() {
		return monthlyLiabilities;
	}
	public void setMonthlyLiabilities(float monthlyLiabilities) {
		this.monthlyLiabilities = monthlyLiabilities;
	}
}
package spectutz.dp.creational.prototype.loan.vo;

import java.io.Serializable;

public interface  ILoan extends Serializable, Cloneable {}
package spectutz.dp.creational.prototype.loan.vo;

public enum LoanType {
	PERSONAL_LOAN, CAR_LOAN, TWO_WHELLER_LOAN;
}
Use Case 2 : Not Every Part is Changing
This is an example shown under the builder design pattern which can show the key difference between these two patterns.
The CacheConfiguration which uses the builder pattern, builds the part which the user wants to change. But, the Cache here is the common base template acting as a prototype.
The prototype as a template comes with all the default configurations. And, it also provides a common place to add or update features which will be shared by its instances.
//Create a singleton CacheManager using defaults
CacheManager manager = CacheManager.create();

// CacheConfiguration : Update as many configs as you want where the rest will run with the defaults.
Cache sampleCache= new Cache(
  new CacheConfiguration("sampleCache", maxEntriesLocalHeap)
    .memoryStoreEvictionPolicy(MemoryStoreEvictionPolicy.LFU)
    .eternal(false)
    .timeToLiveSeconds(60)
    .timeToIdleSeconds(30)
    .diskExpiryThreadIntervalSeconds(0)
    .persistence(new PersistenceConfiguration().strategy(Strategy.LOCALTEMPSWAP)));

  manager.addCache(sampleCache);
Conclusion
The prototype is another most confusing design pattern. Saving the initialization cost through cloning is kind of a common understanding. But, when we think of it as a common base version or a template, it provides a more complementary feature over the other creational patterns.
First of all, as a common base version or a template, it greatly simplifies the creation of multiple variations of the complex object.
Secondly, the prototype providing a common place to accommodate our changes, it makes our design more maintainable and flexible to extend.
Singleton Design Pattern
SINGLETON – Hey, I privately control my own creation to ensure all of you get my single unique copy.
No piracy allowed!
It’s a creational design pattern that ensures that there is only a single instance of the class for everyone to use.
This is useful in managing shared data and configurations across an application instance. It provides a central control to keep the data consistent and reliable for its clients.
Importantly, we must remember that the uniqueness of such instance is confined to its runtime instance. For example, in java each JVM instance can have its separate singleton instance. Hence, in a distributed environment we may need additional implementation to ensure the contents of singleton instances are the same and synchronized.
How does the pattern work?
The below diagram shows a java singleton class highlighting its key points.
Firstly, it shows how to ensure a single instance. And, secondly it tells about the strategies to load and update the shared data. The section following it provides more explanation on the same.

A singleton basically has two important things to manage as shown above.
1. Limit Number of Instances to One :
- A Private Constructor in Java helps us achieve this as it restricts any class other than the Singleton class to create an instance.
2. Load & Manage the Shared Data :
We can choose to load the data at the time of class loading which is called the eager loading. But, the eager loading may seriously impact the class loading time when the data loading is a time consuming process. Hence, the other option is to use is the lazy loading where we load the data at a later point on user’s request. Here, is the summary on these two data loading strategies :
- Eager Loading Data
- This is about loading the data at the time of class loading.
- It’s easy and useful for light data loading.
- Lazy Loading Data
- This is about loading data on client request and not during the class loading.
- This is the recommended approach for heavy and time consuming data loading process.
- Since we might get overlapping data loading requests, we should make these methods thread safe.
The below are the samples showing the ways to implement the above discussed loading strategies. Finally, the demo client at the end shows how the client APIs are independent of all these loading strategies.
package spectutz.dp.creational.singleton;

import java.util.HashMap;
import java.util.Map;

public class LazyLoadSingleton {
	   private static LazyLoadSingleton mySingletonInstance = new LazyLoadSingleton();
	   private static Map<String,String> sharedData;

	   private LazyLoadSingleton() {}

	   public static synchronized LazyLoadSingleton getInstance() {
	      if(sharedData == null) { //Useful for heavy, time consuming data load
	    	  loadData();
	      }
	      return mySingletonInstance;
	   }

	   private static void loadData() {
		  //Load the data from its source such as DB or some service
	      sharedData = new HashMap<String,String>();
	      sharedData.put("myKey01","myData01");
	      sharedData.put("myKey02","myData02");
	   }

	   public synchronized void  updateSharedData(String key, String value) {
		  sharedData.put(key,value);
	   }
	   public String  fetchFromSharedData(String key) {
		   return sharedData.get(key);
	   }
}
package spectutz.dp.creational.singleton;

import java.util.HashMap;
import java.util.Map;

public class EagerLoadSingleton {
	   private static EagerLoadSingleton mySingletonInstance = new EagerLoadSingleton();
	   private static Map<String,String> sharedData;

	   private EagerLoadSingleton() {
		  //Load the data during class loading
	      sharedData = new HashMap<String,String>();
	      sharedData.put("myKey01","myData01");
	      sharedData.put("myKey02","myData02");
	   }

	   public static synchronized EagerLoadSingleton getInstance() {
	      return mySingletonInstance;
	   }

	   public String  fetchFromSharedData(String key) {
		   return sharedData.get(key);
	   }
}
package spectutz.dp.creational.singleton;

import java.util.HashMap;
import java.util.Map;

public class EagerLoadSingleton_StaticBlock {
	   private static EagerLoadSingleton_StaticBlock mySingletonInstance = new EagerLoadSingleton_StaticBlock();
	   private static Map<String,String> sharedData;

	   static {
			  //Load the data during class loading - using static block
		      sharedData = new HashMap<String,String>();
		      sharedData.put("myKey01","myData01");
		      sharedData.put("myKey02","myData02");
	   }
	   private EagerLoadSingleton_StaticBlock() {}

	   public static synchronized EagerLoadSingleton_StaticBlock getInstance() {
	      return mySingletonInstance;
	   }

	   public String  fetchFromSharedData(String key) {
		   return sharedData.get(key);
	   }
}
package spectutz.dp.creational.singleton;

public class SingletonDemo {

	public static void main(String[] args) {
		//From client point of view -The loading strategies does not make any difference
		EagerLoadSingleton eagerLoadSingleton = EagerLoadSingleton.getInstance();
		EagerLoadSingleton_StaticBlock eagerLoadSingletonStaticBlock
										= EagerLoadSingleton_StaticBlock.getInstance();

		LazyLoadSingleton lazyLoadSingleton = LazyLoadSingleton.getInstance();

		System.out.println(eagerLoadSingleton.fetchFromSharedData("myKey02"));
		System.out.println(eagerLoadSingletonStaticBlock.fetchFromSharedData("myKey02"));
		System.out.println(lazyLoadSingleton.fetchFromSharedData("myKey02"));
	}

}
//Demo Output :
/*
myData02
myData02
myData02
*/
Conclusion
It’s being a single copy, a singleton provides a centrally controlled shared data management. It prevents duplicate copy and makes the data consistent across its clients.
But, importantly, as the singular copy limit is restricted to a single runtime environment, a distributed environment will have multiple instances. Hence, it may require additional effort to keep the shared data same and synchronized across those instances.
Flyweight Design Pattern
Think of our browsers optimizing the network performance for –
the heavy resources like images or common resources like css or js files!
It downloads and caches them, so that multiple pages can re-use these files.
Similarly, we use the Flyweight pattern to cache and share the common parts to optimize the memory footprint.
Its a structural design pattern useful for optimizing the memory footprint by sharing the repetitive object instances in a fine grained design.
Which instances can we share ?
When we divide our classes into fine grained objects, it makes our design simple and flexible. But, higher number of objects adds up the memory overhead for each separate instance. But, luckily when we break down the monolithic structures, we get lots of invariant (never changing) components, such as :
- Immutable(i.e. the ones those don’t change state once created) data objects.
- a product object to provide data such as its brand, category, price.
- a glyph object representing a font
- Stateless (i.e. the ones those don’t store client specific data) processing objects. For example :
- loanProcessor.process(loan) – a loan processor to process loans
- Graphical objects in games. The coordinates may vary but, we can re-use the drawing object instance.
- e.g. angryBird.draw(position, color,…)
Hence, instead of creating different instances, we can cache and share just one instance of these invariant types. Because of such sharing, the fine-grained designs may even reduce the memory foot print compared to its coarse grained versions.
When to share?
Flyweight is a simple but, very useful pattern for building lightweight applications. Sharing the invariant object instances, may not only minimize the memory usage, but also save us the initialization cost. Especially, its very significant in the following scenarios :
- First, when we need the same instance repeatedly in large numbers. For example :
- The fonts in a word processor- 26 letters repeated so many times in a document for displaying characters.
- Shared configuration objects in an application
- A small set of product items, in a restaurant application, which we fetch repeatedly for our billing purpose.
- Secondly, when concurrent clients or repeated requests, need the same components again and again. For example :
- A set of controller, service, repository and such fine-grained objects which we need for processing our service requests.
- Singleton beans in a Spring framework is a perfect example in this regard.
- A stateless loan processor or validator instance in a loan processing application.
- A set of controller, service, repository and such fine-grained objects which we need for processing our service requests.
How does the pattern work?
Example –1
Lets say we have a highly customizable AngryBird component as shown and we need 1000s of these of the given pattern.
With the given structure we will need 1000 AngryBirds. But, can we optimize our data?

How about separating the pattern from its position as shown?
In such a case, we can separately define our patterns and save them as our invariants(fixed patterns) we want to re-use. When we need only 3 separate patterns, it will reduce 1000 repetition in the coarse grained structure to just 3 invariant instances.
With the reference to these patterns in place, our new Angry Bird is much lighter!

Off course we can divide our AngryBird, into still more granular levels depending on the flexibility of choice we need. But, sharing invariant granular instances can save us lots of unnecessary new instances. For instance, the java allows us to use cached instances for granular invariant objects like :
- Only two Boolean instances for our entire application, if we use Boolean.getValue(true/false), Boolean.TRUE/FALSE.
- Similarly, we can use cached Characters instances using Character.valeOf(char) and cached Integer instances using Integer.valueOf(int)
Example –2
When we look at the example in our Factory Design Pattern, we are sharing a single instance of the loan processors for each new request. But, this won’t have been possible, if these processors were part of the loan object itself. By keeping the processor separate we have carved out the invariant processing feature from the loan.
Again, because of the factory we are able to control the lifecycle of the beans and share them. If we get these instances without a factory, we may end up creating a new instances for each of our use. Hence, the frameworks like Spring managing the beans using a factory are much lighter. The singleton beans are nothing but the shared invariant(client/context independent) data or processing instances.
Conclusion
We need a fine grained design for keeping our design simple and flexible. Since each new instance of a class has its own overhead, we may think it might need higher memory foot print.
But, the Flyweight pattern shows that with fine grained design we can carve out many invariant (client/context independent) components. By appropriately sharing these invariant instances, we can avoid it’s physical reoccurrence in the coarse grained versions. Thereby, we may end up building a lighter version of the application with our fine grained design.
Proxy Design Pattern
Since Mr. SuperX was not so reachable, he has hired a PA.
Besides making him easily reachable, the PA helps filter and format the messages.
Moreover, it also shortens the time of interaction from his busy schedule.
In short, the PA acts as a Proxy for Mr. SuperX.
Its a structural design pattern simplifying the communication with an object which we can’t make it available locally or directly.
Some of the reason behind such objects could be like they are remote objects, they are secured, vulnerable or expensive objects. In such cases, a local representative called proxy, proves very useful. It provides the impression of the real object making the client interaction easy. It also helps us collect the client’s objective and pass it to the real object with the necessary checks.
A proxy may look similar to an adapter. But, whereas an adapter wraps an object to provide a suitable interface, the proxies hide the communication to the real object. As regards the interfaces, the proxies, in fact, mostly share the same interface with the real object, to make it easy for the clients.
Example usage of Proxy Patterns
Lets look at some real time use cases to understand the scenarios where we can use the proxies.
- Remote Proxy : Lets think of a database, a webservice or a network storage. Unlike the local objects, we need to follow complex networking protocols to interact with these objects. But, the remote proxies can make it easy for the clients in such cases.
- A remote proxy is a local object that hides the complexities in communication with the remote objects from the clients.
- Some examples of remote proxy are – Http client, Ftp client, Jdbc client etc.
- Virtual Proxy : When the real objects are expensive, create a lighter version for the user to interact. Then collect the user interaction on the lighter version, so that we can pass the same to work on the original expensive version. Some examples can be:
- A Video Editor using lighter proxy version to work on the high resolution videos.
- A video or an image browser using low resolution copies.
- Protection Proxy : When the real objects are secured or vulnerable to use, this proxy in between can provide the required security checks. For example :
- The corporate proxies to access the internet, which can otherwise be misused.
- A reverse proxy, providing a central control on the web traffics for multiple domains.
How does the pattern work?
In this section we will look at couple of examples with diagrams to show how can we use proxies for our use cases.
Example 1
The diagram shows an example of a virtual proxy to make an video editor memory efficient.
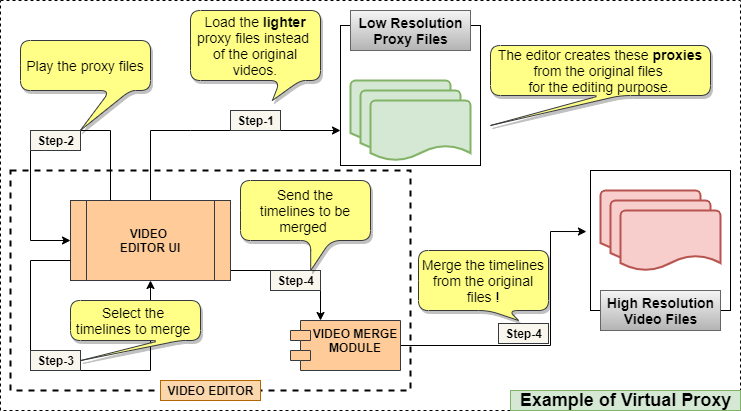
Loading very high resolution videos will consume lot of memory but, we need the visuals for our editing purpose. Hence, as we can see, the editor creates the proxies(lighter versions) of these high resolution videos for the editing purpose.
- While editing, the user works on the lighter proxies, as if they are working on the original videos! Here we collect all the user editing requirements.
- Finally, the editor passes the user choice on the proxies, so that the merge module can do the merging on the original videos.
Example 2

As the diagram shows, the proxy provides an indirection where we can control the access to the real object.
In this case, the corporate proxy monitors, filters, caches or secures the access requests to actual web destinations.
In a similar way, the remote proxies hides the complexities of communication with the remote objects.
A Simple Proxy Demo
This is a simple demo, showing how a proxy works. The comments printed in the program describes the significance of each component inline.
package spectutz.dp.struct.proxy;

public class ProxyDemoClient {

	public static void main(String[] args) {
		System.out.println("When the client calls the proxy,"
				+"\n the proxy communicates the intent to the real object.");

		new RemoteEntityProxy().doSomething();
	}

}
//Output
/*
When the client calls the proxy,
 the proxy communicates the intent to the real object.

RemoteEntityProxy::doSomething
Establish the communication with the RemoteEntity to call doSomething() on it.
Since the RemoteEntity is a local one in this demo, we are calling it directly.

RemoteEntity - Doing something special !
*/
package spectutz.dp.struct.proxy;

public class RemoteEntityProxy implements IRemoteEntity {

	@Override
	public void doSomething() {
		System.out.println("\nRemoteEntityProxy::doSomething");
		System.out.println("Establish the communication with the RemoteEntity"
				+ " to call doSomething() on it.");
		System.out.println("Since the RemoteEntity is a local one in this demo,"
				+ " we are calling it directly.");
		new RemoteEntity().doSomething();
	}
}
package spectutz.dp.struct.proxy;

public class RemoteEntity implements IRemoteEntity{

	@Override
	public void doSomething() {
		System.out.println("\nRemoteEntity - Doing something special !");
	}
}
package spectutz.dp.struct.proxy;

//Both the real object and it's proxy, usually share the same interface
public interface IRemoteEntity {
	public void doSomething();
}
Conclusion
In case an object is not available locally or not supposed to be accessed directly, the proxy provides a suitable local representation.
Even though its an indirection, it provides the clients the impression of working directly on the real object. Like a personal assistant, it acts as the face of the real object. And, manages the communication between clients and the real object.
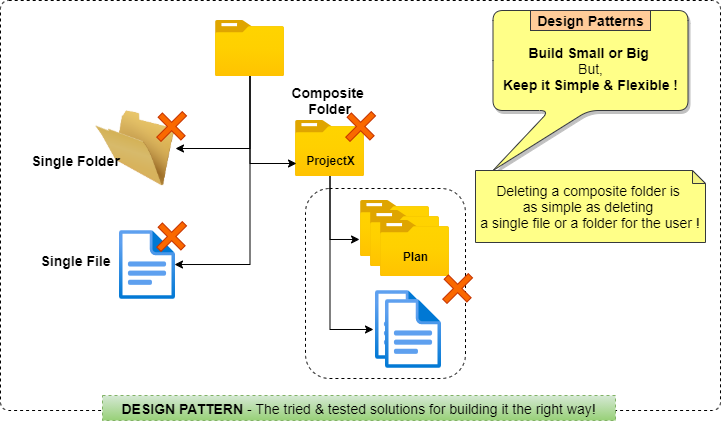
Composite Design Pattern
The composite pattern is like our file system.
The system allows us to re-use the simple base products like the file and the folder, to build much more complex folder structures.
The beauty is that irrespective of the composition of a folder it remains as simple as an empty folder for the user operations!

Its a structural design pattern that lets us build composite products in such way that it remains as simple as it’s base products. In other words, both the composite and the base products share a uniform interface with it’s clients.
Instead of exposing the complexity, the pattern handles it on its own using a whole and it’s part relation using a tree structure. More specifically, it works on the concept that a whole is a sum of its parts. Hence, the user operations on the whole is nothing but a combination of similar operations on all its underlying parts.
For example, just think of an user trying to delete a composite folder as shown above. Even though it needs the deletion of the underlying folder structure, the system handles this for the user. Thereby, it makes a composite folder behave as simple as a single folder for the user.
Sample Usages of the Pattern
This pattern greatly simplifies our design process because it allows us to build complex objects using simpler components. Secondly, it also allows us to organize large number of items in structured hierarchical tree. Here, are some more examples to showcase its usefulness.
- Working on Diagrams : A diagram may consists of multiple other diagrams and basic shapes.
- When we have to draw the main diagram, a composite pattern helps us draw the underlying diagrams automatically.
- When we move, copy , re-size a group; we just do it on the group as a single object. But, the group knows its constituents and applies the same operation without needing any intervention from the client.
- Building Menu : A composite structure can help us organize and display menu items in a hierarchical structure. Here, we are grouping multiple menu items into logically grouped menu items.
- Building Flexible UI : Composing flexible UI using widgets, portlets or using reusable components as in React, Angular etc.
- Files & Folder Browser : As we have discussed above, the user operates on the files and folders as individual items whereas the system takes care of applying the operations to the underlying composition.
- Auto-start manager that starts a customizable list of apps that we want to start during our device startup.
How does the pattern work?
Note : Bill of Material(BOM) is like a recipe when we are preparing our food. It holds details on the parts and sub-parts that we need to build our products.
Lets say we are building a BOM module for a sports equipment manufacturer. Its a complex requirement to manage part details on so many products. Here, is the sample detail on a skate board product.
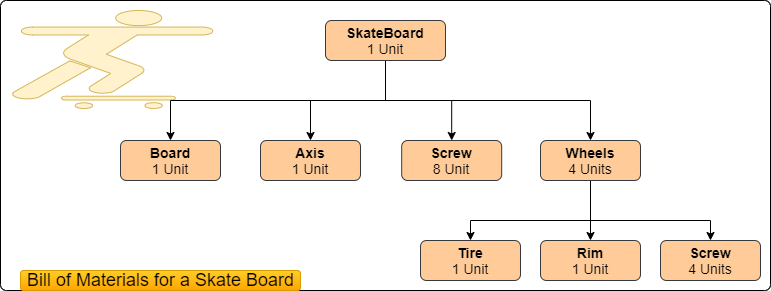
How to manage such a large list of products and their parts for so many different products ?
Lets say we got an order for 10000 skateboards. How to calculate the overall material requirement form this hierarchical structure. The composite pattern can easily solve this kind of whole and its part structures. It can convert the complex composite objects to look simple as our simple individual parts.
In this demo we will see how does it do it. Here, is the design to start with.

From the diagram we can see a composite product can include any combination of individual and composite products. Since it has all the details on its parts, it itself can implement whatever the key things the client may need from its parts. It is just similar to the folder deletion example at the top.
Source Code for Demo
For our demo lets see how the client can build the products and parts for our skateboard. Then, we will try to get the material required for the products at different levels.
package spectutz.dp.struct.composite;

import spectutz.dp.struct.composite.vo.BaseProductPart;
import spectutz.dp.struct.composite.vo.CompositeProductBOM;
import spectutz.dp.struct.composite.vo.ProductBOM;

public class ProductBOMClientDemo {
	public static void main(String[] args) {
		ProductBOM skateBoard = new CompositeProductBOM("SKATE_BOARD", 1);
		//Adding individual products to SKATE_BOARD
		skateBoard.addChild(new BaseProductPart("BOARD", 1));
		skateBoard.addChild(new BaseProductPart("AXIS", 1));
		skateBoard.addChild(new BaseProductPart("SCREW", 8));

		ProductBOM wheels = new CompositeProductBOM("WHEEL", 4);
		wheels.addChild(new BaseProductPart("TIRE", 1));
		wheels.addChild(new BaseProductPart("RIM", 1));
		wheels.addChild(new BaseProductPart("SCREW", 4));
		//Adding a composite product to SKATE_BOARD
		skateBoard.addChild(wheels);

		System.out.println("\nMaterial requirement for:");
		System.out.println("\nOne Board(individual) :\n" + new BaseProductPart("BOARD", 1).getMaterialRequirement());
		System.out.println("\nOne wheel(composite) :\n" + wheels.getMaterialRequirement());
		System.out.println("\nOne skateboard(composite) :\n" + skateBoard.getMaterialRequirement());
	}
}
// Output
/*
Material requirement for:

One Board(individual) :
{BOARD=1}

One wheel(composite) :
{SCREW=4, RIM=1, TIRE=1}

One skateboard(composite) :
{BOARD=1, SCREW=24, RIM=4, AXIS=1, TIRE=4}
*/
The comments in the demo code are self explanatory. But, the key thing to notice here is the flexibility of the design. It can accommodate any combination of the whole and part structure. Again, we can present a wide verity products using a common interface to our clients. Moreover, while getting the parts list the client is least bothered about the internal composition.
The source code below shows the implementation part.
package spectutz.dp.struct.composite.vo;

import java.util.Iterator;
import java.util.Map;

//Common interface for the base product and composite products
public abstract class ProductBOM {

	private String productName;
	private int units;

	public ProductBOM(String productName, int units) {
		this.productName = productName;
		this.units = units;
	}
	public String getProductName() {
		return productName;
	}
	public int getUnits() {
		return units;
	}

	public void addChild(ProductBOM productBOM) {
		throw new UnsupportedOperationException();
	}
	public void removeChild(ProductBOM productBOM) {
		throw new UnsupportedOperationException();
	}
	public Iterator<ProductBOM> getChildIterator() {
		throw new UnsupportedOperationException();
	}
	public Map<String,Integer> getMaterialRequirement() {
		throw new UnsupportedOperationException();
	}

}
package spectutz.dp.struct.composite.vo;
import java.util.HashMap;
import java.util.Map;

//This is for individual products
public class BaseProductPart extends ProductBOM{
	public BaseProductPart(String productName, int units) {
		super(productName, units);
	}

	//Simply returns the individual product
	public Map<String, Integer> getMaterialRequirement() {
		Map<String, Integer> materialRequirement = new HashMap<String, Integer>();
		materialRequirement.put(this.getProductName(),1);
		return materialRequirement;
	}
}
package spectutz.dp.struct.composite.vo;
import java.util.ArrayList;
import java.util.HashMap;
import java.util.Iterator;
import java.util.List;
import java.util.Map;
import java.util.stream.Collectors;

//This is for composite products - We can flexibly add the part list
//The part list may include individual or composite products
public class CompositeProductBOM extends ProductBOM{
	protected List<ProductBOM> partList = new ArrayList<ProductBOM>();

	public CompositeProductBOM(String productName, int units) {
		super(productName, units);
	}

	@Override
	public void addChild(ProductBOM productBOM ) {
		this.partList.add(productBOM);
	}
	@Override
	public void removeChild(ProductBOM productBOM ) {
		this.partList=this.partList.stream()
				.filter(part ->!part.getProductName().equalsIgnoreCase(productBOM.getProductName()))
				.collect(Collectors.toList());
	}
	@Override
	public Iterator<ProductBOM> getChildIterator() {
		return partList.iterator();
	}

	//Does the required calculation for its contained parts
	public Map<String,Integer> getMaterialRequirement() {
		Map<String, Integer> materialRequirement = new HashMap<String, Integer>();
		Iterator<ProductBOM> iterator = partList.iterator();

		while(iterator.hasNext()) {
			ProductBOM part = iterator.next();
			int  quantity   = part.getUnits();
			Map<String, Integer> materialRequirementPerPart = part.getMaterialRequirement();

			materialRequirementPerPart.forEach((k,v)->{
				int requirement = v.intValue()*quantity;

				//Update part requirement into it's composing product
				if(materialRequirement.containsKey(k)) {
					int existingRequirement = materialRequirement.get(k);
					materialRequirement.put(k, requirement+existingRequirement);
				} else {
					materialRequirement.put(k, requirement);
				}
			});
		}
		return materialRequirement;
	}
}
The key thing to observer here is the difference between how the individual and composite return theirs parts list. While the first one is straight forward, the second one automates this for the end users using its part list.
Comparing with other patterns
- Decorators Vs Composition
Since both use composition of products these two patterns sounds similar. But, the difference lies in the change in the behavior of the composed parts.
In case of the decorators, the composition becomes a single product. All the layers together decide the unique behavior of the final product. For example, when we add the filter GZIPInputStream on top of FileInputStream, we can only read .gz deflated stream but, not a regular inflated file.
In contrast, the composition is a collection of parts where each part retains it’s own identity. The parts are simply grouped together to look like an assorted platter. For example, when a group of portlets forms a page, each portlet renders it’s own part.
Conclusion
This is quite an useful pattern with a wide range of usage as mentioned above. It allows us to flexibly group and compose new products based on the existing base products. The beauty of the composition being, the client need not bother about the complexity of the composition. It’s because the pattern guides us build composite products with similar interface to the base products.
In short, the pattern is an implementation of the divide and conquer rule. And, mostly using the concept – “The whole is the sum of its parts!”
Decorator Design Pattern
Think of our universally favorite ice creams!
We can have our individual flavors like vanilla, chocolate, strawberry and so many others.
We can even mix them too as per our choice.
A decorator can help us of build our favorite flavors, including the mixed flavors, with ease !
It’s a structural design pattern that allows us to create multiple flavors of our product, which we can even mix and match to create newer flavors.
One way to inherit the existing features is through sub-classing which is also know as the inheritance approach. The other one being the composition. The decorator follows the later one which makes it lot more flexible because of the following reasons:
- First, in case of a sub-class, it has a fixed parent to inherit the features. But, using composition, we can inherit from a family of products as long as they follow the required interface. In short, the sub-classing provides fixed compile time inheritance, whereas the composition provides flexible dynamic inheritance.
- Second, it also allows us to mix multiple flavors of the product as layers within each other just like our ice creams. The different layers here act as a chain of processors, each layer building it’s features on top of the underlying layer.
So, having the concepts in mind, let us see how it really works with some examples.
Why to Use and How does it work?
In this section we will be discussing on two example. In the first, we will see the significance of using a decorator pattern. And, in the second, we will look at how the pattern works.
Example-1 – Java IO Package
When we are from java background, the best place to learn decorators is to look at the IO package. The below diagram shows a set of IO classes under the InputStream.

Clearly, there can be a variety of sources. Even the data formats may vary widely. Again, we may want to read into characters, byte streams or objects. So, with so many factors, its not possible put the processing logic into a simple hierarchy even if many features are dependent on each other. Hence, the best answer here is the composition to create different combination using smaller parts.
Here are some examples in this regard :
/* Composition makes the IO unit highly flexible */

//1. Read the data from a file as byte stream
FileInputStream fis = new FileInputStream("t.tmp");

//2. Read the data from a byte array as a byte stream
ByteArrayInputStream bais = new ByteArrayInputStream("something something ..".getBytes());

//3. Read Objects from a file = Read the byte stream + deserialize the byte stream into objects
ObjectInputStream ois = new ObjectInputStream(fis);

//3.1 Make the reading faster using a BufferedInputStream.
// Combination : ObjectInputStream + BufferedInputStream + FileInputStream
BufferedInputStream bis = new BufferedInputStream(fis);
ObjectInputStream oisFast = new ObjectInputStream(bis);

//4. Read objects from .gz file = Read the data from the file as  byte stream
// + deflate the .gz format + deserialize the resultant byte stream into objects
// Combination : ObjectInputStream + GZIPInputStream + FileInputStream
GZIPInputStream gzis = new GZIPInputStream(fis);
ObjectInputStream objis = new ObjectInputStream(gzis);
In the above examples, we call each of the classes which enclose an existing feature to build a newer feature as the decorators.
- Due to a common interface we are able to replace the classes with each other during composition.
- Each new layer builds on the features provided by the underlying layer.
- Because of the flexibility to mix and match, we are able to dynamically convert the same input stream to address multiple needs.
Example-2 – Fancy Cars
Lets say we have a base version of our fancy car that runs only on the roads. But, we are planning it to sail, fly, climb in the future.
In this example we will see how can we easily build our advanced cars by using decorators. The diagram below shows the design.

Each decorator refers to a concrete FancyCar, so that it can utilize existing features from this reference.
For example, as shown below, the getDescription() in BoatingCarDecorator is mixing its logic with the output from its enclosed FancyCar.

Similarly, in case of the super car, the BoatingCarDecorator adds the sailing feature to a FancyCar that can run only on the roads. Again, the top layer of the FlyingCarDecorator adds the flying feature to a FancyCar that can both sail and run on the roads.
Contrary to getDescription() method, the drive() method usages the existing features conditionally instead of building on it. It’s just showing the kind of flexibility we have in using the multiple layers in a decorator.
Source Code
Below is the source code for our decorator demo on a fancy car.
1. The RoadRacer is our base car version that runs only on the roads. But, we are planning for it to sail, fly, climb in the future.
package spectutz.dp.struct.decorator.car.vo;

public class RoadRacer implements IFancyCar{

	@Override
	public String getDescription() {
		return "RoadRacer";
	}

	@Override
	public void drive(RouteType routeType) {
		if(RouteType.ROAD == routeType) {
			System.out.println("Racing on the road!");
		}else {
			System.out.println("Does not support route type "+ routeType);
		}
	}
}
package spectutz.dp.struct.decorator.car.vo;

public interface IFancyCar {
	public String getDescription();
	public void drive(RouteType routeType);
}
package spectutz.dp.struct.decorator.car.vo;

public enum RouteType {
	ROAD, WATER, AIR;
}
2. While adding the new capabilities, we do not want to disturb the original product. Hence, we are building these decorators to repackage the existing car with additional features.
package spectutz.dp.struct.decorator.car.decorators;
import spectutz.dp.struct.decorator.car.vo.IFancyCar;
import spectutz.dp.struct.decorator.car.vo.RouteType;

public class BoatingCarDecorator extends AbstractCarDecorator{

	public BoatingCarDecorator(IFancyCar fancyCar) {
		super(fancyCar);
	}

	@Override
	public String getDescription() {
		//The decorator, modifying the feature used in the underlying fancyCar
		return fancyCar.getDescription() +" plus BoatingCar";
	}

	@Override
	public void drive(RouteType routeType) {
		if(RouteType.WATER == routeType) {
			//Feature from the decorator
			System.out.println("Sailing fast with pointed nose !");
		}else {
			//Feature from the underlying fancyCar
			fancyCar.drive(routeType);
		}
	}
}
package spectutz.dp.struct.decorator.car.decorators;
import spectutz.dp.struct.decorator.car.vo.IFancyCar;
import spectutz.dp.struct.decorator.car.vo.RouteType;

public class FlyingCarDecorator extends AbstractCarDecorator{

	public FlyingCarDecorator(IFancyCar fancyCar) {
		super(fancyCar);
	}
	public String getDescription() {
		//The decorator modifying the feature used in the underlying fancyCar
		return fancyCar.getDescription() +" plus FlyingCar";
	}

	@Override
	public void drive(RouteType routeType) {
		if(RouteType.AIR == routeType) {
			//Feature from the decorator
			System.out.println("Flying high with wings spread ! ");
		}else {
			//Feature from the underlying car
			fancyCar.drive(routeType);
		}
	}
}
package spectutz.dp.struct.decorator.car.decorators;
import spectutz.dp.struct.decorator.car.vo.IFancyCar;
import spectutz.dp.struct.decorator.car.vo.RouteType;

//The base decorator
public abstract class AbstractCarDecorator implements IFancyCar{

	protected IFancyCar fancyCar;

	public AbstractCarDecorator(IFancyCar fancyCar) {
		this.fancyCar = fancyCar;
	}
	public abstract String getDescription();
	public abstract void drive(RouteType routeType);
}
3. Finally, the demo code shows how the repackaging with the decorators, creates the newer versions of the underlying product.
package spectutz.dp.struct.decorator.car;
import spectutz.dp.struct.decorator.car.decorators.BoatingCarDecorator;
import spectutz.dp.struct.decorator.car.decorators.FlyingCarDecorator;
import spectutz.dp.struct.decorator.car.vo.IFancyCar;
import spectutz.dp.struct.decorator.car.vo.RoadRacer;
import spectutz.dp.struct.decorator.car.vo.RouteType;

public class FancyCarDecoratorDemo {

	public static void main(String[] args) {

		RoadRacer roadRacer = new RoadRacer();
		System.out.println("\nMy Fancy Car: "+roadRacer.getDescription());
		roadRacer.drive(RouteType.ROAD);
		roadRacer.drive(RouteType.WATER);
		roadRacer.drive(RouteType.AIR);

		BoatingCarDecorator roadPlusWaterCar = new BoatingCarDecorator(roadRacer);
		System.out.println("\nMy Fancy Car: "+roadPlusWaterCar.getDescription());
		roadPlusWaterCar.drive(RouteType.ROAD);
		roadPlusWaterCar.drive(RouteType.WATER);
		roadPlusWaterCar.drive(RouteType.AIR);

		FlyingCarDecorator superCar = new FlyingCarDecorator(roadPlusWaterCar);
		System.out.println("\nMy Fancy Car: "+superCar.getDescription());
		superCar.drive(RouteType.ROAD);
		superCar.drive(RouteType.WATER);
		superCar.drive(RouteType.AIR);
	}

}
My Fancy Car: RoadRacer
Racing on the road
Does not support route type WATER
Does not support route type AIR

My Fancy Car: RoadRacer plus BoatingCar
Racing on the road
Sailing fast with pointed nose !
Does not support route type AIR

My Fancy Car: RoadRacer plus BoatingCar plus FlyingCar
Racing on the road
Sailing fast with pointed nose !
Flying high with wings spread !
Conclusion
The decorators provide a lot of flexibility in creating newer flavors from the existing products. Because of the ability to mix and match, decorators can provide a significant advantage over sub-classing for a given solutions.
However, importantly, the flexibility to mix and match can be error prone and difficult to identify at compile time. Hence, we should be careful in using the right set decorators and also in the right order.
Adaptor Design Pattern
It is an additional layer like an universal power adaptor.
Its a structural design pattern intended to address the compatibility concerns.
Akin to their names, the pattern works very similar to an universal power adaptor:
- If we think of our gadgets as our clients, it makes them compatible even against the incompatible power points.
- Again, from a different angle, it provides a stable interface even if the underlying power point types change.
- For example, our gadgets get the same interface even if we tour from India, to EU, to USA, to China.
In short, it allows us to wrap or re-package a target component to create a more compatible and stable interface for our clients.
In the following section we will look into how it works. And, more importantly, how does it help us in managing the changes happening on our target component.
How does the pattern work?
Lets say we are developing an application for an insurance company. And, we are using a shared PDF service providing many utility features like :
- Create PDF – Based on templates specific to the document types
- Password Protection – User specific password protection on the PDFs
- And many other features.
Lets consider just one feature for simplicity. But, being a basic utility module, we use it from various modules as shown.
With this background in mind, lets say we are doing a major upgrade and moving it from a SOAP based service to a REST based service. Then, the diagram below shows the effect of this change, with and without the use of an adapter design pattern.

When we use the option-1, every client using the service will have to incorporate the API changes. But, with option-2, the all changes can easily be incorporated within the adapter. As long as the clients need the same features, there is no need to change the adapter interface. Thus, the adapter keeps the clients unaffected, even against major changes at the target components.
Adaptors in DI Frameworks
When the clients are directly instantiating the adapter object, we have to modify the same adapter for our changes.
But, in DI(Dependency Injection) frameworks like Spring, we can build our adapters by using the programming to interface approach.
Since we can dynamically inject the required implementation, we can either modify the adapter or replace it with a new one as shown. Thus, the clients can simply be dependent on the base adapter interface, remaining unaffected in both the cases. The diagram below just depicts the same.

Source Code for the Demo
For the ease of understanding, we have divided the demo code into two sets.
The first set shows the adapter and its underlying target services- the existing and the upgraded version.
package spectutz.dp.struct.adapter;

import spectutz.dp.struct.adapter.service.NewPDFService;
import spectutz.dp.struct.adapter.service.PDFService;
import spectutz.dp.struct.adapter.vo.Document;
import spectutz.dp.struct.adapter.vo.PDFDocument;

public class PDFServiceAdapter {
	//Code modification required for the upgrade has been kept commented out

	//Existing Service: The service class providing the existing version
	private static PDFService pdfService = new PDFService();

	//New Service: The service class providing the upgraded version
	//private static NewPDFService newPdfService = new NewPDFService();

	public PDFDocument buildPDF(Document document) {
		//Existing Service: Feature implementation using existing service
		return pdfService.createPDF(document);

		//New Service: Feature implementation using upgraded service
		//return newPdfService.generatePDF(document);
	}
}
package spectutz.dp.struct.adapter.service;

import spectutz.dp.struct.adapter.vo.Document;
import spectutz.dp.struct.adapter.vo.PDFDocument;

public class PDFService {
	public PDFDocument createPDF(Document document) {
		System.out.println("Create a SOAP request to send the document content.");
		System.out.println("Return the generated PDFDocument containing the pdf content.");
		return new PDFDocument(document.getName(), "PDF", "something, something...");
	}

	//Other utility services........
}
package spectutz.dp.struct.adapter.service;

import spectutz.dp.struct.adapter.vo.Document;
import spectutz.dp.struct.adapter.vo.PDFDocument;

public class NewPDFService {
	public PDFDocument generatePDF(Document document) {
		System.out.println("Make a REST call to send the document content.");
		System.out.println("Return the generated PDFDocument containing the pdf content.");
		return new PDFDocument(document.getName(), "PDF", "something, something...");
	}

	//Other utility services........
}
This second set shows the demo client and the remaining files for our reference.
package spectutz.dp.struct.adapter.clients;

import spectutz.dp.struct.adapter.PDFServiceAdapter;
import spectutz.dp.struct.adapter.service.NewPDFService;
import spectutz.dp.struct.adapter.vo.Document;
import spectutz.dp.struct.adapter.vo.PDFDocument;

public class AdapterDemoClient {


	public PDFDocument buildPDFWithAdapter(Document document) {
		//This code does not require any change for an upgrade
		PDFServiceAdapter pdfServiceAdapter =new PDFServiceAdapter();
		return pdfServiceAdapter.buildPDF(document);
	}

	public PDFDocument buildPDFWithoutAdapter(Document document) {
		//This code needs to be changed for an upgrade
		NewPDFService pdfService =new NewPDFService();
		return pdfService.generatePDF(document);
	}

	public static void main(String[] args) {
		Document demoDoc = new Document("XYZ-TermInsurance-1256", "XYZ-TermInsurance", "{...}");

		AdapterDemoClient adapterDemoClient = new AdapterDemoClient();

		PDFDocument pdfOne = adapterDemoClient.buildPDFWithAdapter(demoDoc);
		System.out.println("pdfOne :"+ pdfOne.getName() +"\n");

		PDFDocument pdfTwo = adapterDemoClient.buildPDFWithoutAdapter(demoDoc);
		System.out.println("pdfTwo :"+ pdfTwo.getName() +"\n");
	}

}
package spectutz.dp.struct.adapter.vo;

public class Document {
	private String name;
	private String type; //enum
	private String jsonContent; //JSON string
	public Document(String name, String type, String jsonContent) {
		this.name = name;
		this.type = type;
		this.jsonContent = jsonContent;
	}
	public String getName() {
		return name;
	}
	public void setName(String name) {
		this.name = name;
	}
	public String getType() {
		return type;
	}
	public void setType(String type) {
		this.type = type;
	}
	public String getContent() {
		return jsonContent;
	}
	public void setContent(String content) {
		this.jsonContent = content;
	}
}
package spectutz.dp.struct.adapter.vo;

public class PDFDocument {
	private String name;
	private String type; //enum
	private String content;
	public PDFDocument(String name, String type, String content) {
		this.name = name;
		this.type = type;
		this.content = content;
	}
	public String getName() {
		return name;
	}
	public void setName(String name) {
		this.name = name;
	}
	public String getType() {
		return type;
	}
	public void setType(String type) {
		this.type = type;
	}
	public String getContent() {
		return content;
	}
	public void setContent(String content) {
		this.content = content;
	}
}
As we see in the domo code, we can implement our features with or without an adapter. But, the adapter can provide the following key advantages:
- APIs which are more suited to our application, instead of the generic the APIs of the target components.
- The adapter keeps the clients unaffected, by handling the changes triggered by the target components.
Conclusion
When we use a third party component, we do not have much control over its generic interface. But, using an adapter we can transform this into a more compatible which is more suited to our specific usage.
Besides the compatibility concern, it also provides the much needed control over their changes, as we have seen above.
Thus, an adaptor being an additional layer, we may not go for it for all our third party components. But, considering it is a must, if we are planning for their frequent upgrades or likely replacements. And, more so, if we are planning to use the component at lot many places.
As we have seen above, in DI frameworks like Spring, we can use the programming to interface as an effective approach to build our adapters.
