
Module – Share Code & Instances
Module is an important concept in Nodejs to organize the code to create re-useable assets as well as share the instances.
fs – Module for working on the files & directories,
http – Module for creating http server, working on request and response objects,
events – Module for creating and consuming events using event emitters ;
are some examples from core Nodejs modules which groups the constants, functions, classes ect. related to their respective features.
Such groupings not only help us create re-usable assets but, also, help us create shared instances, as the Nodejs caches the exported instances `by default on loading.
1 How to create and use a local module ?
1. a Export from a local module
As mentioned above a module may contain constants, variables, function or class definitions. In order to make them available to another module, we can export them as a value assigned to module.exports as shown below.
function sayHello(name){
  console.log(`Hello : ${name.toUpperCase()}`);
}

class Duck {
  sound(){
    console.log('quack...quack...quack...');
  }
}

//The default value of modlue.exports is an empty JSON object --> module.exports = {};
module.exports.x = 'x';              //exports a variable
module.exports.sayHello = sayHello;  //exports a function
module.exports.duck = new Duck();    //exports an instance
module.exports.Duck = Duck;          //exports a Class
1.b Import from a local module
To use them from a different file, we can import this local module like any other module using ‘require‘.
The require() takes the relative file location and assigns the value of module.exports as shown below.
//require() assigns the value of module.exports
const myModule =require('./my-module.js');

myModule.sayHello("David");   //prints - Hello : DAVID
myModule.duck.sound();        //prints - quack...quack...quack...

duck = new myModule.Duck();
duck.sound();                 //prints - quack...quack...quack...
In case we want to get the exported components separately, we can do that as shown below:
const {sayHello, duck, Duck} = require('./my-module.js');

sayHello("David");    //prints - Hello : DAVID
duck.sound();         //prints - quack...quack...quack...
new Duck().sound();   //prints - quack...quack...quack...
2. Using ‘exports’ – An alias for shortcut
While exporting the components, we often use ‘exports’ instead of ‘module.exports’ as a shortcut. Importantly, the nodejs initializes ‘exports’ as an alias to ‘module.exports’ internally before our code executes.
//What a module does internally before our code executes...
var module.exports = {};
var exports = module.exports; //Both refer to the same empty JSON object
Since, nodejs exports only the values assigned to module.exports :
- We should not to assign any new object to ‘exports’, because it will remove the reference to ‘module.exports’
- Rather we should only assign new attributes through the ‘exports’ alias as shown below.
function sayHello(name){
  console.log(`Hello : ${name.toUpperCase()}`);
}


//Initially both module.exports and exports refer to the same empty JSON object
//Adding new attributes to exports is fine
exports.sayHello = sayHello;
exports.x = 'x';
exports.y = 'y';

//Updating an existing attribute on exports is also fine
exports.x ='xx';   //This will work as it is updating module.exports.x

//Assigning a new object to exports is a mistake
exports   = {x : 'xxx'}; //Now exports is no more the same module.exports
//All the following assignments will not be exported
exports.y = 'yy';
Thus, for reference, the output of the following code will be as specified in the comments :
const myModule=require('./exports-alias.js');

myModule.sayHello("David");  //prints- Hello : DAVID

console.log('x = '+ myModule.x); //prints - xx
console.log('y = '+ myModule.y); //prints - y
3. Caching on load helps us share the instances
function getRandomInt(max) {
  return Math.floor(Math.random() * max);
}
exports.a =  getRandomInt(10);
const a1 = require('./module.js');
const a2 = require('./module.js');

//getRandomInt(10) executes only once
console.log(a1.a == a2.a); //prints -true

a1.a = 50;
//Both refer to the same variable
console.log(a1.a == a2.a); //prints -true
Besides allowing us to re-use the code, the modules also help us share the instances. It’s because when we load any module using require(), nodejs caches the exported components. Hence, on the subsequent loads we get the same instances. Thus, it keeps the application lighter with shared instances.
4. Exporting from ECMAScript modules
In case we are using *.mjs files using ECMAScripts, we need to use import and export statements instead of require.
We can not import a *.mjs module on a *.js file but, we can import from a *.js file into *.mjs file.
Export Module
 function sayHello(name){
  console.log(`Hello : ${name.toUpperCase()}`);
}

class Duck {
  sound(){
    console.log('quack...quack...quack...');
  }
}

var duck = new Duck();

export {sayHello, duck, Duck};
function sum(a,b){
  return a+b;
}
exports.sum = sum;
Import Module
import { sayHello, duck, Duck } from './my-ecma-module.mjs';
import cjsModule from './my-commonjs-module.js';

sayHello("David");    //prints - Hello : DAVID
duck.sound();         //prints - quack...quack...quack...
new Duck().sound();   //prints - quack...quack...quack...

console.log(cjsModule.sum(20,40)); //prints - 60
NodeJS – EventEmitters

The Event Emitters allows us to build highly customizable components. By sending the events at the key points in our program execution, we let the clients add their custom logic externally at those points.
In short, the events provide easy to use customization points for the clients. Because of this, most of the Nodejs APIs implement these event emitters to keep their usage simple and customizable.
Understanding the Benefits with an Example:
Here is an example of a readable stream that implements EventEmitters. The highlighted lines shows three key events from this component, namely ‘data’, ‘end’, ‘error’.
The comments within each shows, how the events help us customize the core logic across the readable stream at a few simplified points.
const fs = require('fs');
const rs = fs.createReadStream('example.txt','utf8');

rs.on('data', (chunk)=>{
    // Here is another chunk of data collected for you....
    // You focus on doing what you need to do. For example :
    // 1. You may pipe it to another stream.
    // 2. You may do some inflate or deflate operation on it
});

rs.on('end', () => {
  // We have just finished reading all our data!
  // Do you have anything specific in your mind to do here ?
});

rs.on('error', (err) => {
  // The error might occur at different points inside the readable component..
  // But, don't worry, I will report all the errors here for you to handle
});
Just by implementing these event handlers we will have a customized version of the readable stream ready for our specific need.
How to Create an Event Emitter
Making any class an event emitter is simple. We just need to extend the EventEmitter class from the ‘events’ module, as in line-3.
Now once we create an instance of the class, we can add the handlers for the events we want to customize.
const EventEmitter = require('events');

//Making a Bird class that is capable of emitting events
class Bird extends EventEmitter {}

//1. Creating an instance for a specific use
const myDuck = new Bird();

//2. Adding sound event handler : What sound should it make on sound event?
myDuck.on('sound', () => {
  console.log('quack...quack...quack...');
});


//Emit different events to test
myDuck.emit('sound');   // prints: quack...quack...quack...

myDuck.emit('move');    //It will be ignored as there is no handler

myDuck.emit('sound');   // prints: quack...quack...quack...
const EventEmitter = require('events');

//Making a Bird class that is capable of emitting events
class Bird extends EventEmitter {

    wayBackHome(){
          this.emit('sound');
          //Other processing logic, if any
          this.emit('move');
          //SomeOther processing logic, if any
          this.emit('sound');
    }
}

//Creating an instance and add required event handlers
const myDuck = new Bird();

myDuck.on('sound', () => {
  console.log('quack...quack...quack...');
});

//This is going to emit events
myDuck.wayBackHome();
As specified in the comments, running this class will print : ‘quack…quack…quack…’ twice and ignore the ‘move’ event since it does not have a handler.
Just for reference, the second tab above shows how a real class emits such events from its operations.
Exploring EventEmitters with Examples
1. Handle an event only once
The on(‘event’) handles the events on each occurrence. In case we want to handle an event only once, we can use once(‘event’) as shown on line-8.
const EventEmitter = require('events');

const myEmitter = new EventEmitter();

myEmitter.on('event', () => { //will print thrice
     console.log('On handler ...');
});
myEmitter.once('event', () => {//will print only once
     console.log('Once handler ...');
});

myEmitter.emit('event');
myEmitter.emit('event');
myEmitter.emit('event');
Output:
On handler ...
Once handler ...
On handler ...
On handler ...
2. How to pass data along with the event?
As shown below, we can pass a list of data elements as comma separated parameters while emitting events.
const EventEmitter = require('events');
const myEmitter = new EventEmitter();

myEmitter.on('event', () =>{
  console.log('Not using data.');
});
myEmitter.on('event', (arg1) => {
  console.log(`First data : ${arg1}`);
});
myEmitter.on('event', (...args) => {
  console.log(`All data : ${args}`);
});

myEmitter.emit('event', 1, 2, 3, 4, 5);
Output:
Not using data.
First data : 1
All data : 1,2,3,4,5
3. How to throw and handle an error?
In case we throw an error, the client need to handle it using a try catch block. But, in case of an EventEmitter, instead of throwing an error, we can emit the error using an ‘error’ event as shown in line-9 below. It will have the same effect, had we simply thrown that error.
To handle this error, we can add an event handler as shown in line-4.
const { EventEmitter} = require('events');
const myEmitter = new EventEmitter();

myEmitter.on('error',(err)=>{
    console.log("Error handled: "+ err.message);
});

//Instead of throwing the error, we can emit using 'error' event
myEmitter.emit('error', new Error('Oooops! Something went wrong.'));
console.log("Program won't reach here without handling the error event!");
Output:
Error handled: Oooops! Something went wrong.
Program won't reach here without handling the error event!
4. How to capture an error for monitoring purpose
The events module provides an utility called, errorMonitor; just to capture the error without handling it. We can use this to collect the error for some monitoring tool.
The line-6 shows the use of this utility. With line-4 commented out, the following program should crash.
const { EventEmitter, errorMonitor } = require('events');
const myEmitter = new EventEmitter();

//myEmitter.on('error',(err)=>{console.log("Error handled: "+ err.message);});

myEmitter.on(errorMonitor, (err) => {
  //I am not handling the error,
  //just capturing it to a monitoring tool
});

//Instead of throwing the error, we can emit using 'error' event
myEmitter.emit('error', new Error('Oooops! Something went wrong.'));
console.log("Program won't reach here unless we handle the error event!");
5. Utility Functions for Managing Listeners
The event handlers that we add are the listeners for the events. The events module provide various apis for functions such as counting, listing, removing these listeners.
The table below lists some of those key functions.
| Functions | Usage |
| listenerCount(myEmitter,’some-event’) | Provides the count of handlers for event ‘some-event’. |
| myEmitter.eventNames() | Provides the event names for which we have listeners. |
| myEmitter.listeners(‘some-event’) | Provides the listners functions registered for the event ‘some-event’ |
| myEmitter.getMaxListeners() | Provides max number of listeners we can register for the emitter. The default is 10. We can change it using setMaxListeners |
| myEmitter.removeListener(‘event’, myListener) | This will remove the last matching listener in the listener array for the event. |
| myEmitter.addListener(‘event’, myListener) | Same as on(‘event’, myListener) Adds the listener at the end of the listener array for the given event. |
| myEmitter.prependListener(‘event’, myListener) | This allows us to add the listener at the start of the listener array. |
The following program shows the usage of these functions :
const { EventEmitter, listenerCount } = require('events');
const myEmitter = new EventEmitter();

const myListener1 = () => { console.log('myListener1'); }
const myListener2 = () => { console.log('myListener2'); }

myEmitter.on('some-other-event', () =>{});

myEmitter.on('event', myListener1);
myEmitter.on('event', myListener2);
myEmitter.on('event', myListener1);

console.log("listenerCount for event :"+ listenerCount(myEmitter,'event'));
console.log("listenerCount for some-other-event :" + listenerCount(myEmitter, 'some-other-event'));
console.log("myEmitter.eventNames :"+ myEmitter.eventNames());
console.log("myEmitter.listeners :" + myEmitter.listeners('event'));

console.log("myEmitter.getMaxListeners :" + myEmitter.getMaxListeners());

myEmitter.removeListener('event', myListener1);
console.log("myEmitter.removeListener('event', myListener1) - Done")
console.log("myEmitter.listeners : " + myEmitter.listeners('event'));

myEmitter.prependListener('event', myListener2);
console.log("emitter.prependListener('event', listner2) - Done")
console.log("myEmitter.listeners : " + myEmitter.listeners('event'));
Output:
F:\nodejs\node01\samples\events>node 05-multiple-listners.js
listenerCount for event :3
listenerCount for some-other-event :1

myEmitter.eventNames :some-other-event,event
myEmitter.listeners :() => { console.log('myListener1'); },() => { console.log('myListener2'); },() => { console.log('myListener1'); }

myEmitter.getMaxListeners :10

myEmitter.removeListener('event', myListener1) - Done
myEmitter.listeners : () => { console.log('myListener1'); },() => { console.log('myListener2'); }

emitter.prependListener('event', listner2) - Done
myEmitter.listeners : () => { console.log('myListener2'); },() => { console.log('myListener1'); },() => { console.log('myListener2'); }
Nodejs – REPL
The REPL(Read-Eval-Print-Loop) provides an interactive environment to interact with the core Nodejs module.
It’s a handy utility to test small snippets and explore various Nodejs packages from command line.
Starting REPL
The simplest way to start this REPL shell is by using node command as follows:
The other tab shows some of the useful commands available in REPL just for reference.
F:\nodejs\repl>node
Welcome to Node.js v12.18.3.
Type ".help" for more information.
>
> .help
.break    Sometimes you get stuck, this gets you out
.clear    Alias for .break
.editor   Enter editor mode
.exit     Exit the repl
.help     Print this help message
.load     Load JS from a file into the REPL session
.save     Save all evaluated commands in this REPL session to a file

Press ^C to abort current expression, ^D to exit the repl
This internally starts repl.REPLServer. We can also start instances of this server inside our programs by importing the following module.
const repl = require('repl');
As we will see at the end, we can start multiple instances to work on the same Nodejs process. But, to start with lets see some of the useful features we can get out of this REPL servers.
1. Evaluate Commands on REPL
We can use it for evaluating simple single or multi-line commands and functions on Nodejs.
> 5+5
10

> throw new Error("Oops...");
Uncaught Error: Oops...

> _error.message     //Shows last seen error message
'Oops...'
>
> function hello(name){
... console.log("Hello "+ name);
... }
undefined
> hello("Nodejs");
Hello Nodejs
undefined
Three dots shows the continuance of the same program in the next line.
REPL also provides autocomplete features while typing Nodejs commands.
2. Explore Global Objects
As shown below, we can explore the global objects in the Nodejs by using global. + [TAB] command.
> global.
global.__defineGetter__      global.__defineSetter__      global.__lookupGetter__      global.__lookupSetter__      global.__proto__
global.hasOwnProperty        global.isPrototypeOf         global.propertyIsEnumerable  global.toLocaleString        global.toString
global.valueOf

global.constructor

global.Array                 global.ArrayBuffer           global.Atomics               global.BigInt                global.BigInt64Array
global.BigUint64Array        global.Boolean               global.Buffer                global.DataView              global.Date
global.Error                 global.EvalError             global.Float32Array          global.Float64Array          global.Function
global.GLOBAL                global.Infinity              global.Int16Array            global.Int32Array            global.Int8Array
global.Intl                  global.JSON                  global.Map                   global.Math                  global.NaN
global.Number                global.Object                global.Promise               global.Proxy                 global.RangeError
global.ReferenceError        global.Reflect               global.RegExp                global.Set                   global.SharedArrayBuffer
global.String                global.Symbol                global.SyntaxError           global.TextDecoder           global.TextEncoder
global.TypeError             global.URIError              global.URL                   global.URLSearchParams       global.Uint16Array
global.Uint32Array           global.Uint8Array            global.Uint8ClampedArray     global.WeakMap               global.WeakSet
global.WebAssembly           global._                     global._error                global.assert                global.async_hooks
global.buffer                global.child_process         global.clearImmediate        global.clearInterval         global.clearTimeout
global.cluster               global.console               global.crypto                global.decodeURI             global.decodeURIComponent
global.dgram                 global.dns                   global.domain                global.encodeURI             global.encodeURIComponent
global.escape                global.eval                  global.events                global.fs                    global.global
global.globalThis            global.http                  global.http2                 global.https                 global.inspector
global.isFinite              global.isNaN                 global.module                global.net                   global.os
global.parseFloat            global.parseInt              global.path                  global.perf_hooks            global.process
global.punycode              global.querystring           global.queueMicrotask        global.readline              global.repl
global.require               global.root                  global.setImmediate          global.setInterval           global.setTimeout
global.stream                global.string_decoder        global.tls                   global.trace_events          global.tty
global.undefined             global.unescape              global.url                   global.util                  global.v8
global.vm                    global.worker_threads        global.zlib
3. Explore Packages
We can explore the constants and functions available in a Nodejs module as shown for file system(fs) module.
> fs.
fs.__defineGetter__      fs.__defineSetter__      fs.__lookupGetter__      fs.__lookupSetter__      fs.__proto__             fs.constructor
fs.hasOwnProperty        fs.isPrototypeOf         fs.propertyIsEnumerable  fs.toLocaleString        fs.toString              fs.valueOf

fs.Dir                   fs.Dirent                fs.F_OK                  fs.FileReadStream        fs.FileWriteStream       fs.R_OK
fs.ReadStream            fs.Stats                 fs.W_OK                  fs.WriteStream           fs.X_OK                  fs._toUnixTimestamp
fs.access                fs.accessSync            fs.appendFile            fs.appendFileSync        fs.chmod                 fs.chmodSync
fs.chown                 fs.chownSync             fs.close                 fs.closeSync             fs.constants             fs.copyFile
fs.copyFileSync          fs.createReadStream      fs.createWriteStream     fs.exists                fs.existsSync            fs.fchmod
fs.fchmodSync            fs.fchown                fs.fchownSync            fs.fdatasync             fs.fdatasyncSync         fs.fstat
fs.fstatSync             fs.fsync                 fs.fsyncSync             fs.ftruncate             fs.ftruncateSync         fs.futimes
fs.futimesSync           fs.lchmod                fs.lchmodSync            fs.lchown                fs.lchownSync            fs.link
fs.linkSync              fs.lstat                 fs.lstatSync             fs.mkdir                 fs.mkdirSync             fs.mkdtemp
fs.mkdtempSync           fs.open                  fs.openSync              fs.opendir               fs.opendirSync           fs.promises
fs.read                  fs.readFile              fs.readFileSync          fs.readSync              fs.readdir               fs.readdirSync
fs.readlink              fs.readlinkSync          fs.readv                 fs.readvSync             fs.realpath              fs.realpathSync
fs.rename                fs.renameSync            fs.rmdir                 fs.rmdirSync             fs.stat                  fs.statSync
fs.symlink               fs.symlinkSync           fs.truncate              fs.truncateSync          fs.unlink                fs.unlinkSync
fs.unwatchFile           fs.utimes                fs.utimesSync            fs.watch                 fs.watchFile             fs.write
fs.writeFile             fs.writeFileSync         fs.writeSync             fs.writev                fs.writevSync
4. Customize REPL
As mentioned above, we can also create the repl server instance using the repl module. Here, is an example of customizing the repl console :
- We have customized the prompt
- We have initialized the repl context with a variable and
- Finally, we have also added a new function to it.
const repl = require('repl');

function initializeContext(context) {
  context.desc = 'My REPL Console';
}

const replServer = repl.start({ prompt: 'My REPL ==> ' });
initializeContext(replServer.context);

replServer.defineCommand('bye', () => {
  console.log('bye bye!');
  replServer.close();
});
F:\nodejs\repl>node create-repl-server-02.js
My REPL ==> desc
'My REPL Console'
My REPL ==>
My REPL ==> 2+5
7
My REPL ==> .bye
bye bye!
NodeJS Event loop – The TODO Lists
NodeJS uses the Event-Driven Architecture for processing its requests where the event loop and the worker pool are two key components.

As we have seen in the previous article (Single Vs Multi Thread), the event loop acts as a TODO list for the main thread. In fact, such a list becomes very essential while it works on multiple requests in parallel; dealing each request in parts.
These events include everything that needs attention from the main thread. For example, the incoming requests, the callbacks from worker pool, various other system generated events, our program generated callbacks and so on.
Hence, it’s important to understand how this TODO list is structured and the rules behind picking these events for execution.
This TODO list, in fact, consists of set of queues; each one being for a specific purpose. Since the main thread keeps picking up the events from one queue after the other in a loop, we call it as event loop.
In this article, we will look at those various queues, their order of execution and their significance in more detail.
How does the Event-loop work ?
As shown in the diagram below, NodeJS event loop has different phases and each phase has a FIFO queue. And, the main processor keeps processing events registered in these queues in a loop.
Processing of each event is called a Tick. After processing an event, the event execution loop picks the next event as shown.

Besides the event loop there is another high priority queue, the JobQueue. This sits right in-front of the event loop in the event processing mechanism. Only if this queue is empty, the process continues inside the event loop from its last point.
We register events in this fast-track queue using process.nextTick() and promise. Moreover, within the JobQueue the process.nextTick has a higher priority over the promise registered tasks.
Phases in Event-loop
- Timers : Functions registered using setTimeOut or setInterval falls into this phase.
- While coming from a main module, nodeJs initializes the loop and enter from here.
- Importantly, such events come into the queue only after the specified time interval is over; not when we set them.
- Pending IO Callback : NodeJs uses this internally to execute callbacks for some system operations such as types of TCP errors.
- Idle and Prepare : This is again another one that NodeJS uses for internal purpose.
- Poll : This is one of the most important phase to understand, as it executes most of our request specific events.
- The phase waits for and executes the asynchronous IO related callbacks. (eg. callbacks from fs.read(), fetch() etc.)
- It also receives the incoming connections or requests into its queue.
- If the queue is not empty:
- It keeps processing its events until the queue is empty or the system configured hard limit is reached.
- If the queue is empty (i.e. the phase is idle):
- a. If the loop has any event ready, it moves out in a loop starting with the Check (setImmediate) phase to execute the pending events in all the phases in a loop.
- b. If no events are there, it keeps waiting for the callbacks from the ongoing asynchronous IO calls.
- c. If no events are there and we are not waiting on any IO call, the process will proceed for a shut down.
- Check: This phase executes the callbacks registered using setImmediate.
- Close Callbacks: This phase executes the callbacks associated with the closing events like
socket.on('close', fn)
A Layman’s View :
Having seen the various queues and the execution rules, what does it point to ? Why the loop prefers waiting in the loop phase and occasionally goes for a round trip only on a need basis?
Well, perhaps the customers are the king rule also applies here 🙂
The main process gives highest priority to the user requests and it’s callbacks from its associated IO calls. In fact, most of our real time request consists of a chain of synchronous pieces of code and asynchronous IO calls with synchronous code in its callback. Since both run here, this phase would be executing most of our code.
There would be rare cases where we want to do something intermittently with setTimeout or setImmediate. The loop will be addressing them when poll phase will be idle. We also have the option of Promise or process.nextTick(), to handle these asynchronous pieces on a priority basis; without going out of the poll phase.
Sample Programs to Understand the Event Loop
Case -1 : Starting from a Main Module
Let’s register a printMessage function into various phases of the event loop as shown to test their order of execution.
function printMessage(msg){
  console.log(msg);
}

function testEventLoopSequence(){
  //Functions registered in different phases
  setTimeout(()=>{printMessage("TimerPhase : setTimeout - 1")},0);
  setImmediate(()=>printMessage("Check Phase : setImmediate - 2"));
  Promise.resolve('JobQueue : promise - 3').then((msg)=>printMessage(msg));
  process.nextTick(()=>printMessage('JobQueue : nextStep 4'));


  printMessage('Main Module - This completes before any of the events.\n')
}
testEventLoopSequence();
F:\nodejs\examples\even-loop>node test-execution-sequence-01.js
Main Module - This completes before any of the events.

JobQueue : nextStep 4
JobQueue : promise - 3
TimerPhase : setTimeout - 1
Check Phase : setImmediate - 2
As we can see in the output, the main module completes first before Nodejs picks up any event from the event module.
Secondly, when we are starting a program in Nodejs, it starts the Nodejs process and initializes the event loop. The process starts picking events from the timer phase of the event loop. Hence, we can see the message in the timer phase has printed before the one in check phase even if the order of registration was the opposite.
Third, even after being registered last the message from JobQueue has appeared first because the process always ensures this queue is empty before it looks for any events in the event loop.
Now let us register the same set of things as an IO callback.
Case -2 : Sequence also Depends on Your Starting Point.
Now we are repeating our test in case-1 with the following two changes:
- Register the message using setTimeout before setImmediate.
- Instead of calling directly, call the testEventLoopSequence as a callback from fs.readFile.
const fs = require('fs');

function printMessage(msg){
  console.log(msg);
}

function testEventLoopSequence(){
  //Functions regitered in different phases
  setTimeout(()=>{printMessage("TimerPhase : setTimeout - 1")},0);
  setImmediate(()=>printMessage("Check Phase : setImmediate - 2"));
  Promise.resolve('JobQueue : promise - 3').then((msg)=>printMessage(msg));
  process.nextTick(()=>printMessage('JobQueue : nextStep 4'));

  printMessage('Main Module - This completes before any of the events.\n')
}

//Call testEventLoopSequence as an IO callback
fs.readFile('test-execution-sequence-02.js', testEventLoopSequence);
F:\nodejs\examples\even-loop>node test-execution-sequence-02.js
Main Module - This completes before any of the events.

JobQueue : nextStep 4
JobQueue : promise - 3
Check Phase : setImmediate - 2
TimerPhase : setTimeout - 1
This is a case where the asynchronous IO call is registering its callback into poll phase.
When we look at the output for the sequence of execution, everything remains the same as in case-1 except the last two lines.
Contrary to case-1, here the check phase has come before the timer phase. Its because we have registered these events while executing the callback in the poll phase. Hence, when we go round the loop from the poll phase , the check phase come before the timer phase.
In short, we should remember that setImmediate comes before setTimeout as we usually set those from inside the IO callbacks.
Case -3 : Using process.nextTick for key follow up events.
Being a high priority queue it is quite useful in adding event handlers after creating an object but before any I/O has occurred.
For example let’s say we are creating a server application and we have a listener on start event. Below are the options shown after creating the instance as shown in the inline comments:
const EventEmitter = require('events');
const util = require('util');

function MySpecialServer() {
  EventEmitter.call(this);


  //this.emit('running');                      //Case -1

  //setImmediate(()=>this.emit('running'));    //Case-2

  process.nextTick(()=>this.emit('running'));  //Case -3
}
util.inherits(MySpecialServer, EventEmitter);

const mySpecialServer = new MySpecialServer();
mySpecialServer.on('running', () => {
  console.log('My Special Server has started!');
});
Case-1 : Emitting event at this point (line-10) won’t work as our handler is not set yet(line-17).
Case-2 : Using setImmediate will work, but not before completing any IO calls, if at all has reached right after the server got started.
It’s because the event loop moves to the check phase only when the pool queue is idle.
Case-3 : The option to set using process.nextTick is the best as this will send the event right after the creation and before we handle any event from the event loop.
Case -4 : Using process.nextTick for fixing semi-asynchronous functions
The functions should be either synchronous or asynchronous but, anything in-between could create unexpected results.
Take the following function for example where we are internally calling the callback both synchronously and asynchronously on a conditional basis. But, since it has an asynchronous signature, the client is setting the contact in the calling program; unfortunately after making the asynchronous call.
const fs = require('fs');
const isAsync = Math.random() > 0.5;
let contact;


function myAsyncFunction(isAsync, callback) {
  console.log("isAsync value :"+isAsync);
  if(isAsync){
    fs.writeFile('test.txt',"Something",callback);
  }else{
    callback(); //Case-1 :Sometimes callback runs synchronously
    //process.nextTick(callback); //Case-2: The right approach
  }
}

myAsyncFunction(isAsync, ()=>{
  console.log("Sending status to: "+ contact);
});

//Expecting contact to be available when myAsyncFunction completes!
contact="Ron@xyz.com";
In such a case the output may vary as shown below, depending on how we are calling the callback. Hence, a better approach here is to use process.nextTick, shown as case-2, to ensure the callback runs asynchronously all the time.
F:\nodejs\examples\event-loop>node test-semiAsyncFunction.js
isAsync value :true
Sending status to: Ron@xyz.com

F:\nodejs\examples\event-loop>node test-semiAsyncFunction.js
isAsync value :false
Sending status to: undefined
Single Vs Multi-thread Model
As a beginner, when we hear a Single thread model being more scalable compared to the multi-thread model, it sounds quite confusing ! How can a team be less powerful compared to a one man army ?
Well, even though it may not be true always, but it’s definitely true in handling high volume data intensive requests. By data intensive request we mean, calls involving more of IO calls (calls to databases or services etc) and requiring minimal cpu processing.
Moreover, Nodejs has been designed to handle this specific scenario better. And, it is one of the key reason behind its early acceptance and rapid growth in top tier internet companies.
In this article, we will focus on this particular feature to see what problem it solved and how ?
A Typical Data Intensive Request
Let’s consider a bank account home page where we would be showing customer account summary. We may just use the client id to get the summary as follows:
- Fetch his account numbers using the client id and use this to fetch the following details
- Get his savings account balance
- Fetch his latest transactions using
- Fetch his fixed deposit balance
- and return an account summary.
As we can see such types of request require more of IO calls compared to any heavy computational work.
In most of our applications that we use on daily basis, the requests mostly involves CRUD operations and very minimal processing as in the example given above.
So, let us consider such a data intensive request where the IO calls share the majority of the response time as shown below.
- Three very small parts needing CPU processing and
- Two much longer parts involving IO calls.

Assuming we have a continuous flow of this call from different clients, lets see how the two systems will handle them.
Multi-thread Model
In a multi-threaded system, each thread takes up call to process it end to end before its ready to accept a new one. Hence, besides doing its part of processing, it also waits on the IO calls for the response to come back.
As we can see, even if we have multiple threads working on the incoming requests, there are many a times all of them sit idle.

When all threads are waiting it simply wastes the CPU time, even if there would be many new request in the pending queue. If this case continues longer, it will keep building up the pending queue, hence the response time and, finally, result in a server crash.
In other words, we are under utilizing the power of the our CPU and would be blaming him for the under performance. The Single thread model tries to do away with this injustice and allows the CPU to show case its capability in full.
Single Thread Model – Reactive Models
In the Single thread model we are ensuring the main thread is not waiting on these time consuming IO calls.
It provides asynchronous IO APIs and a small number threads in a worker pool, so that the main thread can offload the waiting part.
As soon as it hands over the IO call to a thread in worker pool, it proceeds with other tasks pending for it. Meanwhile, as the blocking IO returns the response, the thread registers the associated callback into the NodeJS Event Loop. The callback defines the further processing; using the result from the asynchronous call. The processing of the request; sharing it between the main thread and worker pool then looks as shown in the below diagram.

Importantly, as we can see, the main thread now only works on what needs it attention and never waits on others. This maximizes the CPU utilization and, hence, the scalability.
- In our example, whereas with 10 threads we can process 10 request in 4 seconds using multi-thread model; we can process around 100 requests within the same time using the single thread models.
The below diagram shows another view of what we have seen above. To be specific, it shows how we divide the parts of a request between the main thread and the worker pool using the even loop.

Summary
Nodejs is quite effective for handling high volume, data intensive calls with significantly less number of servers. By data intensive calls, we mean the calls involving more of IO calls and minimal CPU processing. It can provide a much better performance in terms of response time and handling spikes in the load.
Because of this feature, many high volume internet based companies such as LinkedIn, Uber, Netflix have been early adopters of NodeJS. High scalability, better load handling, usage of the same language for both front-end and back-end are the some of the key reasons for making NodeJS so popular across the industry, so fast.
We should remember that the server was not built for CPU intensive tasks such as complex calculations, image or video processing etc. Hence, we should always keep such stuffs away from the main thread, ensuring we do not block it for long. For such tasks, we should make use of the child threads which was introduced later in version 10.5.0 for optimal processing.
Understanding the Basics of the JWT Tokens
Sending your payload using JWT Token is like sending your object in a transparent box locked with a highly secure shared key.
If someone changes your box, you wont be able to open it.
If you are able to open it, you can safely say that the object is genuine- no one has changed it on the way.
JSON Web Token (JWT) is an open standard where two parties can exchange JSON payloads in a trusted way. Both parties can trust each other on the exchanged payload because it is digitally signed using a shared secret key or a public\private key.
The key thing to remember is that the JWT token do not protect your data, but only ensures it’s integrity. Hence, if we are able to verify a token, it means no one has tampered the payload in it. We would require additional encryption for protecting the payload data.
We have a separate article on its usage in authorization process. But, in this article, we will keep our focus only understanding the data in the token and exploring why should we trust it ?
Decoding the Token
Below is an example of JWT Access Token, containing an authorized user detail.
eyJhbGciOiJIUzI1NiIsInR5cCI6IkpXVCJ9.eyJ1c2VybmFtZSI6InRlc3RBZG1pbiIsInJvbGUiOiJhZG1pbiIsImlhdCI6MTYwNjk1MDQ5MywiZXhwIjoxNjA2OTUwNDk4fQ.Vfr4M31jkqT5u4BqbDqNQaEtZ1Sqbwwy7zS7jw94CC0
If we look at the token above, it has 3 sections. The last part is the signature whereas the first two parts are the base64 encoded Header and the PayLoad.
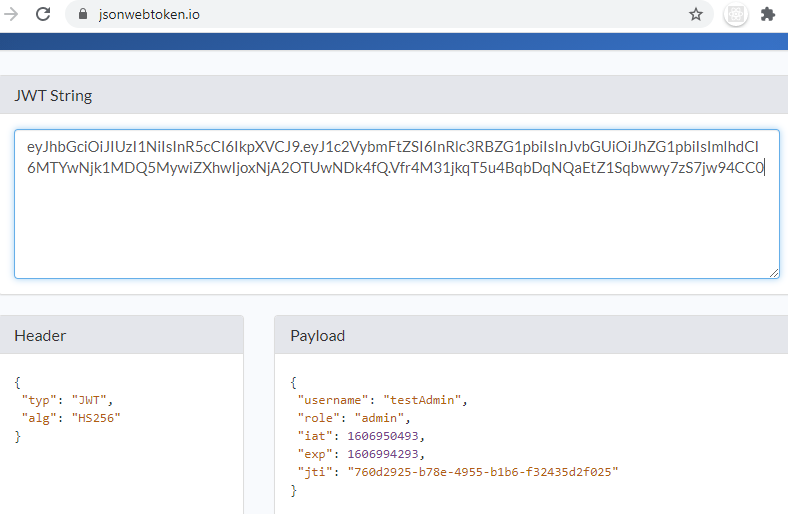
Hence, clearly the header and payload are not protected and the above figure shows their actual content.
- The header contains the encryption algorithm used in the signing process.
- The payload, here, includes the user detail, his role and an expiry time for the token.
Why should we trust these tokens ?
Of course, these tokens do not protect the content but definitely ensures it’s integrity. The below diagram shows how ?

As we can see, both the signing authority and verifying client, try to re-create the signature on the message. They use the same encryption algorithm as it is shared inside the token header.
- Only if both have the shared secret key or a matching public\private certificates, the generated signatures will match.
- First, this ensures no other than the targeted client is able to verify and, hence, use it as a valid data.
- Second, a verified token also confirms that it has come from the signing authority holding a matching secret.
- Finally, if any one tampers the message or the signature, the signatures won’t match and the verification will fail.
Summary
In short, a successfully verified JWT token ensures that -1. No one has tampered the payload and 2. It has come from the right authority.
As regards the protection of the payload data, we can use another layer of encryption over the token.
The article on using JWT Access Token for Authorization shows a practical usage along with a simple POC on this signing and verification process.
Singleton Design Pattern
SINGLETON – Hey, I privately control my own creation to ensure all of you get my single unique copy. No piracy allowed!
It’s a creational design pattern that ensures that there is only a single instance of the class available for everyone to use.
This is useful in managing shared data and configurations in the application.
Importantly, we must remember that the uniqueness of such instance is confined to its runtime instance. For example, in java each JVM instance can have its separate singleton object. Hence, in a distributed environment we may need additional implementation to ensure the contents of singleton instances are the same and synchronized.
How does the pattern work?
A singleton basically has two important things manage.
1. Limit Number of Instances to One :
- A Private Constructor in Java helps us achieve this by restricting any class other than the Singleton class to create an instance.
2. Load & Manage the Shared Data :
We can choose to load the data at the time of class loading but, it might impact the loading time. Hence, in case of time consuming data load process, we may choose to use lazy loading. Thus, we can categories data loading in singletons into the following two categories :
- Eager Loading Data
- Easy and useful for light data loading.
- Lazy Loading Data
- This is the recommended approach for heavy and time consuming data loading process.
- Since we might get overlapping data loading requests, these methods need to be made thread safe.
So, let us look at an example code to understand it better.
Summary of the benefits
- Its very useful in adding new features to objects with complex structures.
- Its keeps the processing logic clean by separating the traversal logic .
K8s – ConfigMap

The ConfigMap enables us to store non-confidential configuration data. It’s being specific to namespace, we can use it for externalizing environment specific configurations.
By externalizing our environment specific configurations, it makes our container IMAGEs portable across different environments.
Considering the dynamic nature of scheduling of PODs in different Nodes, it provides an elegant solution to share the application configurations.
How it holds key-value literals & configuration files ?

The diagram sums up the concept behind the ConfigMaps. It shows how it stores the files and literals as key-value pairs inside the ConfigMap.
The sample ConfigMap represents two literal key-value pairs and two properties files(app.properties and subscription.yaml).
- Literals : literal-key is used as key; literal-value is stored as its value.
- Files : The file name is used used as the key and the content as its value.
As we will see we can import each of the keys as separate environment variables or separate linked files using volume.
Create ConfigMap -Using ‘create configmap’
We can edit the ConfigMap API object and apply it the server. Kubectl ‘create configmap’ provides an easier option to create it directly from our local configuration files.
Create ConfigMaps from Files and Literals
Step-1 : Create the below two files on your local system.
app.properties
email=test@spectrums.com
session.timeout=20
max.retry=3
subscription.yaml
maxTeamSize:
- free: 1
- premium: 10
Step-2 : Run the below ‘create configmap’ command on a minikube cluster :
kubectl create configmap app-config \
--from-literal=default.theme=dawn \
--from-literal=premium.theme=awesome \
--from-file=app.properties \
--from-file=SUBSCRIPTION=subscription.yaml
To view the ConfigMap run the below command.
kubectl get configmaps app-config -o yaml
The output would look similar to :
apiVersion: v1
data:
  default.theme: dawn
  premium.them: awesome
  app.properties: |
    email=test@spectrums.com
    session.timeout=20
    max.retry=3
  SUBSCRIPTION: |
    maxTeamSize:
    - free: 1
    - premium: 10
kind: ConfigMap
metadata:
  creationTimestamp: "2020-06-27T14:16:09Z"
  name: my-app-config
  namespace: default
  resourceVersion: "473"
  selfLink: /api/v1/namespaces/default/configmaps/my-app-config
  uid: 0d7f0e55-8a9c-4937-88dc-44ecf219fe59
- We can see the generated ConfigMap has two key-value literals and two files.
- For the first file the file-name, app.properties is the key
- For the second one the default file name key has been modified with the specified key ‘SUBSCRIPTION‘
Summary of the ‘create configmap’ data parameters
- We have used from-literal , from-file in our example and we can also use:
- from-env-file : For each entry in the file content to create a literal key-value pair.
- from-directory: Useful to include all the files in a directory, without using form-file multiple times.
Importing ConfigMap into a Pod
1. Import ConfigMap as Env Variables
app-config.yaml
apiVersion: v1
kind: ConfigMap
metadata:
  name: app-config
  namespace: default
data:
  DEFAULT_THEME: dawn
  PREMIUM_THEME: awesome
  test.properties: |
    free.team.size=1
    premium.team.size=10
test-config-pod.yaml
apiVersion: v1
kind: Pod
metadata:
  name: test-config-pod
spec:
  containers:
    - name: test-container
      image: k8s.gcr.io/echoserver:1.4
      envFrom:
      - configMapRef:
          name: app-config
The highlighted lines in test-config-pod.yaml, says to import all data in ‘app-config’ ConfigMap as environment variables.
Step-1 : Create the above two files, start minikube and run the below two commands in sequence.
kubectl apply -f app-config.yaml
kubectl apply -f test-config-pod.yaml
Step-2 : Login to container bash and print the environment variables:
kubectl exec -it test-config-one -- /bin/bash

printenv
The output should show the configmap related environment variables as below:
#For literal data : literal-key is set as key and literal-value is set as value
DEFAULT_THEME=dawn
PREMIUM_THEME=awesome

#For files : file name is the key and file content is set as value
test.properties=free.team.size=1
   premium.team.size=10
Observations from the above test:
- It imports each literal is as a separate env variable
- It imports each file as a separate env variable, with its content set as its value.
- The files content, does not create any environment variable of its own.
How to import a specific key ?
The above example reads all the keys from a configmap. It’s comparison of the syntax to read a specific key is as shown below:
envFrom:
  - configMapRef:
        name:[ConfigMap Name]
env:
  - name: MY_ENV_KEY
    valueFrom:
        configMapKeyRef:
              name: [ConfigMap Name]
              key: [Literal's Key]
2. Import into POD Volume as Linked Files
Let us use the same ConfigMap example file app-config.yaml from the previous section and now import it to a pod using volume as shown below.
apiVersion: v1
kind: Pod
metadata:
  name: test-config-vol-pod
spec:
  containers:
    - name: test-container
      image: k8s.gcr.io/echoserver:1.10
      volumeMounts:
      - name: config-volume
        mountPath: /config
  volumes:
    - name: config-volume
      configMap:
        name: app-config
Deploy the pod and as the pod is running go to the container mount path :
#Deploy the pod
kubectl apply -f pod.yaml

#Once the pod is running , move to the mount path
$ kubectl exec -it test-config-vol-pod -- /bin/bash
root@test-config-vol-pod: cd config
Analysis of the imported linked files
1. The literal-keys and the file-names(or file-name keys) shows up as linked files.
root@test-config-vol-pod:/config# ls
DEFAULT_THEME  PREMIUM_THEME  TEST_FILE_KEY  test.properties
2. For literal-keys, the file has the ‘literal-value’ as its content.
root@test-config-vol-pod:/config# cat DEFAULT_THEME
dawn
root@test-config-vol-pod:/config# cat PREMIUM_THEME
awesome
3. For linked files, the content is the original file content.
root@test-config-vol-pod:/config# cat TEST_FILE_KEY
free.team.size=1
premium.team.size=10

root@test-config-vol-pod:/config# cat test.properties
free.team.size=1
premium.team.size=10
How to import a specific file or a literal ?
If we want to import a specific file or literal, we can use items.key as below:
  volumes:
    - name: config-volume
      configMap:
        name: app-config
        items:
        - key: DEFAULT_THEME
          path: DEFAULT_THEME_PATH
With a mount path as /config , the linked file would be available at:
config/DEFAULT_THEME_PATH
Conclusion
ConfigMap provides an elegant solution to store and share application configurations in a distributed K8s cluster environment.
- We use this to manage non-confidential configuration data.
- These are never saved on any external storage and imported configmap get deleted as the Pod or the container is deleted.
- Secret is the other counter part which works in a similar way to address confidential data.
Visitor Design Pattern
Processing Logic : The visitor(processor) comes with a purpose. It knows how to visit(process) each element but, does not know how to traverse the whole object.
Traversal Logic : It invites(accept) the visitor and guides him to visit all the elements.
At the end of its visit, the visitor becomes ready with its report on the whole object.
Its a behavioral design pattern that help us keep our processing logic independent of the structure of the object. In other words, it allows us add features for an object externally without having to understand its internal structure. Hence, its very useful in developing features for the complex and highly configurable objects.
How does the pattern work?
Lets say a computer manufacturer wants to build a support system for its products. As part of this it wants to build several features such as:
- HealthScanProcessor : This will go through the key components and run its test cases to verify their health.
- SupportGuideGenerator : It wants to standardize and automate these guides as we use many common components across our models.
- ProductSpecificationReport: This report will provide the details on the components used in the model.
What’s the problem ?
When we look at these features, each one needs to traverse through a given model and process each of its individual element.
Firstly, these system can have a variety of configurations. Hence, the traversal logic is not going to be easy. Secondly, the configurations will go through lots of changes with the new models. Hence, the maintenance of the traversal logic across all our features will be quite an effort.
Thus, all our support features are going to go through lots of maintenance work!
How to solve this using a Visitor Pattern?
As shown in the diagram, both the features traverse through the ProductModel and process the individual elements in it.
But, even though the traversal logic is the same, we have to maintain it in both the places. Moreover, both need to know the structure of the product and the APIs for it.
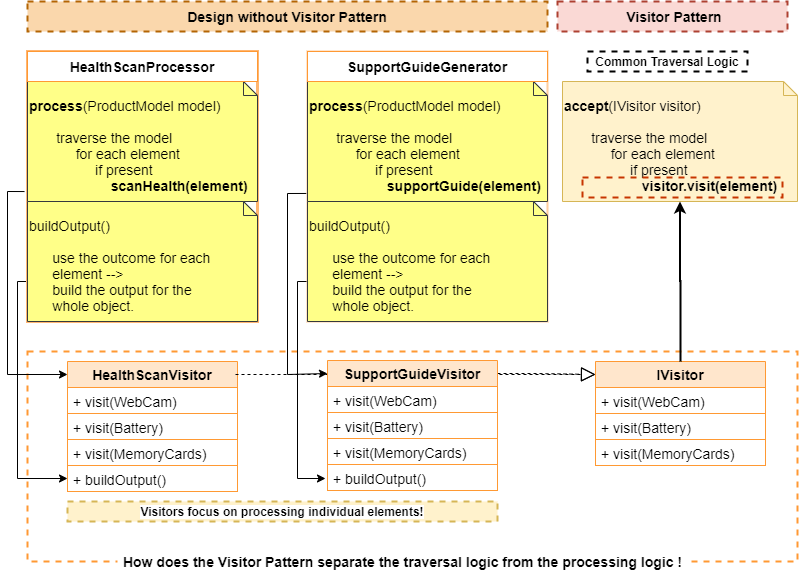
In order to simplify the problem, the Visitor Pattern says, why not have a common traversal logic for all our features !
When we separate out the complex traversal logic, adding a new feature boils down to handling the individual elements. The Visitor pattern allows us to insert the specific processing of individual elements into a common traversal logic as shown above.
As we can notice, when we accept the HealthScanVistor, it will visit a WebCam for checking its health. Whereas if we accept the SupportGuideVisitor, it will visit the WebCam for retrieving its support guide content from the document repository.
Now all the visitors use a common traversal logic. And, at the end of the traversal, the visitor visits all the elements and, thereby, processes the whole object.
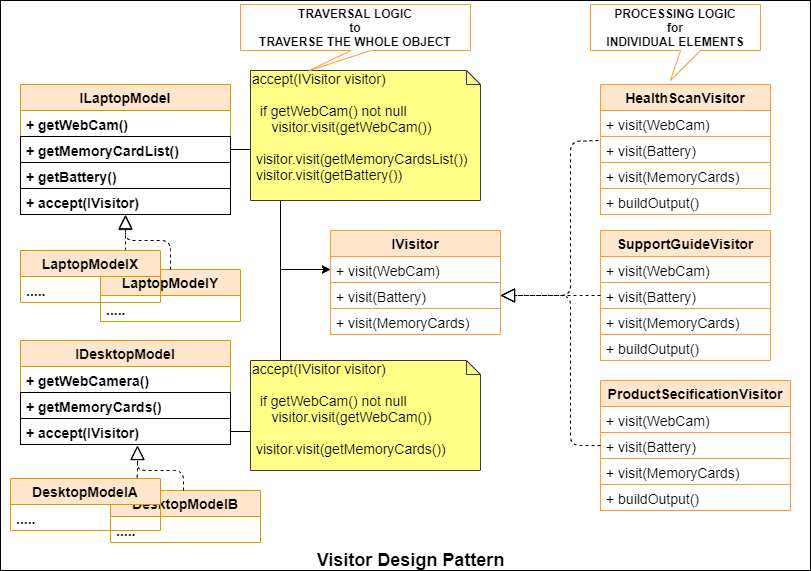
Here is the UML diagram of the Visitor pattern we discussed above.
Let us implement and check a demo
Having seen the design lets now look at its implementation.
Part 1: The Object & the Traversal Logic
The LaptopModelX is the key object here which holds the traversal logic. It can accept any visitor and make him visit its elements.
package spectutz.dp.behavior.visitor.pc;
import spectutz.dp.behavior.visitor.pc.visitors.IVisitor;

public class LaptopModelX implements ILaptopModel {
	private WebCam webCam;
	private Battery battery;
	private MemoryCards memoryCards;

	public LaptopModelX(WebCam webCam, Battery battery, MemoryCards memoryCards) {
		this.webCam = webCam;
		this.battery = battery;
		this.memoryCards = memoryCards;
	}
	public WebCam getWebCam() {
		return webCam;
	}
	public MemoryCards getMemoryCards() {
		return memoryCards;
	}
	public Battery getBattery() {
		return battery;
	}

	//Accepts the visitor and makes him visit all it's elements
	public void accept(IVisitor visitor) {
		visitor.visit(webCam);
		visitor.visit(battery);
		visitor.visit(memoryCards);
	}

}
//Note: Depending on our use case we can have a generic accept(IVisitor) method
//1. At an abstract base class
//2. A separate class for managing the traversal logic
package spectutz.dp.behavior.visitor.pc;

public interface ILaptopModel {

	public WebCam getWebCam();
	public MemoryCards getMemoryCards();
	public Battery getBattery();

}
package spectutz.dp.behavior.visitor.pc;

public class Battery{
}
package spectutz.dp.behavior.visitor.pc;

public class MemoryCards{
}
package spectutz.dp.behavior.visitor.pc;

public class WebCam{
}
Part 2: The Visitor
The HealthScanVisitor implements a feature to check the health status of the components of a computer. As we can see it does not have any information on the structure of the product it would be scanning.
package spectutz.dp.behavior.visitor.pc.visitors;

import java.util.ArrayList;
import java.util.List;

import spectutz.dp.behavior.visitor.pc.Battery;
import spectutz.dp.behavior.visitor.pc.MemoryCards;
import spectutz.dp.behavior.visitor.pc.WebCam;

public class HealthScanVisitor implements IVisitor{
	List<String> findings = new ArrayList<String>();

	public void visit(WebCam webCam) {
		System.out.println("Scanning webCam for health check...");
		findings.add("WebCam is OK.");
	}
	public void visit(Battery battery) {
		System.out.println("Scanning battery for health check...");
		findings.add("Battery is working with 40% performance.");
	}
	public void visit(MemoryCards memoryCards) {
		System.out.println("Scanning memory cards for health check...");
		findings.add("Memory cards : \n Slot 1: 8GB Status: Ok \n Slot 2: empty");
	}

	public void buildOutput() {
		System.out.println("Component Health Status :\n");

		findings.forEach(System.out::println);
	}
}

//Notes:
//As there are lots of components, we should be using a factory to implement the visit method
//We have avoided a factory, to keep the example simple and focus on the visitor
//The sole purpose here is to provide a visit method for each individual component
package spectutz.dp.behavior.visitor.pc.visitors;

import spectutz.dp.behavior.visitor.pc.Battery;
import spectutz.dp.behavior.visitor.pc.MemoryCards;
import spectutz.dp.behavior.visitor.pc.WebCam;

public interface IVisitor {
	public void visit(WebCam webCam);
	public void visit(Battery battery);
	public void visit(MemoryCards memoryCards);
}
The visitor contains the processing logic for each individual elements. In a similar fashion we can add any new feature.
The Demo Time
The demo uses a product model LaptopModelX which accepts a visitor for generating a health check report.
Along with the demo code we have its output at its end.
It just shows, how the visitor processes the object when it completes its visit, without having to know the structure of the object.
package spectutz.dp.behavior.visitor;

import spectutz.dp.behavior.visitor.pc.Battery;
import spectutz.dp.behavior.visitor.pc.LaptopModelX;
import spectutz.dp.behavior.visitor.pc.MemoryCards;
import spectutz.dp.behavior.visitor.pc.WebCam;
import spectutz.dp.behavior.visitor.pc.visitors.HealthScanVisitor;

public class PCVisitorDemo{
	public static void main(String[] args) {
		LaptopModelX modelX = new LaptopModelX(new WebCam(),
											   new Battery(),
											   new MemoryCards());

		//Invite the visitor and make him visit your components
		HealthScanVisitor scanHealthVistor = new HealthScanVisitor();
		modelX.accept(scanHealthVistor);

		System.out.println("\n***Visit completed. Lets print the report.***\n");
		scanHealthVistor.buildOutput();
	}
}

/*
Scanning webCam for health check...
Scanning battery for health check...
Scanning memory cards for health check...

***Visit completed. Lets print the report.***

Component Health Status :

WebCam is OK.
Battery is working with 40% performance.
Memory cards :
 Slot 1: 8GB Status: Ok
 Slot 2: empty
*/
Summary of the benefits
If we have to add features to objects with complex and widely varying structures, the Visitor pattern proves very useful.
A common use case being when we are building features against the complex code structures. The syntax highlighters, code review tools, compilers for instance, heavily use visitors to simplify their design.
In short, it keeps the processing logic clean and simple by separating it from the traversal logic of complex structures.
Observer Design Pattern
Hey Mr. Subject,
we the observers want to add bells & whistles around what you do,
please share your events with us!
Even though being simple, it is a powerful behavioral design pattern to build highly customizable and re-usable components.
In order to understand the power of this pattern, the simplest example is to think of a button. Even if it notifies a few basic events such onClick, hover etc; we can customize it for doing so many different things.
From a processing module point of view, the common example are the listeners. Because of these listeners, we can keep our core processing module simple, re-usable and highly customizable. The listeners here are nothing but the observers who add the bells and whistles around the core process.
How does the pattern work?
It basically tells you to share what is happening at your end as events, so that the Observers can add features around it externally.
The pattern basically consists of a subject and a set of observers monitoring the events happening at the subject.
The events could be representing some processing status, error conditions or a change of state etc. around which we want to customize our action. The set of observers allow us to build these the actions, whereas the subject take care of notifying these events.
The diagram below shows the UML of a sample observer implementation.
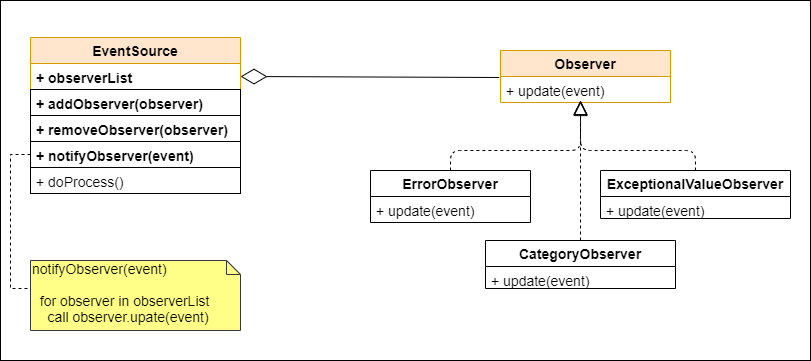
Part 1: Subject
The EventSource is the subject here.
It includes features to add or remove observers and, also, a method to notify the events to the list of observers.
package spectutz.dp.behavior.observer;

import java.util.ArrayList;
import java.util.List;
import java.util.Random;

public class EventSource {

	//Methods to add and notify observers.......
    private final List<Observer> observers = new ArrayList<>();

    public void notifyObservers(String event) {
    	System.out.println("\nnotifyObservers() : "+event);//Update all observers
        observers.forEach(observer -> observer.update(event));
    }

    public void addObserver(Observer observer) {
        observers.add(observer);
    }

    //Source of events
	public void doProcess() {
		Random randomGenerator = new Random();
		//Some event while processing....
		String eventX ="EventX: Value = "+100+randomGenerator.nextInt(10);
		notifyObservers(eventX);

		String eventY ="EventY: Value = "+100+randomGenerator.nextInt(10);
		notifyObservers(eventY);
	}


}
Part 2: Observers
The observers could be implementing an interface that accept the event, so that the subject can use it for sending the events. Here we are using an Observer interface with an update method to accept the event.
package spectutz.dp.behavior.observer;

public class ObserverOne implements Observer {

	public void update(String event) {
		System.out.println("ObserverOne processing event :"+event);
	}

}
package spectutz.dp.behavior.observer;

public class ObserverTwo implements Observer {

	public void update(String event) {
		System.out.println("ObserverTwo processing event :"+event);
	}

}
package spectutz.dp.behavior.observer;

public interface Observer {
	void update(String event);
}
Testing the Pattern
The below demo code adds two observers to the EvenSource object, the subject.
When we call the doProcess() method, the output shows how it updates the events to its observers.
package spectutz.dp.behavior.observer;

public class ObserverPatternDemo {
    public static void main(String[] args) {
        EventSource eventSource = new EventSource();

        //Adding two observers
        eventSource.addObserver(new ObserverOne());
        eventSource.addObserver(new ObserverTwo());

        //Do some processing that generate events
        eventSource.doProcess();
    }
}

/* Console Output :

notifyObservers() : EventX: Value = 1001
ObserverOne processing event :EventX: Value = 1001
ObserverTwo processing event :EventX: Value = 1001

notifyObservers() : EventY: Value = 1005
ObserverOne processing event :EventY: Value = 1005
ObserverTwo processing event :EventY: Value = 1005

*/
Summary
To summarize, the observer pattern help us build highly customizable and re-usable components using event-driven approach.
The Subject can decided the points of customization by generating and sending the events to its observers. Whereas the Observers can use these events to add custom actions around it.
The events can represent a change of state in the subject or points of extension in a process inside the subject.
